
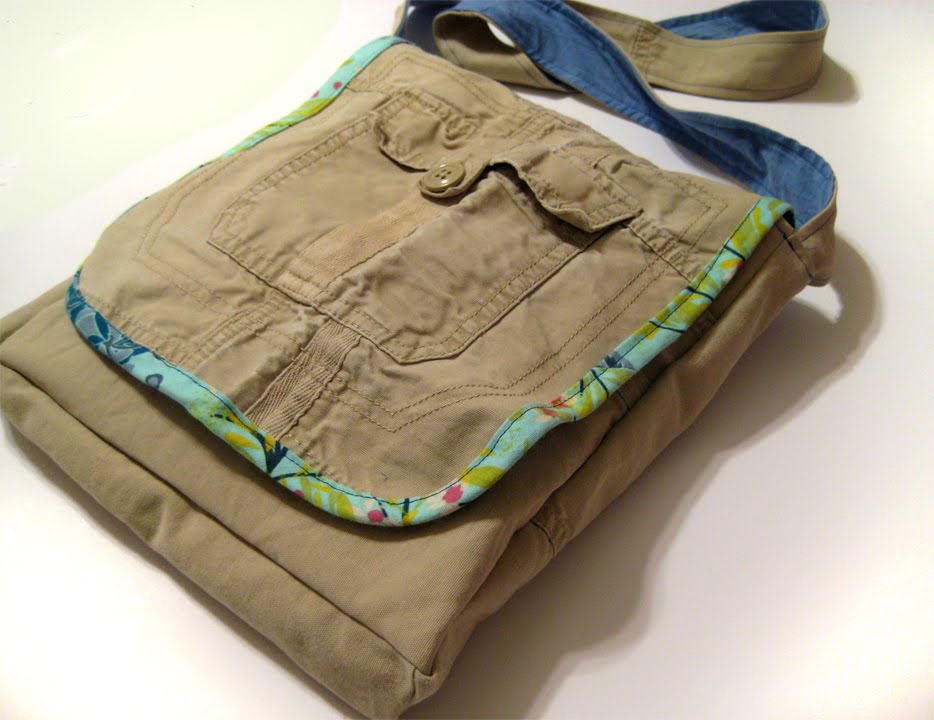
Want to make one of these?
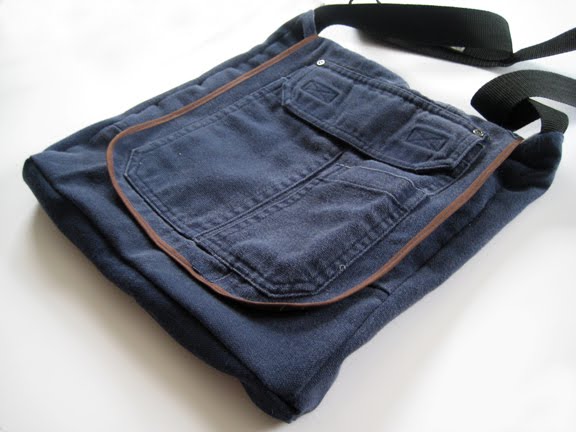
From a pair of these?
Here’s the tutorial!
Materials:
1 pair cargo pants (from the going to Goodwill pile of course)
1/2 yard lining material
bias tape (store bought or make your own)
thread
{1/4″ seam allowances throughout}
Getting started…
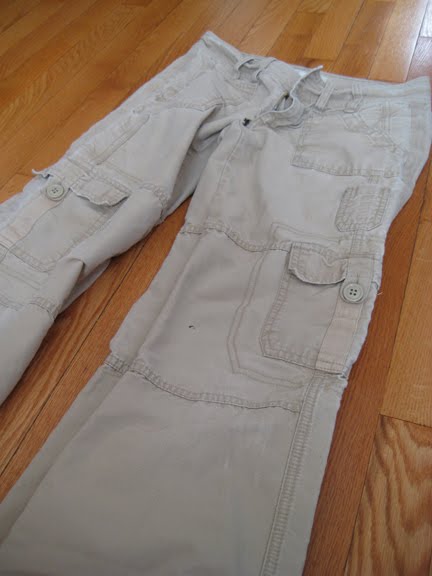
Take your pair of cargo pants and cut the inseam of each leg of the pants up to the crotch area. Cut straight across the leg of the pants in either direction. This should give you enough fabric to work with, you’ll have two large pieces to cut your exterior bag pieces from.
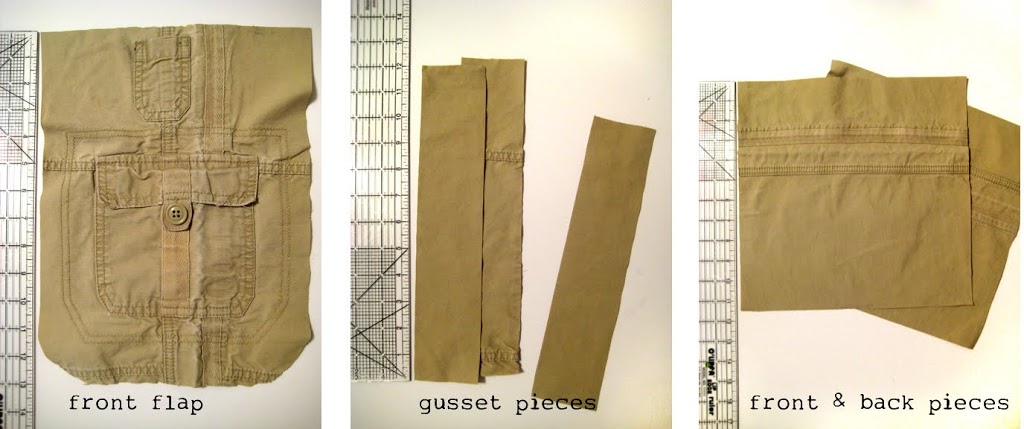
Cut the bag exterior pieces:
-
front flap (this is where the cargo pocket comes in handy – cool pockets you don’t have to sew!) 10″ wide x 13″ tall, round the corners by tracing the edge of a small bowl (or roll of tape in my case)
-
front and back of bag 10.5″wide by 11.5″ tall
-
side gusset (cut 2) 12″ x 2.5″
-
bottom gusset 11″ x 2.5″
-
strap 44-52″ long by 2.5″ wide (leaving this measurement up to you on the length, whatever you feel comfortable with) I ended up piecing my strap together because I didn’t end up with a piece long enough.
Cut the same size pieces from the lining material. I used a fat quarter to make the bias tape and part of the lining (gusset) on my tan cargo pant bag.
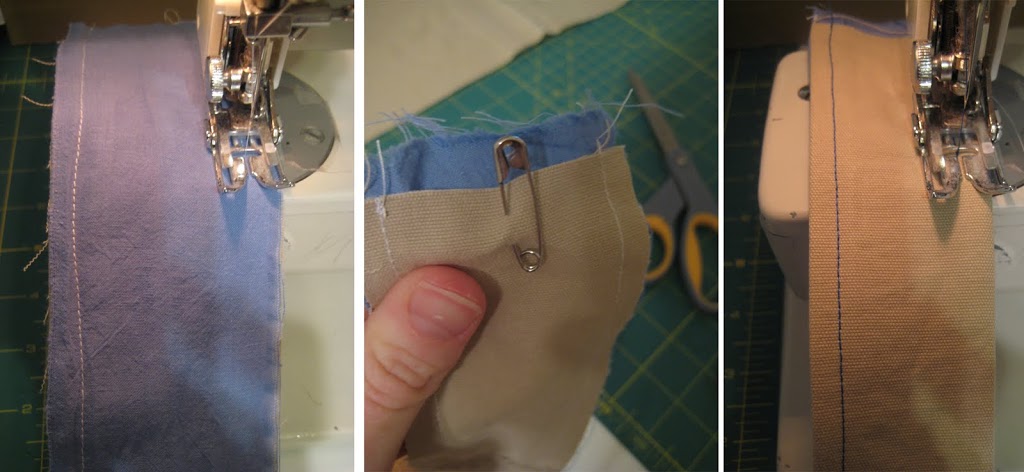
Make the strap by placing the long pieces right sides together, sew down each side. Turn tube of fabric right side out with a safety pin. Press. Topstitch down both sides about an 1/8″ from each side. Set strap aside.
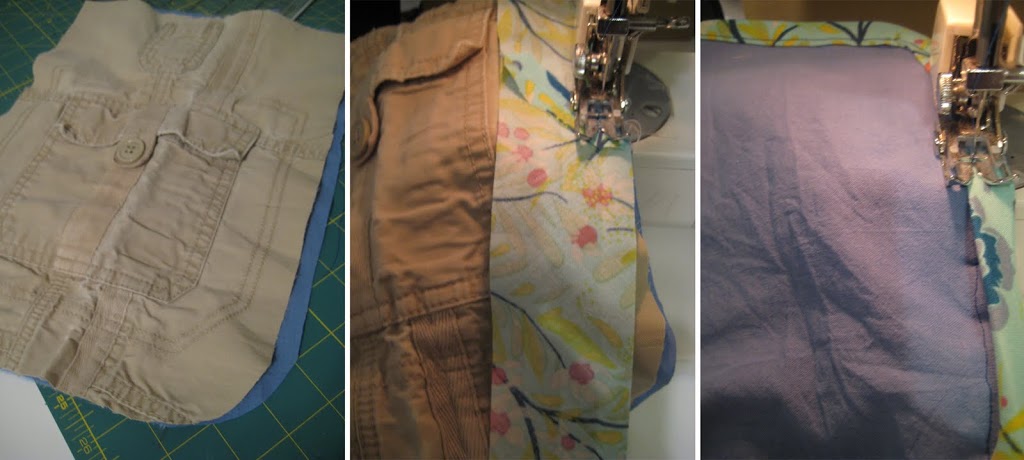
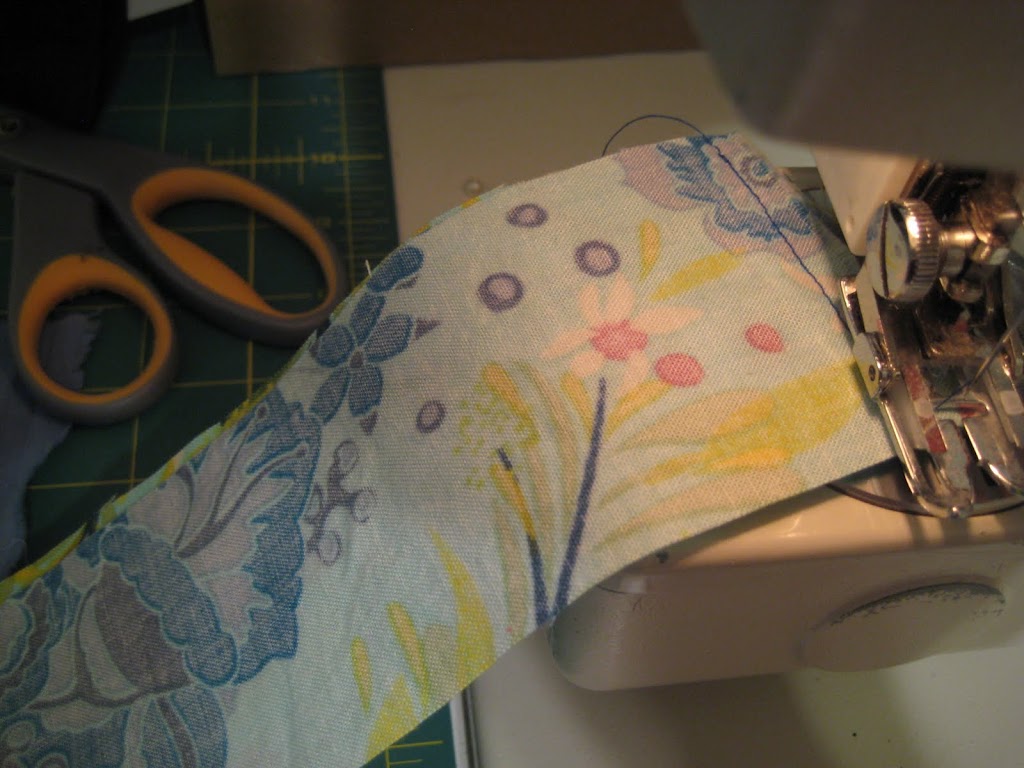
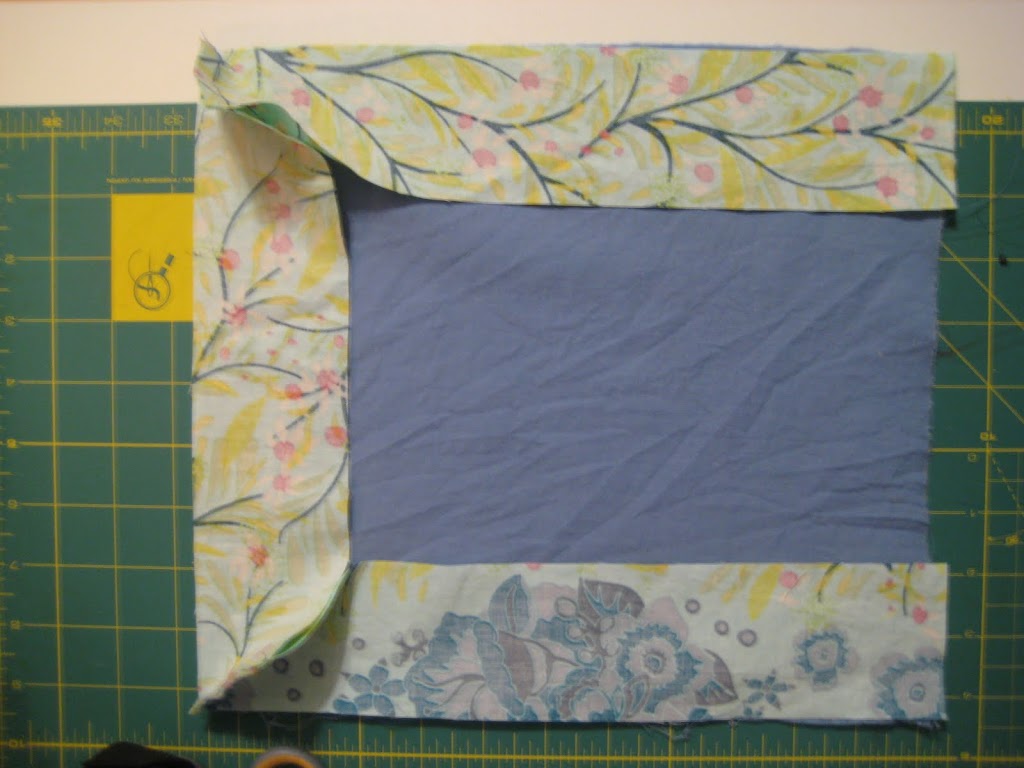
Now make the front flap. Put the exterior flap piece and lining flap piece WRONG sides together. Take the bias tape and attach it along the sides and bottom of the flap. Set aside.
Assembling the lining: Take gusset pieces (2 sides and a bottom) and sew the short ends together. Sew one side piece to the bottom piece and then the remaining side piece to the other side of the bottom piece. Sorry, I guess a picture is worth 1,000 words here.

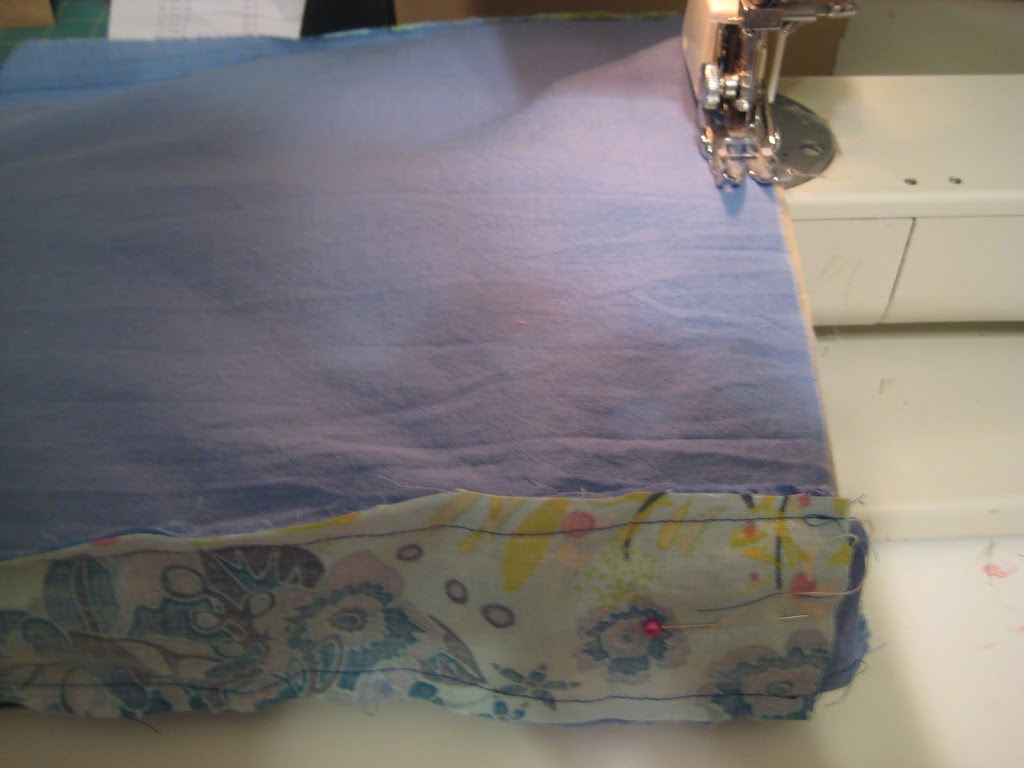
Lay your connected gusset pieces right sides together on top of the front of the bag piece, pin, sew. The tricky part is the corners. Stitch down the right side until you get about 1/4″ from the bottom of the bag, lift your presser foot and tuck the gusset fabric to the left side, then turn the fabric 90 degrees and continue stitching the bottom part of the bag.
Lay the back of the bag down and set the front/gusset piece on top, pin in place. Stitch the gusset to the back of the bag just like you did to the front.
Make the exterior just like you did the lining of the bag.
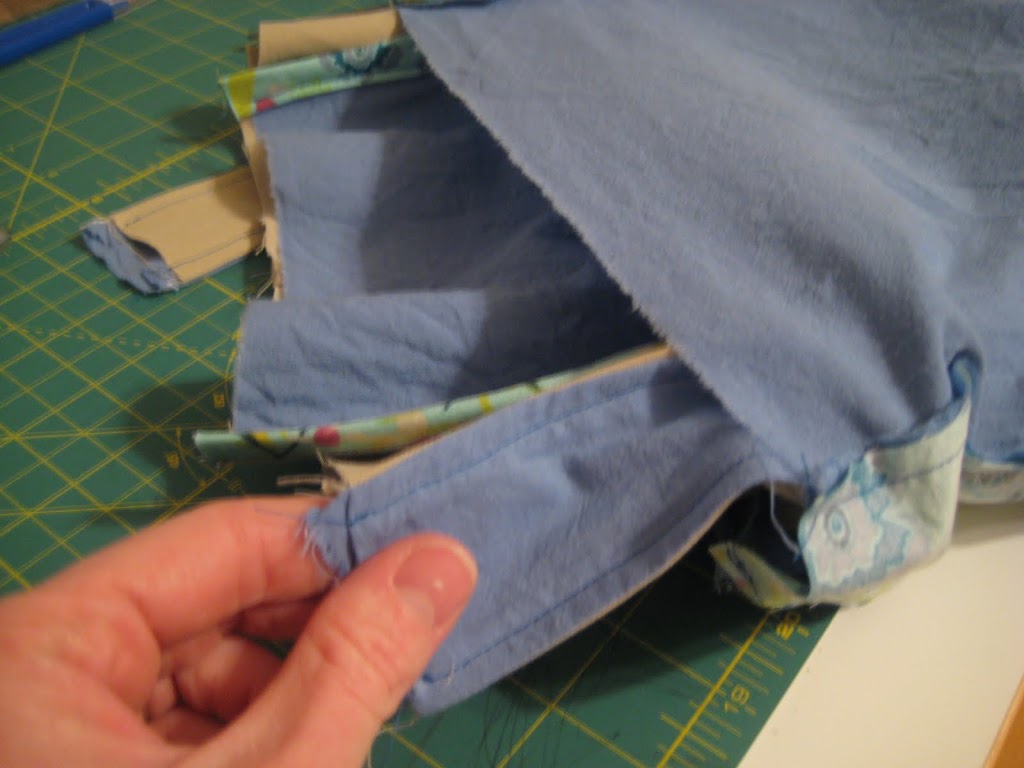
Assembling the bag: Turn the exterior of the bag right side out. Place the exterior of the bag into the lining so that they are facing RIGHT sides together. Place the strap with RIGHT sides facing the exterior {making sure not to get the strap twisted} onto each side of the gusset. And finally, place the front flap RIGHT sides together with the exterior of the bag. Pin all in place.
Stitch all around the opening leaving a 5-6″ opening for turning. Pull bag through the opening. Push lining into bag exterior, press around the top edge making sure to tuck in the raw edged from the opening.
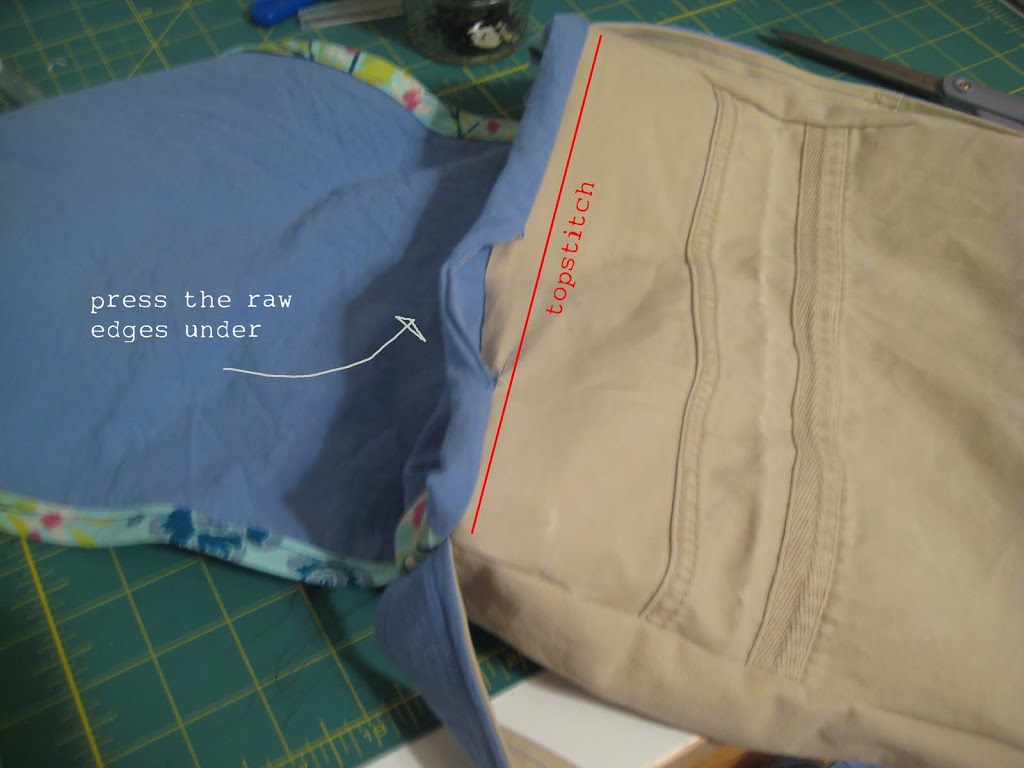
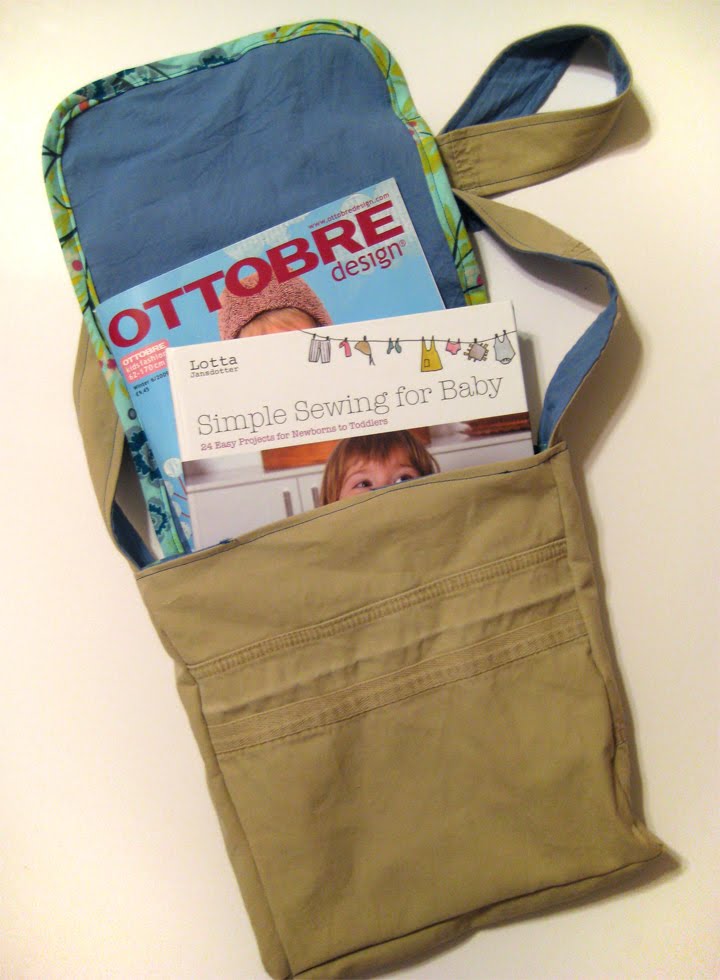
Topstitch around the entire opening of the bag. You’re done! Now stick some books and your wallet in the bag and you’re ready to go!
Thank you so much. This is absolutely phantastic and I must try it next time I find some old jeans. And I am sure my grown-up children, preferably the boys will like such a bag. A super idea! Greetings from Germany and thanks for sharing!
Thanks for the great tutorial…I have put a link to you on my freebies blog if that’s okay…Khris
Great idea for reusing old cargo pants. Now, where did I leave mine???
Oh my. That’s so smart! I’ll have to make one real soon! Thank you!
Thanks for the tutorial. I can’t wait to make one, now where did my husband leave his cargo’s!!
I love this…I’m going to ask my hubby today if he has any old cargo pants he needs to get rid of 🙂
Love it!! I can’t wait to try it. Thanks for posting the tut
Oh, and do you mind if i feature this tomorrow on my blog? Thanks!!!
lynette
getyourcrafton.blogspot.com
this is such a great idea!!!. so cute and such a great way to re use something. hmmm…now i am going to have to hunt down a pair around here so i can make one.
Fantastic! Thank you for the great idea! I may even make my son one out of his camo pants – he always needs something to carry his toy weapons and ammo..
This is all kind of fabulous, in a why-didn’t-I-ever-think-of-that sort of way! Great idea, can’t wait to rip into some pants and get this going.
I knew I was saving those old cargo pants for something! The pockets are just too cool to trash.
This is so cool! I have a bag of my hubby’s old cargos that I just couldn’t throw away. Now I know why!
Thanks so much for the tute!
This is great! You have some fantastic ideas, thank you for sharing.
I LOVE this idea! I’m so going to make some!
Very cute bag. Can’t wait to try it.
This is so awesome! You do such a nice job Anna!
super cute!
That is awesome !
Brilliant! And to think, I just put aside a pair of cargos that can’t be worn anymore knowing that I might find something cool to make from them. Now I know what that something is! Thank you!
This is amazing! I might be digging in my husband’s closet for a pair… shhh.
That’s fantastic. I love not letting anything go to waste. I just asked my b/f if he’s willing to give any up.
I love the idea. I went ahead and gave it a shot today but I made it out of my hubbys ACU cargo pants…heres the link
http://creativemommyatwork.blogspot.com/2010/01/different-style-of-acu-purse.html
just thought I would share
Darling! I love it. I think I may have to hit the Goodwill to find a pair of cargo pants just for this project. Thanks for sharing!!
Great Idea! I made myself a purse from my boyfriend’s cargo pants a year ago, too! But your messenger bag is cuter!
Very cool – I’ll have to give this one a try.
I have a tut for a purse from corduroys on my blog! 🙂
This bag looks great. Thanks for the tutorial!
Awesome! I need to find a pair of cargo pants now!
I just finished my bag! I love this! Thanks so much for sharing the idea. I’ll try to get it posted to my blog, so you can see, tomorrow. Thanks again! Awesome!
Thanks for sharing this awesome tut! I’ve linked your post in my blog.
Eleonora
This is such a cute bag! I’m trying to come up with something to use up all of my husband’s work khakis. Unfortunately, they don’t have cool pockets on the outside like yours do.
I love this tutorial, I featured this with a bag that I made using your idea. Thanks for sharing.
Hi there!
I write a weekly craft blog for Craft Candy, a craft consortium based in Sheffield, UK. I am pleased to inform you your messenger bag tutorial was featured in our round-up of beautiful things (‘Museround’) on a ‘Satchels’ theme. You have been fully credited for your work and we have provided links to your blog. You can see the post, and your featurette, here http://www.craft-candy.org/blog/?p=710, and see the weekly updates here at the Craft Candy Blog http://www.craft-candy.org/blog/.
Thank you very much for your inspiring creativity!
Kay (lilidrawspictures)
http://www.lilidrawspictures.com/
http://www.facebook.com/lilidrawspictures
So flippin cool. I can’t wait to make one! 😀
I love these. You are so GOOD!! I have now made 4 of them and I am dying to find some more cargo pants so I can make more. I am addicted!!! Thanks so much for sharing. The tutorial it awesome.
Very cool! Anxious to give this a try.
Hi there. I found your blog through MADE’s Celebrate the Boy month, and saw this tutorial and fell in love! I made my daughter one tonight, and have plans to make my son one soon, too. Thanks for the fabulous tutorial.
If you’re interested, I blogged it here:
http://vivamorris.blogspot.com/2010/02/my-favorite-thing-i-ever-made.html
Great Tutorial!
I love making bags out of old clothes! Typically I use shirts, and I just started selling them on etsy! It’s so fun!
just got some cargos today-will let you know how they turn out!
I might re-think my idea of giving away some of my children’s pants now that I saw you over on Today’s Creative Blog! :oD Great concept on re-using, re-purposing, re-cycling. Am thrilled to see that you offer a tutorial. Thank you for writing the instructions…I know how taxing that sometimes can be.
Keep up the creative work and fun blog! ~j.
Love this! It’s now on my must sew list! 🙂
Love it! I just tried it myself, without the lining though. Thanks for the great idea! I posted about it on my blog: crafty-mamacita.blogspot.com
And linked back to you too. Just so you know. 🙂
Thanks again!
makinf this right NOW. but i have a question…how do you make your own bais tape?
thanks-thethriftyba@yahoo.com
thanks for your help! here is mine…http://thethriftyba.blogspot.com/2010/02/good-news-bad-news.html
Wow! This is awesome! I’ve been wanting to make messenger bags for my kids for our summer road trip (West Virginia, Penn, and Wisconsin!) and fill with games, puzzles, small toys etc. This is the perfect size bag. thanks!
Emily
Thanks for this! I am totally going to make one this weekend. I posted it on my blog today. http://perfectlyupcycled.blogspot.com/
Thanks for the tute. I made a smaller bag posted here on my blog:
http://tamarathomas.blogspot.com/2010/03/toddler-messenger-bag.html
Love it, looks great, I see quite a few others have made this 2. Gunna make one soon.
Hannah
Handmade Jewellery
http://surfjewels.000space.com
I have made it now. Love it, looks totally cool, better than I thought it would.
There were a few tricky bits with the pattern and I was a bit worried when it was all inside out in layers and I had to sew it all together. Thought I might turn it out back through the hole and find that the flap was on wrong or the strap was inside out, but it wasn’t, it was all fine. Even making my own bias binding worked!! Thought that could have gone wrong too, but didn’t.
So pleased with it, thanks for the pattern. I have wanted to make my own bag for some while, but thought it might b too fiddly and difficult. But this was fine.
I’ll add a pic to my blog soon. Just gotta do a couple of finishing touches to it first- mayb a button?!
Thanks again.
Hannah.
Handmade Jewellery
http://surfjewels.000space.com
Check out the pic of the bag I made from this pattern, very happy with it, thanks once again.
http://surfjewels.blogspot.com
Hannah.
Handmade Jewellery
http://surfjewels.000space.com
Thank you so much for this tutorial!
I just made my first bag and have a few more planned 🙂
http://growingfree.wordpress.com/2010/04/08/cool-messenger-bag-from-cargo-pants/
I love messagenger bags and this absoloutelty adorable, now if I only knew how to sew! Stopping over from Craft Project Ideas. http://www.miamamiah.com Have a wonderful week and I am so glad I found your Blog!
thanks for sharing! I think I have some pants somewhere that I don’t wear anymore and would be perfect for this. 🙂 Clever! 🙂
Adin B
http://itssewtasticmama.blogspot.com/
Love the Tutorial! I bought some cute Cargos from Old Navy like 4 years ago and I never fit into them. They have the cutest cargo pockets on them. I have now found a good use for them!
I just made one of these bags for my laptop! Thanks for the wonderful tutorial! I modified the pattern to fit my laptop and I use the front pocket to hold the power cord…very clever idea!
Oh, perfect! Now I can make a tote to match the water bottle carrier I made with the OTHER leg!! :p
This idea is genius! I can’t wait to try it. My hubby better lock up his cargo shorts. 🙂
(Love your header, by the way! I love kids’ people drawings.)
wow it’s really nice ,,, good work
I am so anxious to try this with a pair of camo pants I got @ the thrift store for 25 cents. Military prints are supposed to be very in this winter 🙂
Love this template! In fact I have some old cargo pants in the goodwill pile and now I think I may have to dig them out 🙂 I have been looking for new craft ideas to showcase on CraftSpy.com, I would love if you checked it out and posted this template there. It’s a free show case for craft bloggers to post their templates. I’m just getting started so I would LOVE any feedback!
perfect project for that pair of cargos that’s just a wee bit too small (but I just can’t get rid of!!) Fantastic project & tutorial… Thanks!
Thanks for the great tutorial. I based a bag for my boys on it–they’re always asking me to make bags for them! I wrote about here and linked back to your tutorial (hope that’s ok)…
http://www.toniweinstein.com
Hi, I´ve used your tutorial and it worked very well. Thanks so much for sharing many wonderful tutes
I finally made my own HUGE cargo bag. Thanks for your inspiration! I’ve posted my photos on my blog and linked to this post. 🙂
I made two of these yesterday for my boys to take to school. I loved them, and so do they! I made the strap shorter to fit my 4 and 5 year olds, and I used a $2 men’s shirt with cool pockets instead of pants. For the lining I used a pair of scrub pants I bought at a garage sale. For both bags, the fabric cost me $3. Woohoo 🙂 Thanks so much for sharing this tutorial!
Loved this… I made an army version and a flowery versin and blogged this here..
http://create-eat.blogspot.com/2011/04/blog-post.html
What a great project! I love using the pants pockets. I included this in my link love today. Thanks for sharing!
I made this today, and it’s so cute! I had a button-down shirt that none of my boys were ever going to wear, and I used it for the lining. It was an “outdoorsman” shirt with several pockets that wound up inside the bag, and even a back velcroed vent flap, which turned into an inside pocket for the bag. I’ll try to send pictures soon. Thanks for the idea!
Just made two of these amazing creations for my boys. Love! Thanks for the tutorial!
I am a big fan of patterns that use repurposed materials, especially clothes! 🙂 I have added this link to my list of messenger bag patterns on my blog. Thanks for the great tutorial!
Finally got my bags posted. Check them out here: http://www.delightingintoday.com/?p=499
Thanks again!
For those curious about the Bias Tape, the pics look like the fabric is beautiful Contrasting-color binding, but cut on the straight grain of the fabric vs. on the bias. I think making true bias strips from a fat quarter could be a Crazy-making. Beautiful purse! The contrast fabric strips add so much.
Thanks so much for posting this! I’m new to sewing and wanted a army-type messenger bag to go with my Halloween costume. I followed your tutorial and it was so easy!
LOVE this tutorial. I made this bag for my daughter for Christmas. Not only does she adore it, but everyone is impressed that I made it (I don’t sew much). We plan to make these for all the girl cousins next year. And, my daughter had one suggestion – add an inside pocket which should be no problem at all.
so cool! i’d love to give this a try! 🙂 lisa
Just made this for my son from an old pair of Husband’s khakis with a blown out crotch and some boy scout material. Husband is a big guy, so the waistband was perfect for the strap. Great tute! Thank you!
I just happen to have 2 pair of cargo pants that I’ve been saving in my work room that my husband just wants me to donate already! Now, I have something to do with them that I will definitely use!
Thanks so much for this tutorial. I get so much joy from making useful things from thift shop clothing. I just completed an iPad messenger bag from your tute and it looks fabulous! For the lining and binding, I used a thrift store man’s striped shirt (size large) which yields more fabric than this bag requires. I used the left front pocketed side of the shirt for the front lining, so there would be a pocket inside. Also, I put the cargo pants’ pockets on both the front and back of the bag. The cargo pants were size 30W x 30L small, so I also had to piece the strap and did not have enough length to use the front pockets for the bag’s gussets. I’m really glad that I bought the cargo slacks, rather than the cargo shorts, at the thrift store for this project.
I’ll post a photo to Flickr by tomorrow.
Thanks again.
I completed my second bag yesterday and photos are now posted on Flickr. Making these bags is addictive. Thanks for sharing your tutorial.
this bag was a very neat idea. I used the pocket at the seat of the pants for the back of the bag to add an extra pocket.
We”ve been waiting for an opportunity to make one of these messenger bag from cargo pants and know we made one as a birthday gift for our four years old boy.
You can see the result here.
Thanks for sharing.
http://www.amamima.com
Awesome tutorial! I made a bag out of an old pair of blue jeans that had a broken zipper. My mom and sister were asking for their own before I even finished!
Thank you so much!
This is such a cute bag! I made one and really LOVE how it turned out!! The directions were easy to understand and my mom and I both love the turn out of the project! Thanks for the tutorial!
For a beginner to sewing, your instructions were awful and not easy to follow. You need better pictures, too!
wow, okay. I always welcome emails with questions.
that’s so cool and something i would actually use!
I loved this tutorial – as a beginner, I was petrified to try making a bag with a lining. The idea of using an old pair of pants and an old sheet for the lining and binding took a little of the edge off, but after prepping all the pieces I was emotionally invested!
I am so pleased with the results, even with the mistakes I made (didn’t put the strap ends far enough down between the pieces so I re-inforced with an added piece of pant material on the inside). I made a zippered pocket in the lining and added a loop of material along the lining seem on which to hook my keys.
Thank you so much for posting this, I will be using this pattern again!
This is really cute! Think I’ll make one to take to the county fair during the summer or if I’m checking out/returning library books. 🙂
Very nice bag and great way to reuse some old cargo pants. Love the blog.
Thanks for sharing.
Heidi
Exede
Hi, I must be the only one that is confused about the final stitching. The exterior goes into the interior lining with the wrong side of the lining facing out. The flap is sandwiched between the exterior and the lining. Hard to tell that it is sandwiched between from the description. OK, got that part. Now, the how are the straps pinned. Are they pinned to the outside of the whole sandwich? HELP
The strap will be sandwiched in between the lining and exterior bag assemblies.
Very neat! Gotta add it to my project list!
Love the idea, I make them with just a few changes I learned from Embroidery Library – use the waist band for the strap – use the belt loops on the inside for pen holders. Nancy
Quick n Easy! I put one together with an old pair of my husband’s cargo shorts and made it a bit larger because the pocket was so big … also, being short on fabric, I made my strap narrower and infused some of the gusset fabrics into it … I also made my exterior gussets match my pop of color on the front panel.
Cool!
I did it!! I’ve never been able to make anything lined before, but I did it!! Thanks a million!
I followed your instructions to the letter and used a pair of cargo pants from the thrift store (I got 2 bags out of the one pair…they were size 40!). I put the back pocket from the pants on the back of the bag for an extra spot to store stuff. Thanks so much for the tute!
I am fairly new to sewing and have a question for those of you who have done this before. I want to make my own bias for the outside edge of the flap. In her tutorial it looks like she’s sewing on a 2″ wide piece of fabric, not true bias. What have you chosen to do and how did you do it? Thanks a lot!
Designer and founder Ella Vickers’ voyage to the Messenger bags creation of EVSC began aboard the sailing yacht Columbia, the first 12-meter vessel to win the America’s Cup.
Thank you so much for this tutorial. I am new to sewing and I was a bit doubtful if I can do this! I tried and I am glad I did :-), I love my bag.
I would love to share a pic of this with you. Can I email that to you?
Cheers,
Madhavi.
Just finished my purse from pants my daughter outgrew. Thanks so much for teaching me this. It came so cute. I’ll treasure it!
What a surprise to find this! A few days ago, I found a paid of cargo pants in the trash that my grown grandson had thrown away because the zipper was broken. I took them out of the trash and put them in my sewing room, thinking ‘surely I can do something with these.’ Now I know I can. Can’t wait to make the cargo bag. Thanks!
I knew this blog post was existed someplace. Thanks to post such articles. Will unquestionably be using it very soon.
imp source
This text may be value everyone’s attention. How will I learn more?
best credit repair services
I loved making this bag for my friend and she LOVES IT! Check out how it turned out when you get a chance (http://themaverickseamster.blogspot.com/2014/06/stepping-up-my-tote-bag-game.html). Thanks for the great tutorial!
Just saying thanks wouldn’t just be enough, for the fantastic fluency in your writing. Panasonic Arc 3 ES-LT71-S Review
This info you provided in the blog that was really unique I love it!!! Salwar kameez sale
You’ve really inspired me – Check out my new one!
http://themaverickseamster.blogspot.com/2014/07/the-jennie-bag.html
This is so cool. My daughter just gave me four pairs of cargo pants she has worn out. She thought I would find something to do with them. Now I know what they are being used for. Thanks so much.
You have already seen this bag, Anna, but I wanted to post the picture links here so that others can see how fabulous this tutorial is. This is my first time making this bag, and it was very simple. Your instructions and pictures were spot on, and very easy to follow. Thank you so much for going through the trouble of sharing with the world your free and beautiful messenger bag pattern. Here are a few picture links from Flickr:
https://www.flickr.com/photos/buttoncounter/15349336279/
https://www.flickr.com/photos/buttoncounter/14915791403/in/photostream/
https://www.flickr.com/photos/buttoncounter/15349802618/in/photostream/
I found a paid of cargo pants in the trash that my grown grandson had thrown away because the zipper was broken. I took them out of the trash and put them in my sewing room, thinking ‘surely I can do something with these.’ Now I know I can. Can’t wait to make the cargo bag. Thanks!
http://kreasitangan.com/
I learned from Embroidery Library – use the waist band for the strap – use the belt loops on the inside for pen holders.
http://gambarkata.co/
The exterior goes into the interior lining with the wrong side of the lining facing out. The flap is sandwiched between the exterior and the lining. Hard to tell that it is sandwiched between from the description. OK, got that part. Now, the how are the straps pinned.
http://desainarena.com/
Your article is so helpful, glad I was able to read the contents of your blog
enough to add my insight
I made this two years ago and have loved it to death. Time to make a new one!!!
Love this idea! I’m going to make one for my grandson to hold his tablet. Also, love your book “Handmade Style”. I’ve found so many great things in there!
Thanks for this tutorial! Made it today and am thrilled with my results!
Shared it on my blog….
What a great bag! I made something very similar last year for my husband!
Greetings,
Jenny
I have a stupid question. Am I cutting all material from the legs of the pants? Im not using anything above the crotch area?
Yep, that’s right! 🙂 I did use adult size pants, not sure if you could get enough useable fabric from kids pants.
such a cute idea, i love it, really want to try!
hi, I din’t seem to get it right here…do I put the strap BETWEEN the exterior of the bag and the lining when I assemble the bag??
Yes! that’s correct. 🙂