
Just want to say thank you to Vanessa from V & Co. and all her wonderful readers! Thanks for letting me be your guest today.
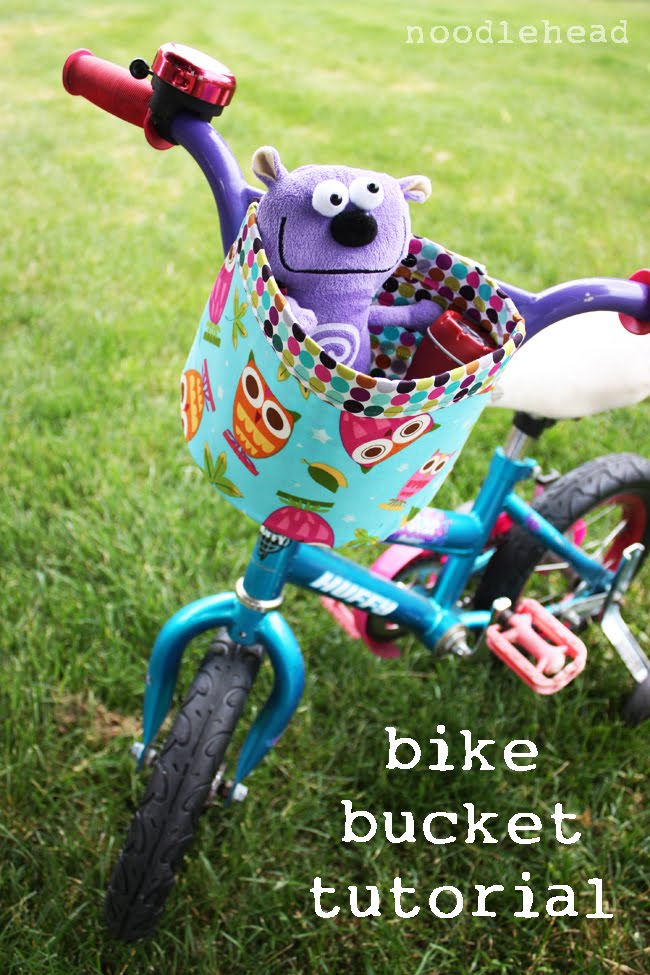
Ready for a fun summertime project?
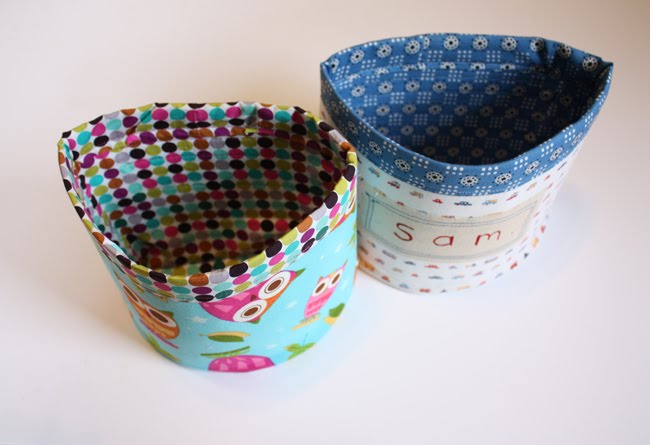
My husband and I were doing some tune ups on my daughter’s bike earlier this spring – you know, new tires, paint the handlebars, fix the seat, fun stuff. So, when we were out tire shopping I saw the cute bike baskets at the store. I was like “oh, we have to get her a basket, it would be so fun” and he’s like “you should just make one”. So here we go!
Materials:
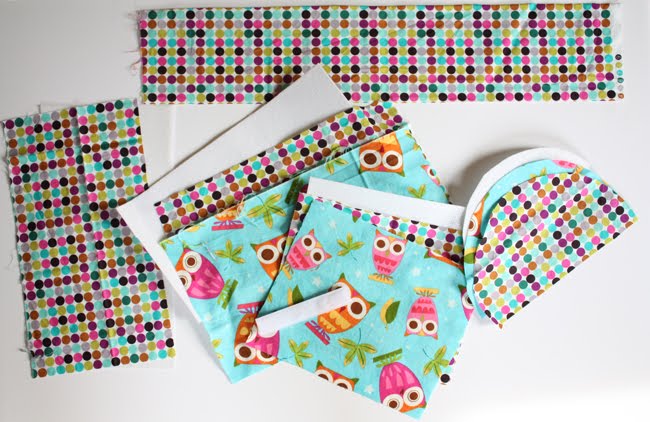
- 2 fat quarters (18″x22″) of coordinating prints
- 21.5″ wide by 4.5″ tall piece for binding top of bucket
- stiff double side fusible interfacing (I used Peltex 72F which I found at Walmart)
- 5 inch piece of 3/4″ wide velcro
- scrap of medium weight fusible interfacing
- thread, pins, etc.
- Pattern piece (updated May 2013)
Cut your materials:
From exterior fabric cut
- one piece 8.5″ wide by 7″ tall
- one piece 12″ wide by 7″ tall
- one piece from the pattern (it’s the bottom of the bucket – use the solid line). Cut the same size pieces from the lining fabric.
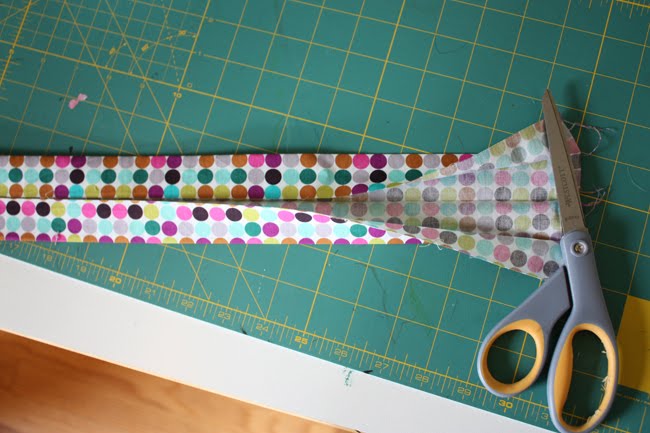
For the tab that attaches the bucket to the bike handle bars cut a 6″ wide by 11.5″ tall piece from the lining material and cut one piece 21.5″ wide by 4.5″ tall for the top binding of the bucket.
From the double sided fusible interfacing cut one piece 7.5″ wide by 6″ tall, one piece 11″ wide by 6″ tall and one piece from the pattern following the dotted line.
{All seam allowances 1/2″ unless otherwise noted}
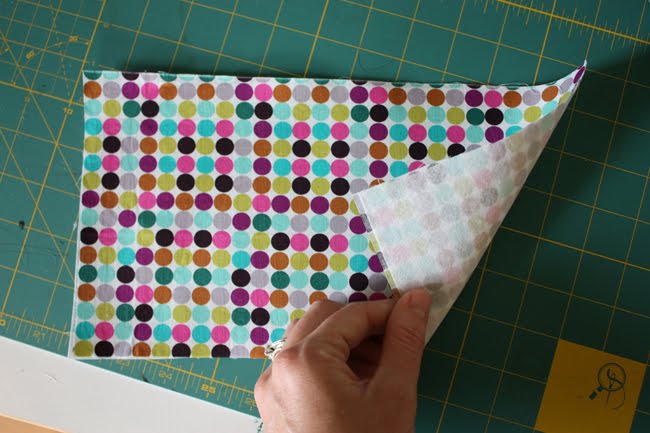
Sew the exterior and lining:
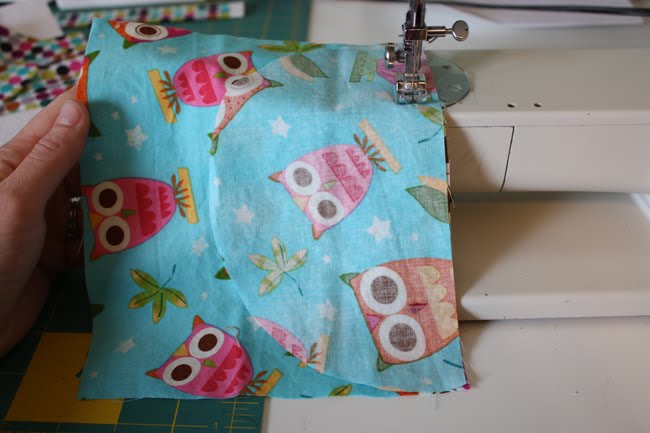
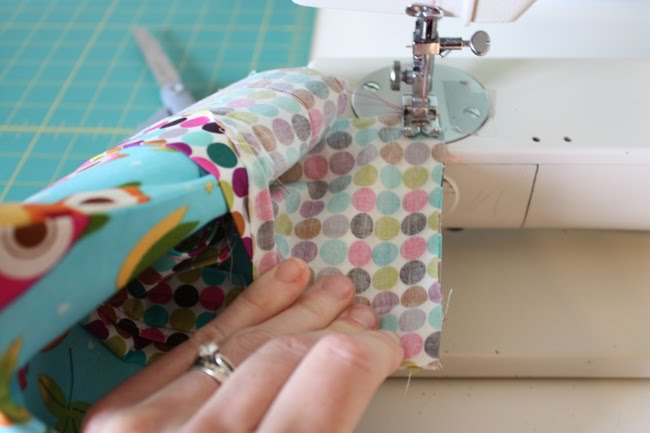
Place the short rectangle (8.5″ wide by 7″ tall piece) RIGHT sides facing to the bottom bucket piece. Sew.
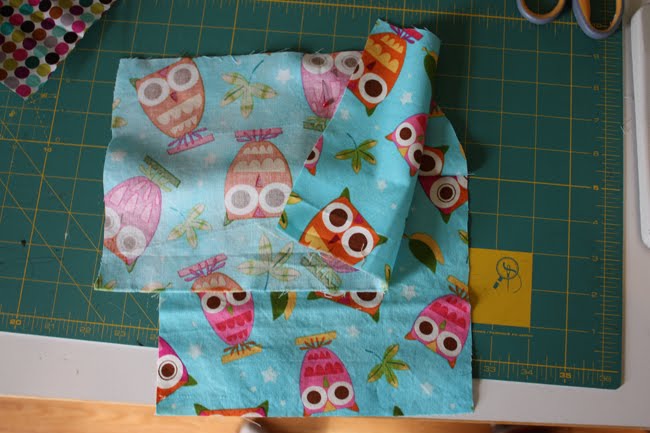
Open up the piece you just sewed and take the long remaining rectangle, find the center (should be at 6″) and pin it to the center of the curved bottom bucket piece.
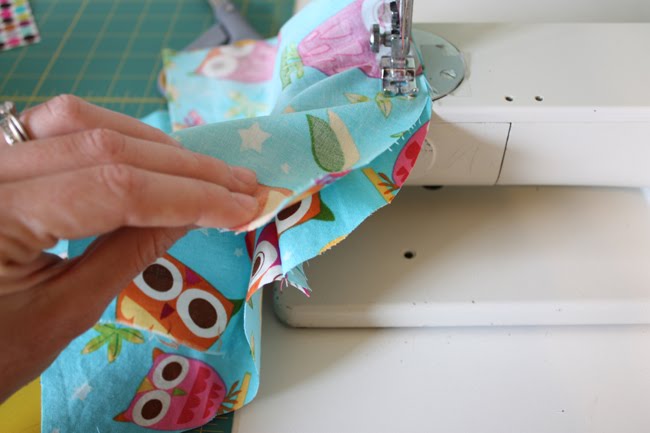
Starting from the pin sew following the curve of the bottom bucket piece, adjusting as you go.
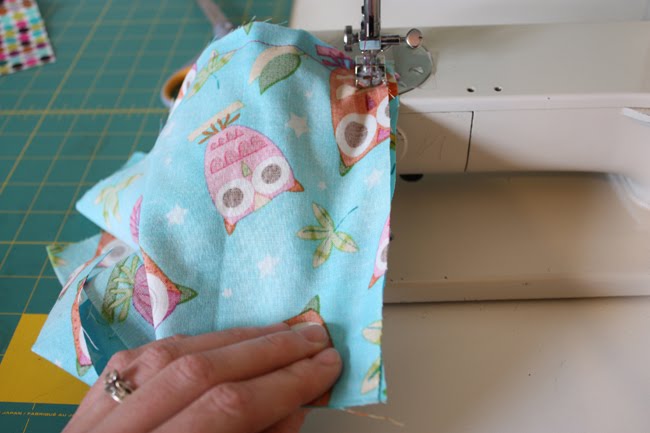
When you reach the seam that joins the bottom bucket piece and the short rectangle, stop with the needle down and lift presser foot, rotate the pieces so that the two rectangles are facing RIGHT sides together. Put presser foot back down and continue sewing. Go back to where you started in the middle of the curve and sew the remaining side. {When lifting the presser foot and rotating the pieces so that they align, it might feel and look kind of wrong or weird, but I promise they’ll line up and look great when you turn it right side out.}
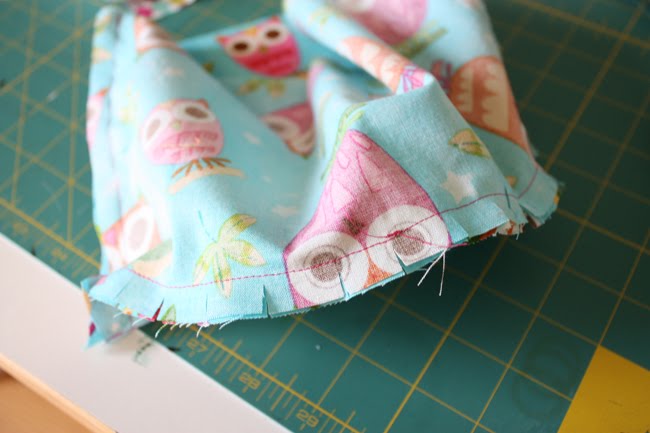
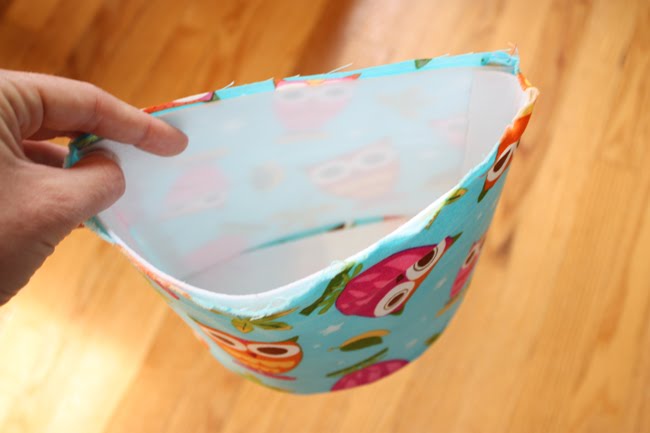
Clip curve. Turn RIGHT side out. Repeat same process for lining pieces.
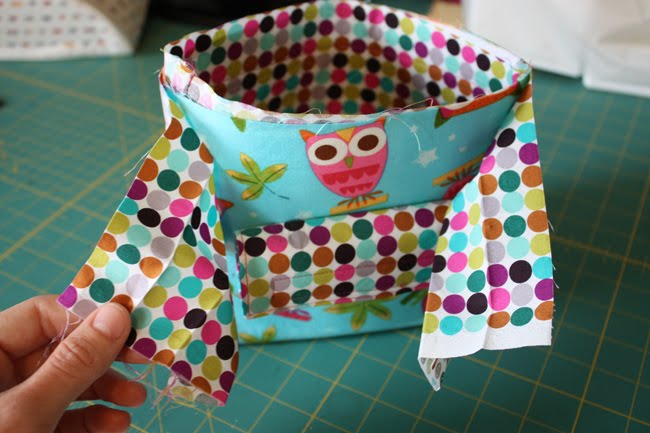
Assemble the bucket:
Take the double sided fusible interfacing pieces and place them into the exterior of the bucket.
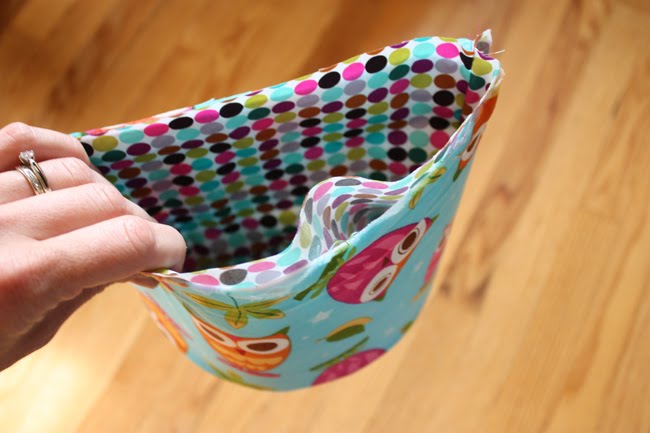
Then place the lining into the bucket.

Press on all sides (exterior and lining and bottom) of the bucket to fuse in place. Set aside.
Make the handle bar attachment:
Take the 11.5″ tall by 6″ wide piece and fuse on a piece of medium weight interfacing.

Fold in half lengthwise RIGHT sides together. Sew along all open sides leaving a 2″ opening in the bottom for turning. Clip corners, turn right side out.
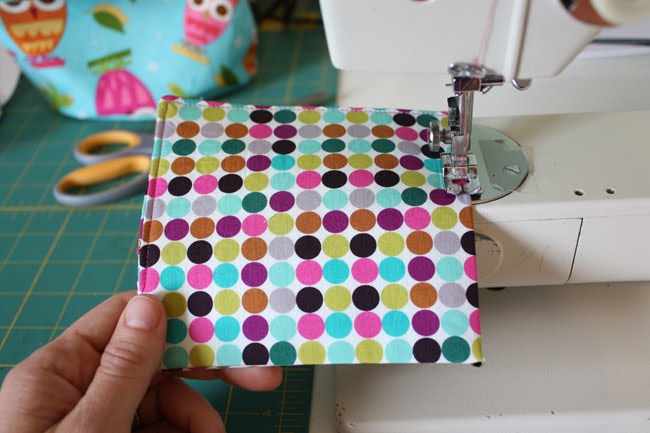
Topstitch around entire piece.
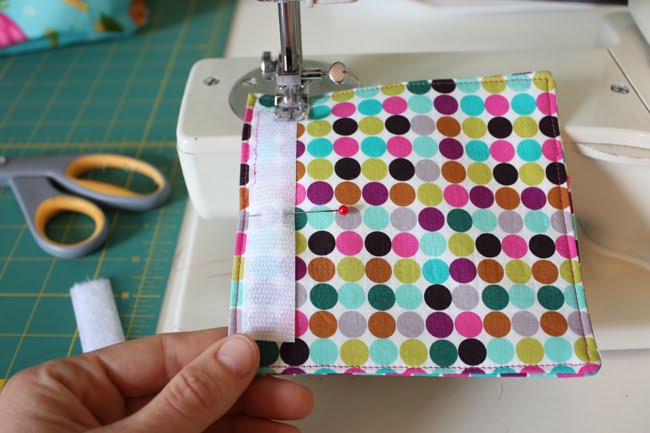
Now take one side of the velcro, sew into place along one of the short edges.
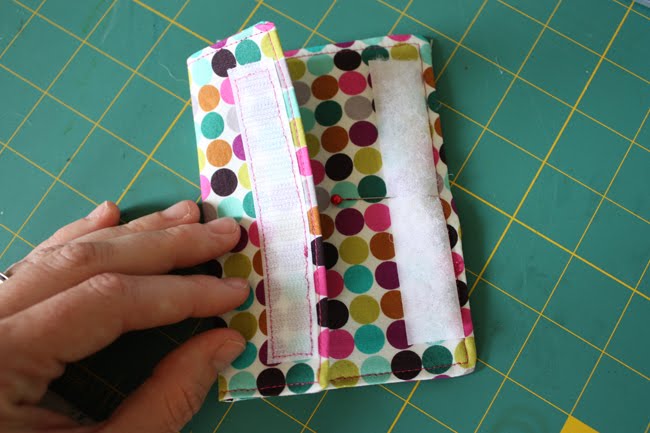
Take the remaining piece of velcro and sew into place on the other end and opposite side you just sewed the first piece of velcro on (as pictured above).
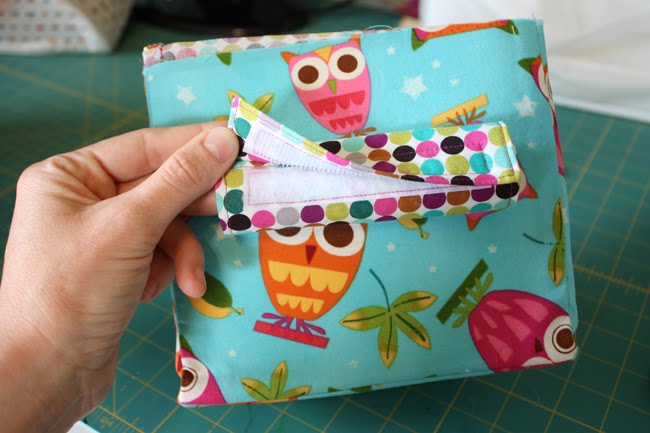
**Now here is where you could do it differently, I sewed this handle bar attachment onto the bucket on this next step, but you could also hold off and sew it on as the very last step, your choice.
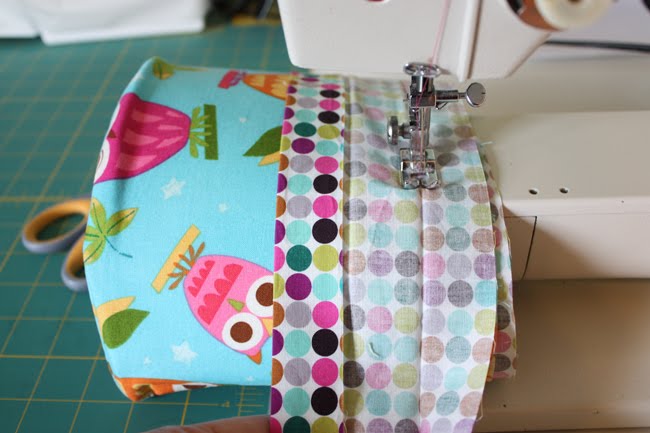
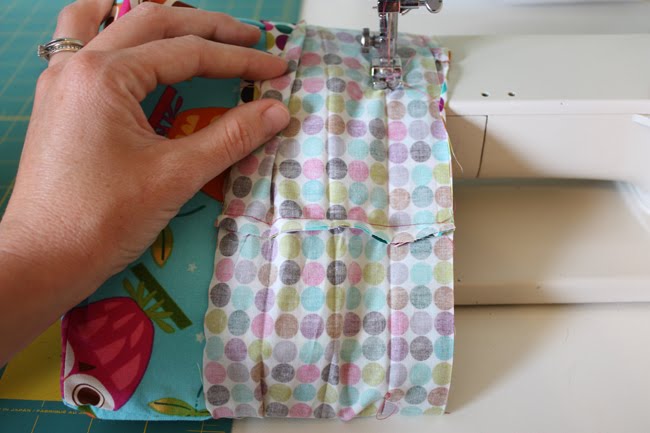
Sew attachment to bucket:
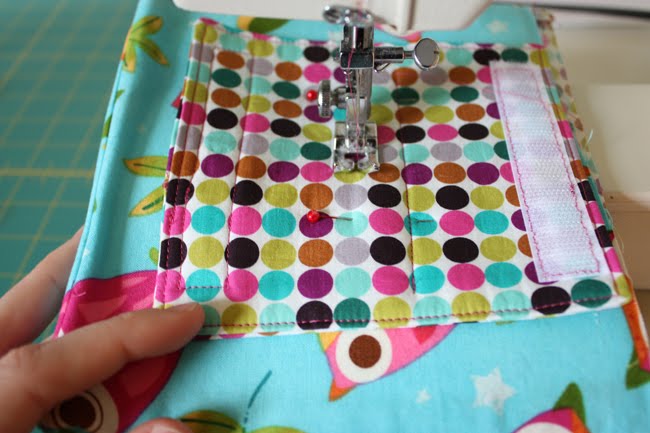
Pin the handle bar attachment to the bucket about 2-3″ from the top. Sew two straight lines completely across the attachment piece about 3/4″ apart.
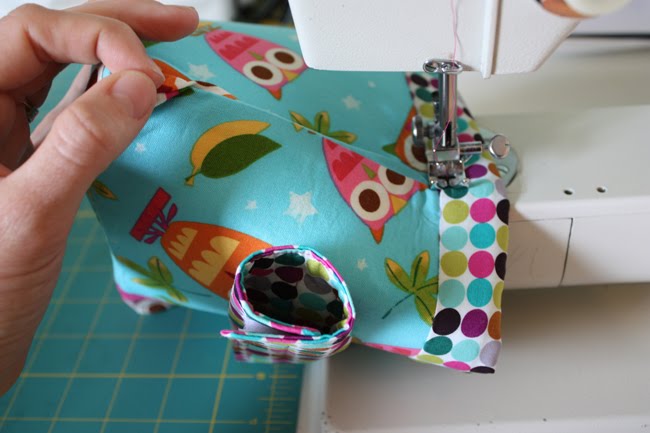
Finishing with the binding:
Now take the binding strip and press it in half lengthwise, open, and press raw edges to the center. If you’ve ever done quilt binding, we’re going to finish this the same way.
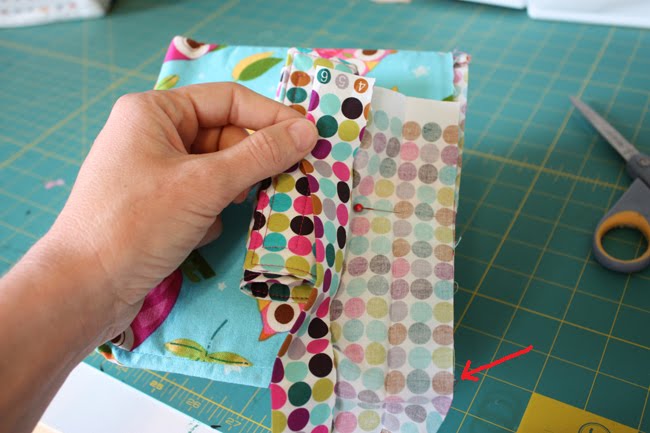
Unfold the binding strip, pin in place aligning raw edges at the back (center) of the bucket. Start sewing along the crease towards the edge of the bucket (where red arrow is pointing) and continue around to the other edge.
It should look like this now:
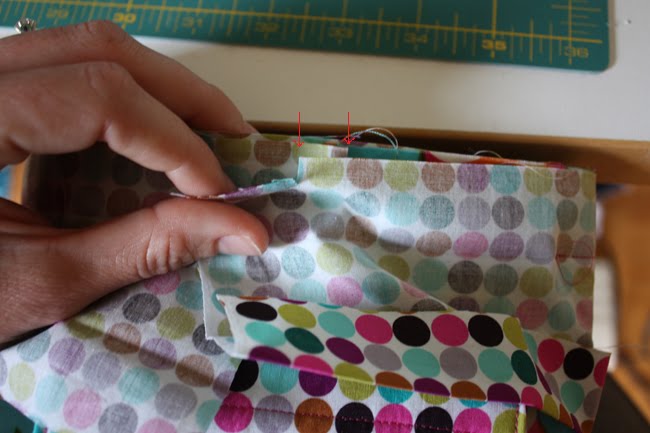
Trim the binding piece so that they overlap by 1/2″ (see tiny red arrows above).
Now grab the bucket and give it a squish and place the binding ‘tails’ RIGHT sides together. Sew using a 1/4″ seam allowance.
Now un-squish the bucket and sew the remaining part of the binding closed, again along the crease.
Flip the binding over the top and in towards the lining. Topstitch along exterior close to the seam. Press!!!
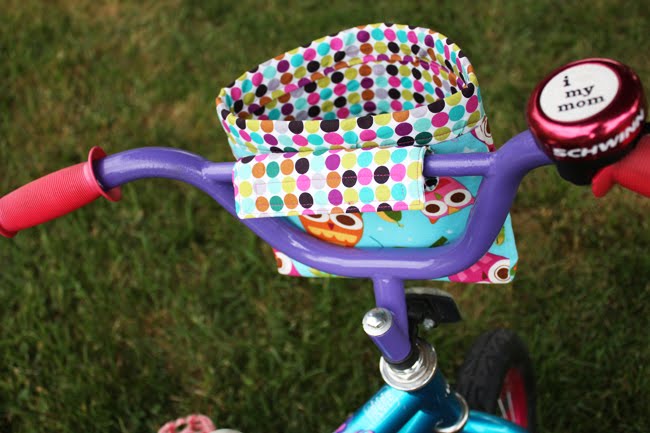
That’s it, one complete bicycle bucket ready for a trip to the park. Have fun!

Don’t forget about the boys!!
Just wanted to add that if you’re looking into different bike basket options, Christie from A Lemon Squeezy Home has a couple cute tutorials as well: Vintage Inspired or her Boy’s Basket.
This is so fresh – I’m about to make some for my kids who will FREAK out over the coolness!!! They have wanted baskets for a while and I am so CHEAP I haven’t bought any. Good b-day gift idea, too. Off to get velcro!
Brilliant Anna!!! Perfect for Abby’s bike!
That is just super cute!!!
Cool!! What a terrific make. I adore that owl fabric.
Thanks, I Love it
Sorry I foget something *smile*
Many greats from Germany
Great tutorial! My daughter is a little young still, but I will definately make one for her someday!
You’re awesome!! This is next on my to-do list for my daughter’s Strider! Everytime she rides I wind up with handfuls of odds and ends from outside (gum tree balls, pinecones, etc) or else she ends up riding one handed (yikes!!) while trying to hold something! I had been putting it off though because I didn’t want to try to figure out a pattern – now I don’t have to!! Thanks so much!
Nice work, Anna! Your sewing always looks flawless!
PS – Hope you can find your name patches!
I just love it!! I would like one for my bike, but first i have to get a bike!
It is just wonderful, well done.
I’m thinking laminated fabric or fuse-on vinyl might be just the ticket for this project — we’re in the Great Lakes region and it rains plenty during the summer around here. I can just imagine the basket being “forgotten” outside a time or two. *grin*
Adorable! Must make one for my 4 year old!! 🙂
WOW! My mom is buying my son a tricycle for his 3rd birthday… Now I have another little gift I can make him! this is seriously cute!
Honestly so cute. I’m extremely impressed by your sewing skills.
i am loving this…my daughter has been wanting a basket and this might just do the trick!!! what kind of interfacing did you use for the body of the basket?
So cute! I love the owl fabric that you used.
Doncha love when hubbies ‘insist’ we make things. 🙂
That is really cool! Wish I’d had one when I was a kid. Might have to make a mini one for Syd’s trike. Thanks!
Dang, Anna. What a fun thing to do for summertime. Thanks for yet another great idea.
What a great idea! We have lots of bikes that would love a little handle-bar basket. My son having a bike rodeo themed party, and I just may have to make some. I love all your ideas, in fact I just made a zaaka inspired pouch for a birthday gift this week. And all those great kitchen ideas are on my long, long to-do list. Thanks for taking the time to do a tutorial for this.
This is so cute!
Awesome!! love it Anna!
That’s darling, and easier than mine without the wire! I’ve been needing to try and re-work my tutorial for my fabric bike basket. Love the fabric you used!
I love this! My little guy isn’t a bike rider yet, but I’ll keep this in mind for when he’s older.
adorable. what a great birthday present too! i love that polka dot fabric, do you know what it is? thanks for the great tutorial!
you are such a busy lady!
GREAT basket. Very cool. Love it!
Just a quick note to let you know that a link to this post will be placed on CraftCrave today [03 Jun 02:00pm GMT]. Thanks, Maria
the fabric is sooo lovely!!
What a great idea! And I love that Dan’s on board with you making things vs buying them (they always turn out much cuter anyhow!).
That is so cute!! I need to make a couple for my girls!! Love the owl fabric….where did you get it? Thanks for sharing!
I’ll have to make one of these for my oldest – her bike is basket-less =) Must remedy that.
Aw! That’s great and great to have a supportive hubby too!
love, love, love it! great blog, by the way.
You make it look so easy, Anna!
Everytime I come to your blog I find you have had a new phantastic idea. I am simply smitten! What a fabulous idea. Love this little project. Thanks for sharing. Greetings from Germany
very cute. too bad my kids won’t get near a bike. i know, i know they are crazy. but we live in the country and people drive on the roads like maniacs. they are just afraid. i don’t blame, not for sure i want them on the road.
Anna this is the bomb! I seriously need one for my bike, with my name and everything. Thanks again for taking the time to make these wonderful tuts. My BF’s daughter is turning 7 in a few weeks, this’ll make the perfect gift for her!
Wow, great idea.
Love it!
This has to be the cutest thing ever
{but then I REALLY like the owl fabric} …
think I know some little ones that would
just L.O.V.E. to have this little
accessory for their bikes.
Great tutorial and thanks for sharing! ~j.
I LOVE this. I am totally going to make one for my boys! I am also going to feature you today! Thank yoU!
Oh man!! That is sooo cool. My son just asked for a bike basket this year. I’ll just have to make him one. Thanks!!!!
Very cute!!
I’ve ever made kind of bag like this for my kid’s bike last year but not as cute as this 🙂
I think yours is better than the ones that you can buy at the store. He was right about making your own. My husband is like the same way, he would just tell me to make something instead of buying it. LOL! I love it! 🙂
This is one great tutorial! Thank you for linking to my link party, Anna! Your work is always so perfect and flawless too.
Oh I love this. I’m going to link it on my site. Then I’m going to make one and hope it comes out as cute as yours!
Super cute…great tutorial!!!
So very cute. I can also see a few of these with loops sewn on back hanging from a row of hooks. Would be cute storage for small items in a toy or craft room.
This is too cute! Can’t wait to try it, thanks for sharing!!! 🙂
Super Tutorial! Thank you!
You are so clever! This is an inspiration – and I’ll bet your little one loves it. It’s raining here on Cape Cod today, and your post makes me think that the perfect way to spend Saturday is up in the sewing room….
xxxs and ooos from Cape Cod
Jude at
dolcecapecod.dotblogspot.com
Thank you so much! I am adding this to my summer to-do list for my 6 1/2 year old daughter!
Soooo cute and so clever!
What perfect timing! We’re about to get Hazel a larger bike and I was half-way through saying to my husband “and we need to get a better bicycle pump and bell and maybe a…oh wait, I saw a tutorial for one yesterday so never mind!” Of course, Mat’d tell me to buy it instead of making it because he knows what my ‘to do list’ is like!
I just made one for my little girl’s bike and she loves it! It’s here http://craftyady.blogspot.com/2010/06/new-bike-and-new-bike-basket.html and now my son wants one too so I’m off to make a second one. Thanks so much!
This is so great! I loved your gathered clutch too and made one this weekend!!! I linked back to you… Come see it here!
Fantastic! You are such a clever cookie!! Thanks for the tut xx
Oh yours is so cute! I have had a bicycle basket cut out and partially sewn for a month now. Now I’m inspired to finish it up! 🙂
Major cuteness overload – Your baskets are adorable!!! I wish I had a little girl to make this for – I am going to have to come up with someone because these are just too great.
Wow fantastic. Thanks for posting yet another great tute.
This is a great project! Just gave our 3-year-old grandson his first bike. Can’t wait to make him one of these!
I just made a “secret agent kit” using your cargo pants messenger bag tutorial, and hope to try this soon!
Great idea! My nieces and nephews (and my daughter someday!) will absolutely love this. What a super gift idea. Thank you!
Just found your blog through How About Orange. This bicycle bucket is an awesome idea! I think I need to go home and make one right away! Thanks for the tutorial – and awesome pictures!
Lovely tutorial. I actually made it for me (a grownup) 🙂 I made a few tweaks to carry my necessities (cell phone, camera, key hook and wallet) I hope you like it: http://sewcraftdecor.tumblr.com/
By the way, what machine do you use? I started with a brother and I make bags and other constructed items, but sometimes I have trouble when a lot of layers overlap. My presser foot won’t be steady enough of the needle won’t go trough smoothly (i had to glue the trim on the bucket for example). Any tips?
Thanks!
thank you for the clear tutorial! i placed a link to it on my website. hope you don’t mind i used a picture as well. (please let me know if you do mind)
Love love love it! Thanks for the tutorial, I’m going to get started on one ASAP – using Fat quarters – genius!
Hello, I have a blog that aims to identify all the tutorials that can be found on blogs. I put a link to your blog (and not the explanation) but I let you put your pictures? thank you and congratulations for your blog marjorie http://tutoriels-loisirs-creatifs.over-blog.com
This is amazing. I need to look more thoroughly through your archives, because I totally missed this one!!!
Does anyone know whatt the size of the bottom is supposed to be? I thought it was a semi-circle, but now I suspect not. I tried to use the template, but can’t seem to get it to print out so that the 1″ sample square is true. I have all of the other pieces cut out. I am assuming the long side of the basket is 8 1/2″ because it matches up with the other piece, but I need to know the distance between the bottom and the tallest part of the curve, if that makes sense. If it were a true circle, I could easily figure it out, of course, but I don’t think it is.
Hey shbook~ it is a true semi circle (or pretty darn close). I designed it with a 8.5 inch diameter, hope that helps.
Anna – you are so creative! I’ll be sharing it to my blog @ http://www.thingswevediscovered.blogspot.com Thanks for GREAT idea, my girls will love it.
well that wasn’t right =P
http://www.thingswevediscovered@blogspot.com
I’m still sharing it though! Thanks again
I am trying to make this but can’t find the pattern you are talking about. Help! Amy
oops, forgot my email quest4snow@gmail.com – need help finding the pattern! Thanks
Digitize: click on the word “pattern” and it will come up for you to print.
What kind of interfacing is everyone using? I have been trying with heat and bond, but it just will not adhere…AHH so close!
oops…freya_maclean [at] hotmail [dot] com
http://tutorialadventures.blogspot.com
Hi Anna, I just wanted to say thanks for the help and let you know that I blogged about your tutorial. I also left a few tips from my mistakes if anyone else is having trouble!
Great tutorial! Thanks!
http://tutorialadventures.blogspot.com
I am going to be linking to this on Bugcreator.blogspot.com on wednesday… due to an impromptu trip out of town and coming across this awesome tut today I used you a little 😉 in a good way though! Check it out wednesday as it is a scheduled post! Thanks for the awesome tut!
Thank you sooo much for this tutorial! I have to use a walker in the house and a wheelchair when I go out. I have been looking for something to use on both and this is perfect! Thank you again! You have made my life much easier! Now I can put stuff in this without having my husband get my stuff for me when I go my sewing maching. *hugs* Lisa W.
Such a great idea. Just shown your tutorial to my 4yr old son and he’s now demanding I make one for him. Great tutorial. Thank you for posting this.
Oh, I’ve just started a blog and not sure of the etiquette of posting links. Is it Ok if I post a link to this tutorial? My blog is http://madisonmakes.blogspot.com/
I made 2 of these last summer. First one I had a little problem following instructions for the bottom, and caught on for the second one. My 3 year old grandson just loved the one I gave him for his bike and the first one I kept and keep odds and ends in it. Thanks for posting this!
I finished one for my son yesterday and I’m currently working on enlarging one for my daughter. Great idea and tutorial!
http://tildastwistedlife.blogspot.com/2011/04/one-down-one-to-go.html
Cute I Like it! Will surely make one for my darling daughter. Thanks for sharing
Adithis Amma Sews
Fantástico.!!!!!!!!!!!!!
This is AWESOME! Love your choice of fabric. I want to feature you at my blog http://www.apronsandapples.blogspot.com THANKS! I will link back for the tutorial. Great job. Kristy
Hi there! I just wanted to let you know I featured this tutorial, with a link to this post, on my blog at:
http://sewlindsaysew.wordpress.com/2011/06/11/sunny-summer-sewing-projects/
Thanks for sharing this magical tutorial!
Great project! I just wanted to let you know that we featured this project on our Facebook page with more than 12,000 fans. We’d love it if you’d use our Featured Blogger button, available at: http://www.dailycraft.com/thank-you-for-crafting/. Our audience loved the project and we look forward to sharing more from you. Please let us know if you have any questions or projects you’d love us to feature! Thanks!
Just what I needed – THANKS!!! Jess is going to FREAK when I make it!!!
Oh my gosh, that is epic cute!
I run Fun Family Crafts, a library of craft tutorials geared at kids of all ages. I would love it if you’d stop by and submit this to be featured! (I link to you, I don’t post your tutorial on the site) Feel free to submit as many kid friendly craft tutorials as you like! http://funfamilycrafts.com/
Love the tutorial. I linked to it on my blog:
http://blueberryjunkie.com/how-tos/diy-child-bike-basket-tutorial-round-up
Thanks for sharing.
Carla
Thank you so much for the tutorial! I made two of these today … one for my daughter and one for my son. I’ll link back to it on my blog and share the tutorial on facebook. It took me about 1 1/2 hours to make the first one and went much faster on the second. Love it!!
Wow! This tutorial is really wonderful. I must try this for my daughter’s bicycle. Actually I am looking for a pretty kids scooter for my little son. Please share some kids scooter here.
Where did you buy your fabric with the owls on it? MUST have.
Thanks!
Becky
http://bucketofbuttons.blogspot.com
Hi Anna! I love this tutorial! I’ve linked to your tutorial from my blog. http://www.yvette-keeping-it-real.blogspot.com Thanks for posting!
Thanks for this awesome tutorial. I have girlified my sons bike for my daughter using your tute and it is a definate success.
http://twolittletornadoes.blogspot.co.nz/2012/04/girlifying-boys-bike.html
Thanks again!
I made this a few days ago and my daughter is loving it! Thank you so, so much for sharing such a fantastic pattern!
Thank you for the detailed tutorial! I was able to make a basket tonight. It will be for my dd’s 7th bday next week. What fun she’ll have being able to gather all the treasures she finds on her bike rides!
The pattern or template for the bottom? How do I get it please? There is no word “pattern” to click as somone suggested; only paid patterns at top of blog.
Click on the words ‘pattern piece’ at the bottom of the materials list.
Of coarse! LOL I got it. Thank you. Ready to sew.
Hello
I literally fell in love with this
do u sell it?
Sorry! I don’t sell finished items, but maybe you can find a crafty friend to help you?
This is seriously just TOO cute!!! I kind of want to make one for my bike {giggle}
I have made these for my girls and they love them, I have requests to make more for friends, but the interfacing is alluding me. I have never sewn with fusible interfacing before, and now I curse it! How do you get your iron in that tiny bike bucket and get it all smooth? Do you have any tips for sewing with interfacing? Thanks so much.
plan.e.creates@gmail.com
I just iron in the lining as far as I could. My iron is on the smaller size, so that helped a little. As far as sewing the fusible interfacing, I recommend following the manufacturers’s instruction exactly. 🙂 Hope that helps.
Can you do an ADULT version???? Pretty please????? 😀
🙂 I might have to! For now you might want to try enlarging the pattern pieces and giving it a try.
I’m the Editorial Assistant for Fun Family Crafts and I wanted to let you know that we have featured your project! You can see it here:
http://funfamilycrafts.com/bike-bucket/
If you have other kid friendly crafts, we’d love it if you would submit them. If you would like to display a featured button on your site, you can grab one from the right side bar of your post above. Thanks for a wonderful project idea!
Do you have any suggestions for weather proofing?
Sure! You could try using oilcloth or laminated cotton. Otherwise a good option would be to use scotch guard fabric protector. I know ours has faded since I made it, but I try to take it off and bring it inside when we’re not out riding! 🙂
Oh my goodness, this is so cute, and kids love to have something to put their stuff in!
You’ve done it again, Anna! ‘Gave me a new sewing addiction! 😉 -Marci @ Stone Cottage Adventures
Whether you’re touring on a road bike, taking a cruiser into town, weaving a fixie through the city, or hard-riding a dirt trail, you’ve got to have a place to stow your stuff while you’re riding.
I made one for my Grandson aged 5. I got him to pick out the fabric from my stash. He thinks it is great for his toy cars on the front of his bike and when it is not on his bike he loves wearing it as a hat.
I made one for little girl to carry her doll in on her bike. I just made 2 leg holes in the bottom. Thank you so much for sharing this pattern, it is wonderful!
I just found this, I have a scooter and I’m in need of a bucket to put my purse in when I ride because mine holds my oxygen machine. Thank you this is so cute and much better than paying $125.00 for one from the medical supply store.
is there a layout for this pattern. I want to try it for my grandkids but it look complicated..
could you tell me what a fat quarter is ?????
It’s a cut of fabric approx. 18″ tall by 22″ wide (a full yard of quilting cotton cut into quarters).
Just made this and it turned out RIDICULOUSLY adorable! Love love love your tutorials and patterns. Thank you so much for putting together such a great project!
http://roonieranching.blogspot.com/2013/07/bike-bucket-for-maisie.html
Do you or would you sell these on etsy?? I need two! A boy and a girl one!
I finished one the other day and I love how it turned out! My daughter will be very pleased when she’ll have it as one of her presents for her upcoming 3rd birthday!!! thank you
Lucky you your husband said no to buying it and to make it yourself! My husband doesn’t understand my love for sewing. We are on set number 3 (or is four)? of those cheap baskets!! Too bad for him, I am making them from now on! I think I will make one for me too! 🙂
I love this pattern. I am going to make these for my grandkids! Thanks so much!
What do you use for the 21.5″ x 4.5″ binding? Just fabric from one of the fat quarters?
hay, Are you like to hire or purchase carbon bike wheels. I give you a good site information, you can hire or purchase racing cycle and and others instrument from here. Please click here for this: TLR Carbon wheels. If you want to know more information about TLR, Please read this magazine.:TLR Carbon wheels. Thanks Everybody.
Have you ever tried to do this with crafter’s canvas (the plastic squares people used to use to make decorative tissue box covers) instead of fusible web for increased stability?
I haven’t. I don’t think it would work well in place of the Pellon (which is a double sided interfacing – not a fusible web) just because of the overall construction. You could certainly try it however you’d like though. 🙂
I finished one today, trying the crafter’s canvas. So now one of my daughters has one with the interfacing and my other daughter has one with crafter’s canvas. The crafter’s canvass definitely required different construction, and a bit of hand sewing to finish everything off, but, in the end it did work. Thanks for the great pattern!
I made this for my little girl, it looks great and she loves it! – thank you so much! The time and effort you put in to the tutorial is much appreciated.
I’m so excited to see this! My daughter insists that all the baskets we see in the store are “too girly” so making one is going to make her very happy. Thanks!
Oh fun! Hope you enjoy making it. I know my girls loved theirs.