
I’ve made tons of these little zippered pouches and I think they’re so useful and can be personalized in so many ways. Plus, they’re super handy when it comes to organizing your purse (or at least make you look like you have an organized purse).
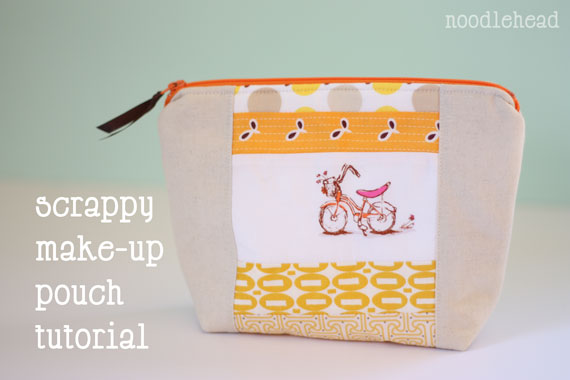
I know there are a ton of other zipper pouch type tutorials out there, but I thought it would be fun to share how I make mine.
Materials needed:

- fat quarter or 1/4 yard linen (or any solid fabric would look great, or for that matter just use what you love)
- fat quarter of 1/4 yard of lining fabric
- small scraps varying heights by 5″ long
- scraps of cotton quilt batting (or you could also use fusible fleece)
- 8″ zipper (or longer, just follow instructions on the package to shorten any zipper)
- thread
{1/4″ seam allowance throughout unless otherwise noted}
Cutting the pieces:
From the linen cut: one piece for the back 9.5″ wide by 8″ tall, and two pieces for front side panels 2.75″ wide by 8″ tall
two pieces of lining 9.5″ wide by 8″ tall
two pieces batting 9.5″ wide by 8″ tall
Assembling the front:

Sew scraps RIGHT sides together until you have a pieced fabric measuring 5″ wide by 8″ tall. Press seams to one side.
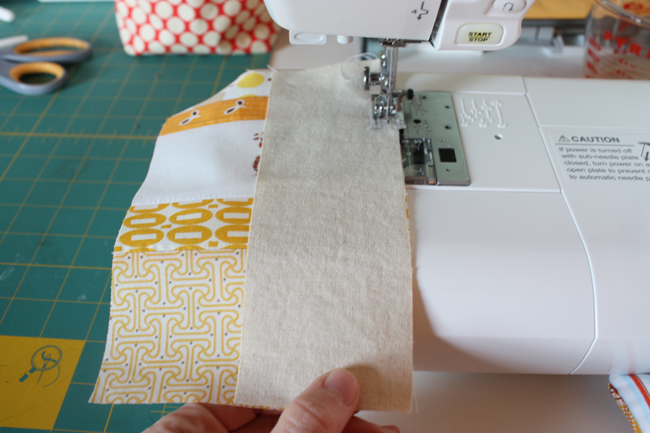
Next, you’ll sew each of the side panels RIGHT sides together to each side of the scrap panel, press towards sides.
Add any quilting details (optional):
Here’s where you can add some fun quilting details. You certainly don’t have to and most of the time I don’t do this step, but it can add a lot of interest to your pouch.

Layer the front piece you just created WRONG side facing down on top of one piece of batting and quilt away! On the examples I’ve shown I’ve sewn a straight line down one side of each scrap panel seam.
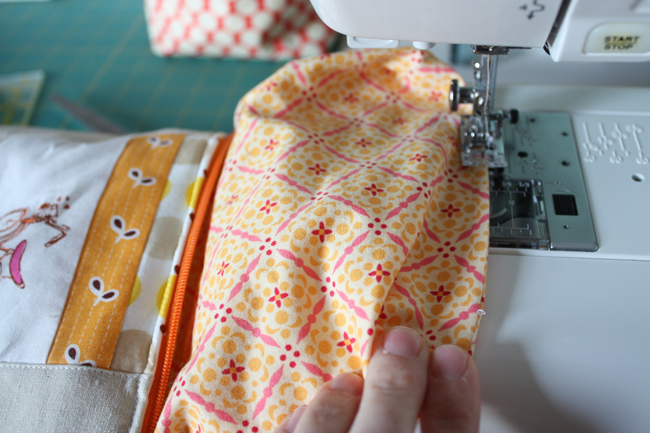
Assembling the pouch:
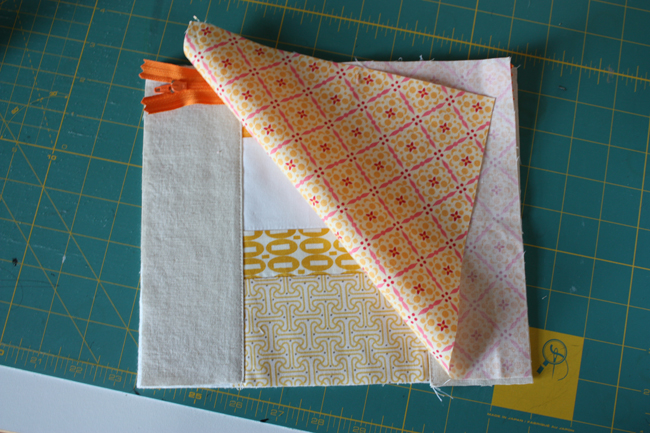
Place exterior RIGHT side up, put the zipper face down with the pull tab at the left. Place lining piece RIGHT side down on top of that.
Pin and sew using your zipper foot.
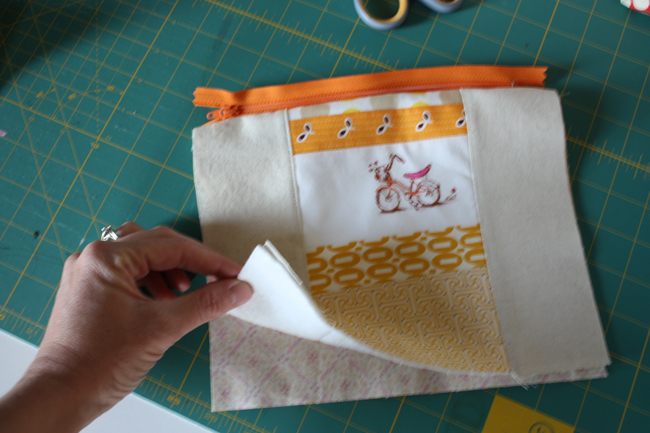
Flip those fabrics WRONG sides together to get them out of the way.
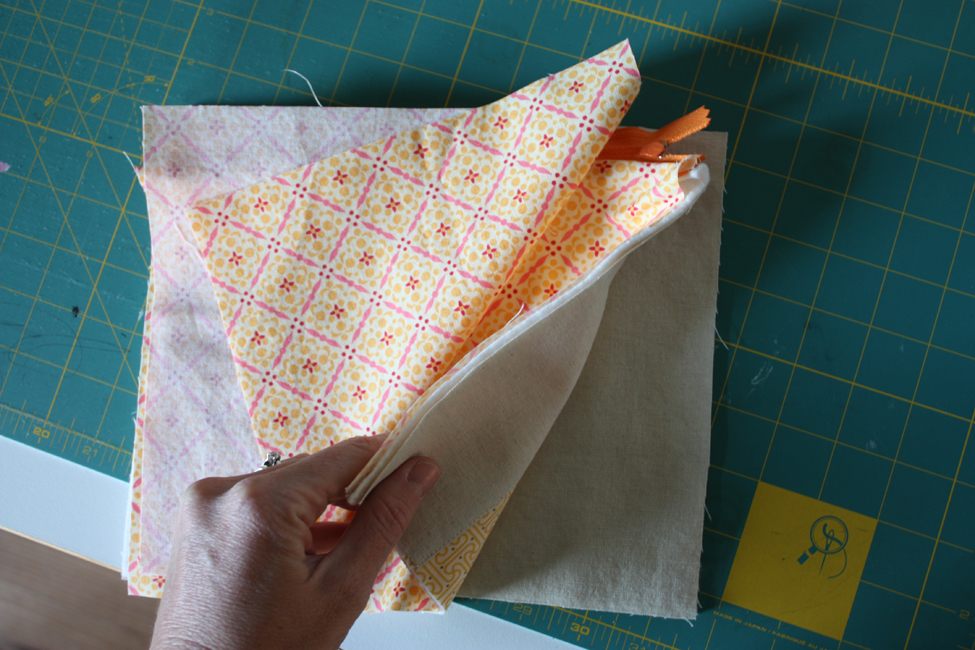
Next, lay the remaining exterior piece RIGHT side up, align the zipper with the top edge zipper face down with pull tab at the right this time. Place lining piece RIGHT side down on top. Pin and sew.
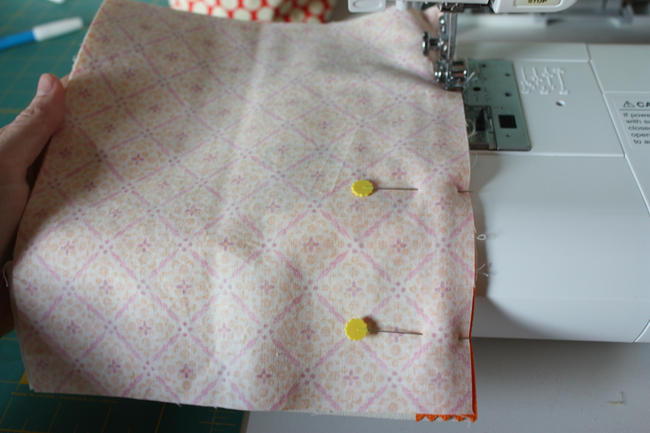
Flip fabrics WRONG sides together on both sides of the zipper. Press.
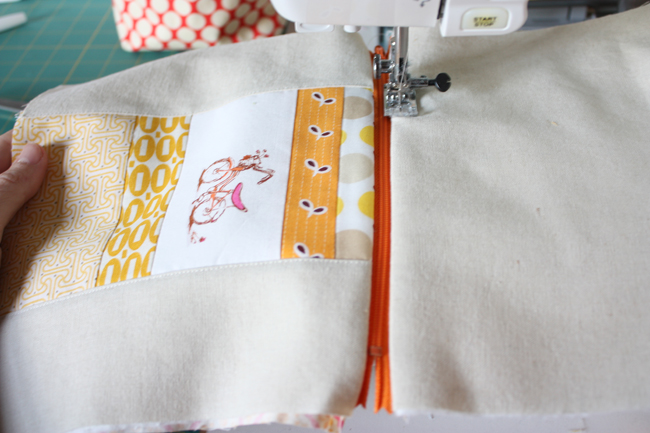
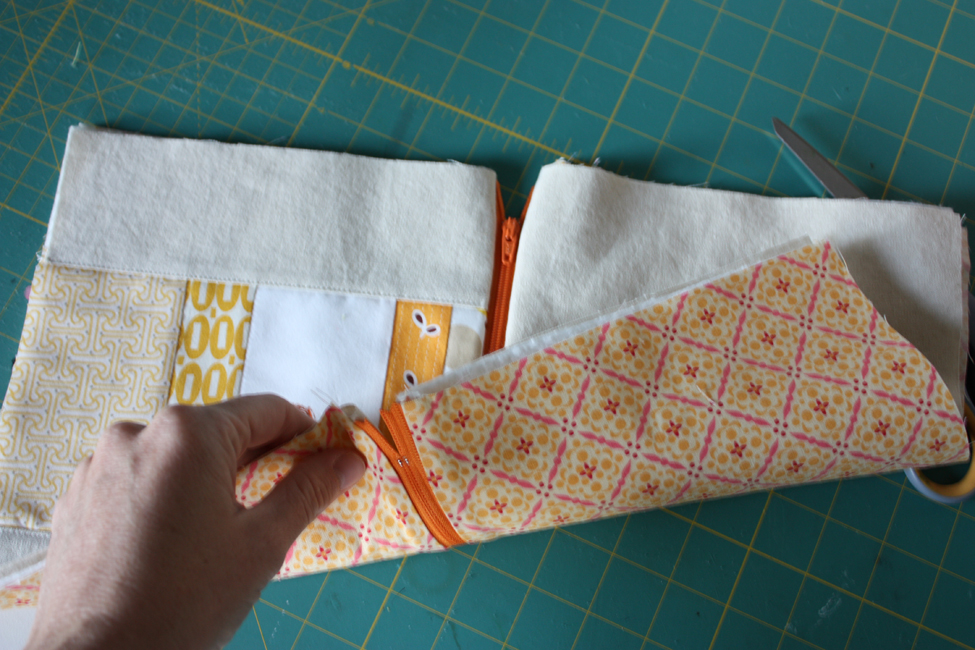
Switching back to your regular sewing foot, top stitch next to the zipper on each side.

Now flip fabrics around so that the exteriors are facing RIGHT sides together and linings are facing RIGHT sides together with the zipper in the middle (you won’t be able to see the zipper, just know that it’s there). Pin and sew around the whole perimeter using a 1/2″ seam allowance and leaving a 3 to 4″ opening in the lining for turning.
You could be finished at this point, but we’ll take it a step further and box the corners so this baby can stand up on it’s own!
Boxing the corners:
Put your hand in through the opening of the lining and pinch the exterior fabrics corners together aligning the seam.

Finger press the seams open and with a ruler mark a line perpendicular to the seam 1.25″ from the tip of the corner.

Mark the line with a water soluble pen and sew along that line.
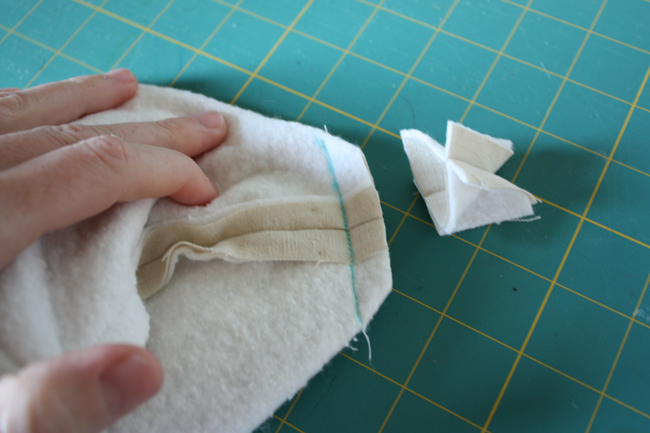
Clip corner leaving a 1/2″ seam allowance. Repeat for other exterior corner and both lining corners.
Finish:
Turn pouch right side out through opening in lining.
Ana, These pouches are so much fun! Thanks for the fabulous how-to!
These pouches are adorable! And what a great way to package little Christmas presents this year!
Too cute Anna!! And is that one of Christina’s owls?? What a fun way to use it. Enjoy your blogging break and that extra time with the hubby. 🙂
wonderful ! you give me THE final solution for sewing properly the lining for one part, and the exteriors for another
just curious to know the dimensions of the finished pouch. i’m sure i could math it out, but the odds of me getting that wrong are extremely great.
Is there a place to purchase the owl and camera fabric? Love these…making some for Christmas gifts!
I love this tutorial – what a great way to use up all those fabric scraps. Here come my Christmas presents! 🙂
thanks for a great tutorial !
I love Admitted Fabricaholic’s idea! I got all the ladies in my family jewelry this year (because I had a jewelry party- usually I do handmade) and these would be way better than wrapping tiny boxes.
Thanks Anna for making zippers so easy 🙂
Thanks for the fab tutorial – I’ve never actually sewn anything with a zipper…it doesn’t look as hard as I thought it would be. Will definitely give this a try!
Love that printed owl.
thank you for sharing another great tutorial, I just finished making one, and it turned out quite cute.
here is the link if you are interested:
http://beardollyandmoi.blogspot.com/2010/10/little-girl-make-up-bag.html
thanks again!
I made one and I no longer fear zippers! Woot!
I always love your tutorials. Your stuff inspires me more than I could ever say! THANKS!!!
I just made a couple of these to put with the Library Bag for Christmas gifts!!! LOVE this tutorial!!! So fast and easy, and just a little bit cuter than the zipper pouch. I love that it stands on its own ;). You’re a genious, Anna! Thanks a million!! Half my Christmas presents are coming from your tutorials 🙂
I like this tutorial a lot. Thank you!
This tutorial was great. Thanks. My problem is I don’t know a thing about sewing and all the terminiology. Can you do a tutorial video? If I can see what I’m supposed to do I can figure it out. If not, I’ll ask my sewing friend when she returns from Georgia. The pouches are so cute!
I just made one, first zipper I have ever sewed. It turned out great. Your site inspires me!
Thank you !
I just made two of these, (although not scrappy) and you answered so many questions ! I had the general idea, but you made them great. I added a ruffle across the front, and didn’t do the corners as wide (wish I had…..mine don’t stand as well !)
I love that little pouch! Can’t wait to try it out…I hope you don’t mind, I added your blog to my blogroll 🙂 I made your diaper clutch last month and it turned out just perfect!
Your tutorials are GREAT! I am definitely adding you to my “Blogs I read”! Thanks for putting in the effort to create these tutorials! I can’t wait to try them!
~M~
This is officially the BEST lined zip bag tutorial on the net. I have read about a million of them and simply couldn’t get my head round it until reading this. I’m so grateful! My mother will have a much classier Christmas present thanks to you!
I just used your tutorial for a zippered pouch for my MIL for Christmas. Thank you so much for the clear directions and photos!
Hi Anna,
Just wanted to let you know I made a couple of these. Love ’em! I blogged about them today:
http://ocd-obsessivecraftingdisorder.blogspot.com/2010/12/gifts-revealed-russian-doll-makeup-bags.html
Happy new year 🙂
Kristie
Hello! Just wanted to let you know I used your pattern and loved it! I’ve posted a picture of a plain one I made using this pattern, but just using solid fabric. Thanks for sharing your great tutorials! I’m finding them invaluable for a beginning sewer!
Thanks for a terrific tutorial. Using your really clear instructions, I’ve just made myself a small shoulder bag to take on holiday, using a pair of old jeans, with the jeans back pocket on the outside of the bag, and I added extra pockets to the lining. I’m really chuffed. Love your blog. Thanks again. Anita
This comment has been removed by the author.
Yea… definitely did not know the zipper should be open when sewing it all shut at the end. Opppsss…. glad I was able to get it open after about 10 min of fiddling around with it haha. Great tutorial tho – I added 1 inch because I had a 9 inch zipper and didn’t want to cut it, turned out great!
Cute! I love your tutorials and oh so cute things! Check out my blog!
http://sissybooboutique.blogspot.com/
i love the bike fabric scrap.
this was my first little pouch.
love it!
http://flytothewall.blogspot.com/2011/02/i-totallllly-want-to-make-that-week-7.html
cheers.
Very nice
Just a look for news ideas. See you soon
http://www.chapeaux-de-femmes.com
http://www.femmes-en-1900.over-blog.com
Thanks again for a wonderful tutorial. I made my own version here using this tut! Thanks for the inspiration!
– Suzanne
http://justanotherhangup.blogspot.com/2011/06/bunting-cosmetic-bag-tutorial.html
these are fabulous!!! love the owl one!!! We are your newest followers!!
Amy
Piękne kosmetyczki.Bardzo fajny tutek.Pozdrawiam
Fab-u-lous!!
Oh massive fail! I tried this today and didn’t get it. I’m going to keep trying though. I know it’s just going to take more experience putting the pieces together. Your tutorial is great with really clear directions. I’m going to try again. maybe leave off all the layers next time.
tried your tutorial and it turned out just perfect. please have a look at http://creativeinstincts.wordpress.com/2011/09/26/my-first-zippered-pouch/
Just made it, love it! Thanks for the great explanation that gave me the courage to go for it! Nicole
Thank you for generously sharing your talent! You do beautiful work, and also have a knack for explaining things simply and clearly. That combination makes for an excellent, inspiring tutorial.
Thanks again!
🙂
Thanks for all the great tutorials. I needed to make a couple last minute teacher gifts tonight and I knew I could find something to make on your blog. I whipped up a couple of these with laminated cotton on the inside, stuffed with chocolate, and wrapped them up. Thank you!
I loved this tutorial, I blogged about it here http://midnightmaker.blogspot.com/2012/03/zippy-pouches.html
Found this post recently and made a friend who is getting married a cute cosmetic case as a send off. She loved it. Thanks so much!
I’ve made a few of these bags now with different variations. This past weekend I made one with appliqued flowers on the front for a wedding shower gift. I also enlarged the measurements (15″x19″) to make a quick tote bag with similar construction to put the cosmetic bag and the rest of the wedding gift inside. That way the bride can use the larger bag to throw stuff into on the wedding day. 🙂
Thank you very much for your tutorial!
I’ve just made a little bag (for make-up or as pencil case you know?)and I succeeded in making it without any problems because of your tips. Thank you from a Belgian quilter
Sorry this may sound a strange question…. how big is a fat quarter?
a fat quarter is 18×24″ it’s a half yard, cut in half. 🙂
Thanks so much for taking the time to write up your great instructions. I think I’ll get started on making one in a few minutes. Never took the time to learn how to make a bag with a zipper to where the lining fits so nicely with the zipper, and seems pretty easy at that. Again, thanks for sharing. Heidi
Thanks so much for this tutorial! I’ve made two of them so far (as well as several of your little zippered credit card wallet) and I love making them!
I just made one as a gift to my godmother 🙂 Thank you so much for the tutorial.
Wauw, these are amazing. Think I have to try this. Regards from a follower in Denmark – Christina 🙂
can you help please! okay, what am i doing wrong if my zipper is getting stuck on the edge of the lining? thanks!
When you press your pieces so that they’re wrong sides facing (before you sew the sides and box the corners), make sure you press them away from the zipper very well. If the lining piece sneaks up close to the zipper when you’re topstiching, the lining will get caught in the zipper every time. Hope that helps!
As a guy who likes to do sewing with his wife, this was a very good tutorial indeed, since i was battling with the lining on a zippered pouch. I got the knack now, and will be using the same method on some other projects i got lined up. One of them is a bag for a new bow and arrows i got the wife, along with some other ideas.
Thanks for a clear tutorial.
Wanted to say a huge thanks for this great tutorial! Just had a great afternoon making a couple of these for Christmas presents. Your instructions are really easy to follow. I definitely improved the second time but both are great so thanks again!
Just made 3 of these! Love your blog! I’ve made many of your items. Thank you for sharing your creativity with the rest of us!
Thanks for this sooooooo easy pouch, now I know what I can use all of my test embroiderys on. They work great. I have alot embroiderys for children so am making them for my grand-daughters. They love pouches for all their trinkets. This is my first time here and I will definatly be back for more great ideas.
Thanks for sharing such a great tutorial! Your instructions were really clear & so helpful for when I made a similar version myself! I have posted this on our blog, with a link back to you 🙂 x
http://buttonsandpaint.blogspot.co.uk/2013/06/makeupbag.html
Another wonderful, clear tutorial! This made a nice followup project to the lil cuties pouches. Thank you for posting such detailed, high-quality instructions! 🙂
when does the 2nd piece of batting go on?
Hi, Maybe I’m missing it but I don’t see any instructions for the 2nd piece of batting. Help? I’m a newbie! 🙂
Awesome Tutorial! I bit-the-bullet 🙂 and decided to make 8 at once for Christmas gifts this year. I did assembly line style, completing each step for every bag before moving on to the next step.
After machine quilting quilts I so very much enjoyed the ease of quilting on this much smaller scale. It was a pleasure to add such detail without man-handling a huge amount of fabric!
I completed the first bag of eight last night and realized two things I’d adjust for in the future: one was that I “centered” the pattern for the front of the bag but when the corners are trimmed to allow it to “stand” (which is awesome) it drew the “front face” of the bag down under to the “bottom” of the bag so my pattern is now a little off-centered. Not a problem if there is no focused “centerpiece fabric or image” on the front piece! Also, the lining ended up being poofy inside and the corners didn’t complement the trimmed corners of the outside bag so for the remaining 7 I’ll simply re-create your trimmed edge (1.25″ off the corners) on the lining before turning inside out and it should be a little more tailored to the outside of the bag.
I am so, so pleased at my first completed bag and it will be difficult to part with the remaining! I am glad that I made a point to make one for myself! Thanks again.
Ok, I need help! When I top-stitch next to the fabric, my lines are all crooked, even with the zipper foot on! What am I doing wrong? How do you get yours so perfect?
Love this so much… how ’bout putting the patchwork strip on one side/ more on one side? mine turned out TERRIBLE but I love this
*page bookmarked*
Hello, what type of cotton quilt batting do you use?
I use Warm & White (it’s a low-loft cotton batting). 🙂
Hello! Love the tutorial, thank you so much for it! It is my next project to complete!
I noticed that in your final product picture at the top, you added something to the zipper slider (I think your slider was the really small lockable type right?), can you share with me what was the addition?
Thanks! 🙂
Thanks so much. I love such clear directions.