
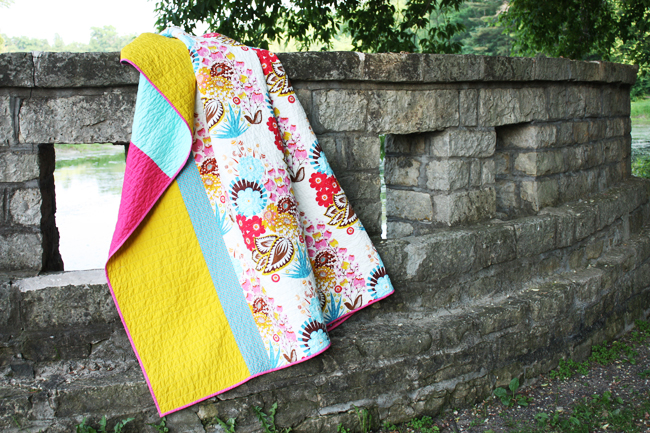
Okay, I had a few requests for more information on my quilt that I made for my own bed. It’s a pretty awesome use of fabric – there’s virtually no remaining scraps and you’ve got yourself a queen sized quilt when you’re finished. It’s actually just a few inches shy of a standard size queen quilt (which is 86″ x 93″), but I just layer my quilt on top of our existing duvet, so for me it doesn’t have to be exact.
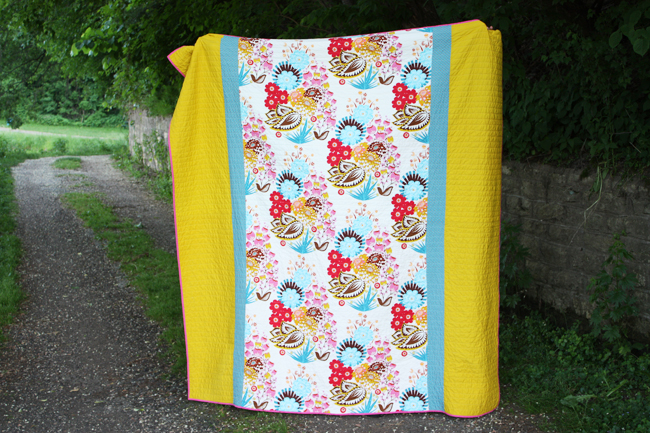

The quilt measures 85″ wide by 87″ tall. You’ll need the following cuts of fabric to make the quilt top:
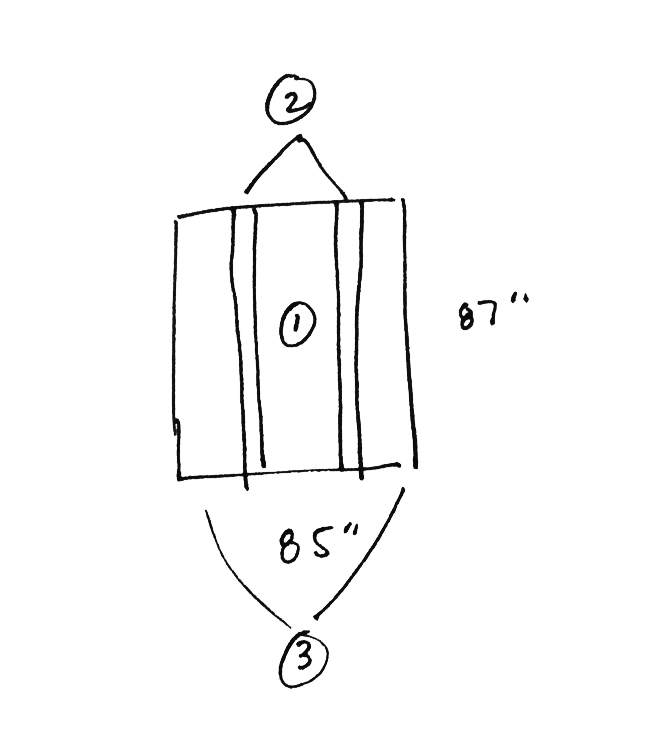
2.5 yard cut for center panel – labeled #1
1/2 yard cut for small borders (blue fabric in my quilt) – labeled #2
2 yards for large outside border (yellow fabric in my quilt) – labeled #3
Cutting:
- For the center panel simply trim off the selvage edges.
- Cut 4 small border print pieces 4.5″ wide by width of fabric (about 44″), depending how your fabric shop cuts fabric, you may or may not have enough, so either adjust it to 4″ wide or get 5/8 yard
- Cut 4 large outside border cut 18″ wide by width of fabric
I should note that you probably won’t want to use fabric that has a directional print (that is a specific upward facing pattern) for the borders just because of the way they’re cut (your print would be facing sideways if you did).
 Sew border strips together using 1/4″ seam, then sew the borders to the center panel. That’s all! And sorry if this is insulting to all the fabulous quilters out there. I just hope this might encourage those who wanted to give a large quilt a try!
Here’s a little roundup of some great quilting tutorials*, and mostly how I learned what I know about quilting:
- Crazy Mom Quilts – Binding Tutorial
- Red Pepper Quilts – Machine Binding Tutorial
- Oh, Fransson! – Making a Quilt Sandwich Tutorial
- Tallgrass Prairie Studio – Straight Line Quilting Hints and Tips
*oh, and definitely feel free to share any other quilting tutorials/tips in the comments.
Can I add my favorite, favorite binding tutorial? This is the BEST way (I have ever seen) to join up your binding at the end of the machine-binding step: http://heatherbailey.typepad.com/photos/continuous_quiltbinding/index.html
LOVE IT. Had to share it.
Anna this is so great! I actually JUST linked to your quilt today on a round-up of great ways to use large prints like that summer totem. It’s not on my blog, it’s for local the fabric store I work in:
http://www.sewnstudio.com/blog/
that’s my kind of quilt! love it! 🙂
Oh how funny, I was just thinking about you and your quilt tonight while I was machine quilting my BABY sized quilt :). Thanks for the links!
Did I tell you how much I love this quilt? Not the design or the fabrics (of course I like them too) but the fact that you did a very ‘for you’ quilt that you love. And it *is* gorgeous in it’s simplicity
Perfection!
It sounds like for the small border we would need more than a half yard, because 4 – 5″ by WOF pieces is 20 inches, not 18.
Thanks for the tutorial, I really like your quilt. Maybe someday when I find that perfect “cant cut it up small!” print I’ll make one of these too!
The perfect use of that big patterned floral ~ and the simplicity is stunning.
thanks for sharing it.
I have a HUGE crush on this quilt. HUGE.
Oh my gosh! I LOVE LOOOOOVE your quilt! Thanks for the links as well!
Absolutely GORGEOUS!! Pinning this on my to do list!
so wonderfuly simple, makes me want to make a new quilt for my bed! =o)
Thank you for breaking it down!! I might tweak the measurements to do a pair of twin quilts for my daughters, since the idea of very little cutting and piecing really appeals to me. I can only hope to make them as fun as the one on your bed!
Thanks so much for sharing!
I’ve bookmarked and have some ideas 🙂 I’m thinking of saving this for some big print fabric I’ve been hoarding.
Also thanks so much for the straight line quilting link, it’s awesome!
I love seeing your quilt again! It really is so gorgeous!
Just a quick note to let you know that a link to this post will be placed on CraftCrave today [26 Jun 01:00am GMT]. Thanks, Maria
it’s really lovely, Anna and I love how you used the large floral fabric in the center! nice job!
I’ve been meaning to comment on this now for awhile. What an absolutely beautiful quilt. You are SO great picking fabrics. I’ve never been much of a quilt person, but YOU have totally turned me on to them because of the amazing ones you have made…including Grant’s quilt that goes with his crib set, of course!!!
And your mom said it’s even more beautiful in person…I believe it!
I just love such colourful patchworks but I don’t have the patience to make them myself.
Stop! Now I want to start another quilt…and I already have three on the go!
Thanks for the helpful links too…
Are you kidding me? That is gorgeous! Love the colors you chosen, love the design. And there’s not a ton of piecing, so I think I could do that. Question: Did you machine quilt? Honstly, you’ve inspired me! 🙂
It’s beautiful. I like the simplicity and modern lines. I think I’ll get similar ones made for the girls’ bedroom. x
It’s perfect for beginning quilters, and a great way to use a favorite fabric that you can’t bear to chop up into tiny pieces. For me, that’s the hardest part about choosing a quilt design – I buy gorgeous fabrics first but then hate the idea of only being able to see a small swatch in the finished product. Thanks for the inspiration!
SO pretty!! I love it Anna! Maybe one day…What did you use for the back? I’m thinking of making a picnic blanket/quilt using a queen size flat sheet for the backing…
Love this post! I have been thinking about attempting a quilt for my daughters bedroom. This would certainly be easy for a first project. I will have to start looking around for the perfect center fabric…
JamieS@ Scattered Thoughts of a Crafty Mom
this quilt is absolute perfection!
Thanks so much for the tutorial! It was my inspiration for the new quilt on my bed!
http://prettyladydesigns.blogspot.com/2011/10/finished-quilt.html
I ended up just doing one side panel on each side of the center panel (just wider), and it ended up looking great! Thanks for making the quilting process less intimidating. :o)
I love this quilt! This is probably a dumb question, but I’m definitely a beginner! How do you get all those lines across the front, and that cool looking texture? I have never made a quilt, but would love to try this one. Thanks!
Hi Shawna M.! The lines across the front are the quilting lines, for sure check out Tallgrass Prairie Studio’s straight line quilting tutorial that I have linked to in the post. The texture comes from washing, once you throw it in the wash and dry it, the quilt becomes nice and crinkly! 🙂
Oh, I LOVE this! I could easily combine this idea with a “His and Hers” quilt pattern I just saw (blue on his side, PINK on hers), and make a king-size quilt for my bed! Love it!
Thank you for showing this quilt. I was wanting to make a simple one for a friend for her birthday, I sat here and made it in 2 hours with just a few interuption lol again thanks
Where do you usually by your fabric from?
Fantastic. Your ability as a seamstress and to convey your knowledge is fantastic. Your ability to teach in the simplest of methods is so important to me as one of your readers! I manage to get really bogged down when the information is posted in a complicated manner – to the point I will not even try something! This is a winner! Plus, I absolutely love the duffle bags! I see a future in making these also. Thank you so much for these postings!
I have been trying to think of something to make my very young 76 year old cousin for his birthday and this is it! I have also been wanting to make a duvet cover for my bed and I love this style. Thank you!
I’ve been thinking about making a quilt like this out of a tulip fabric I have. Thanks for the push.
Could someone clarify what measurement she’s using for cutting the strips for the borders? Thank you ^^;;
I’m new at this, I understand the top part. How do you finish the edges off.
The binding is how you finish off a quilt (traditionally). There are many great tutorials online, a great one by my friend is here: http://crazymomquilts.blogspot.com/2008/10/binding-tutorial.html
🙂
Thank you! We ended up with two full-size beds in a bedroom (long story) and I wanted covers that matched, but hadn’t made up my mind. I’m going shopping with my SiL this Saturday and now I can look for just the right center piece and matching colors!
This is great. Was wondering how to get a new bedspread for our queen-sized bed. I will hold onto this for future reference. Thanks!
I made this top a year or so ago and love it! I used yardage to make it. Easiest quilt I’ve ever made..lol It’s so pretty.
So nice of you to provide this nice tutorial for those, like me, who have always wanted to make a quilt, but were afraid to try. I definitely want to give this my best shot.
I wonder if I could do this with the quilt as you go type of quilt. I am a beginner and don’t want to send my quilt out to be quilted. Tia
Just got 2 single beds for my spare room and was wondering what to make for bed covers. Now I can use this great idea of yours and adjust the measurements to fit the beds. Thanks for sharing.