
I’ve really been finding great style inspiration with some pretty classic vintage pieces. I’ve fallen in love with danish modern furniture and all the great vintage housewares out there. My yellow skirt was inspired by vintage Cathrineholm enamelware:


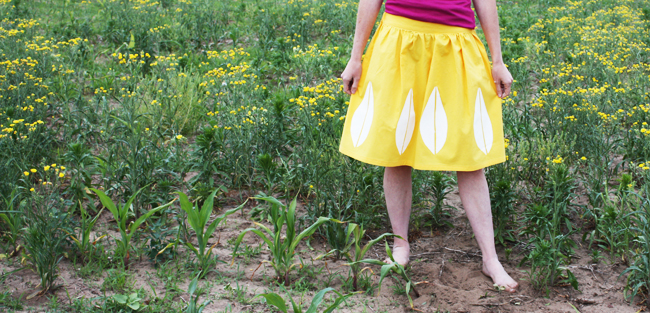

And of course this skirt would be just as beautiful with any printed fabric you like as well.
Materials:

1 1/2 yards main fabric (I used Kona cotton)
1″ or 1/2″ elastic
small piece of fusible interfacing
if side pockets are desired, you’ll need about a fat quarter
thread, etc.
paint and freezer paper for freezer paper stencil
Take your waist measurement:
Measure where on your waist you’d like your skirt to sit. Be sure to measure next to your skin, not over top of clothing. That measurement will be W in our equation. [in brackets are the measurements I used]
Skirt pieces, cut two:
W + 1″ seam allowance by whatever length you’d like. I found 21 inches worked well for me, adjust as necessary depending on your desired skirt length. [33″ wide by 21″ tall]
For the front flat band piece, cut one:
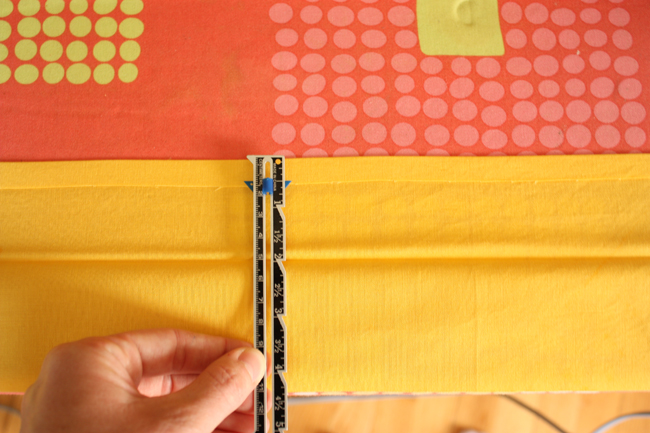
1/2 W + 1″ seam allowance = width of band by 5″ tall [17″ wide by 5″ tall]
Back band piece, cut 1:
Same width as skirt piece by 5″ tall [33″ wide by 5″ tall]
Cut elastic:
one piece of 1″ elastic: 1/2 W minus 2-3″
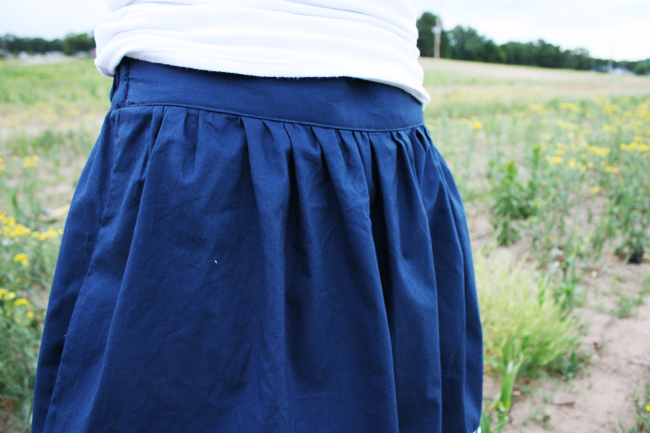
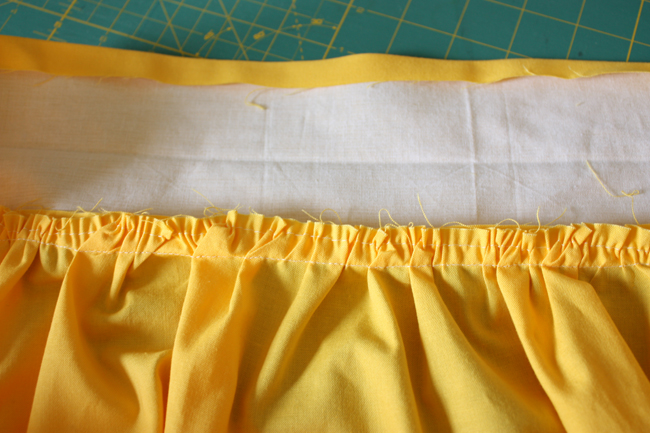
Make waist band:
Fuse interfacing to WRONG side of front band piece.
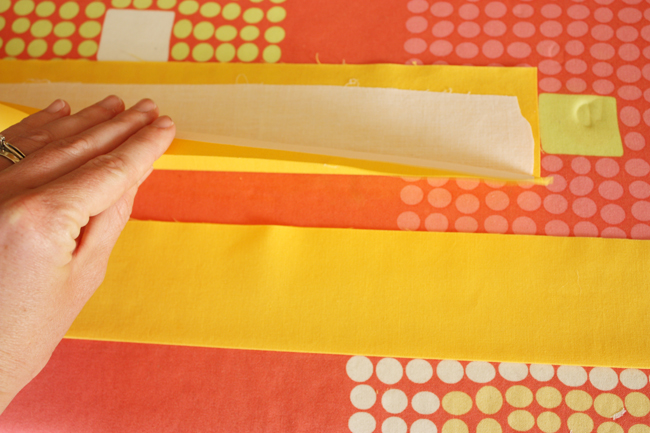
Iron both front and back band pieces in half lengthwise WRONG sides facing.
Unfold and iron one raw edge lengthwise WRONG sides facing by 1/2″. Repeat for remaining piece.
Sew short ends together using a 1/2″ seam allowance, RIGHT sides facing. Press.

After this step you’ll have a loop for the waistband. Set aside.
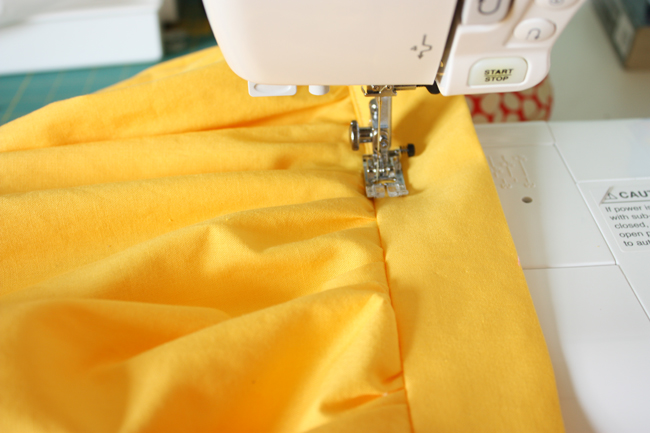
Sew skirt pieces:
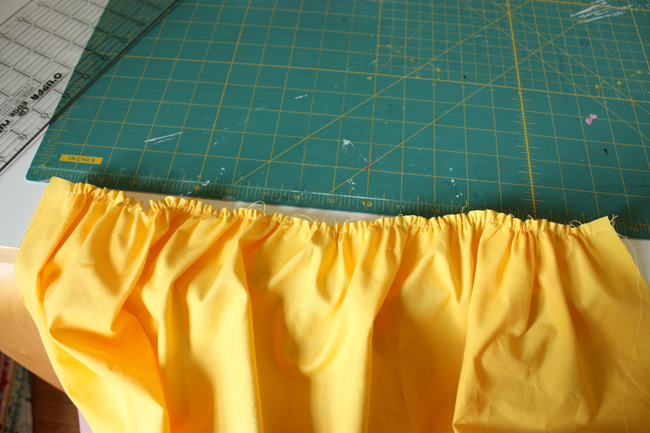
Gather one of the skirt pieces at the top using the longest stitch length on your machine, gather so it is the same length as your front band piece, in my case, 17″. This will be the front of your skirt.
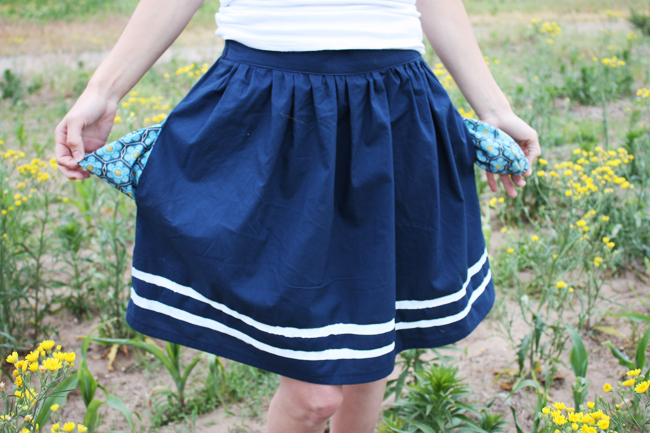
If sewing side pockets, cut 4 pocket pieces, it’s a pretty basic shape. You can quickly make your own by laying your hand down on a piece of paper and tracing around the general shape, giving plenty of wiggle room. About 2-3″ down from the top of the skirt piece pin pocket pieces on either side of both skirt pieces RIGHT sides facing. Sew pocket piece on, aligning raw edges, using a 1/2″ seam allowance.
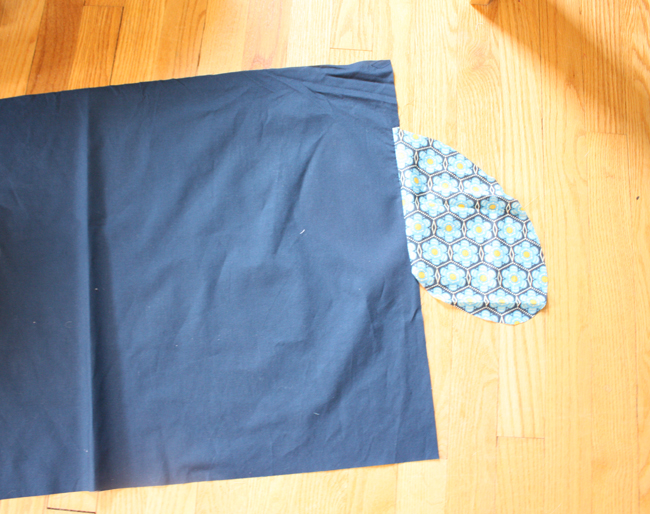
Press away from skirt piece. Repeat for all pocket pieces.
Sew skirt:
If you’re omitting the side pockets, put skirt pieces RIGHT sides together and sew along each side using a 1/2″ seam allowance.
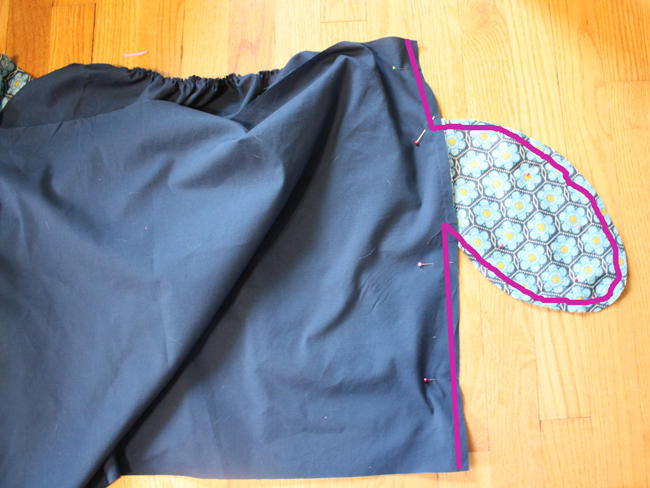
If using side pockets, sew using a 1/2 seam allowance as well, but sewing down the side, pivoting at the pocket, sew all around pocket, pivot and continue by finishing sewing down the remaining part of the skirt. Serge, zig zag or leave side seams raw.
Attaching band:
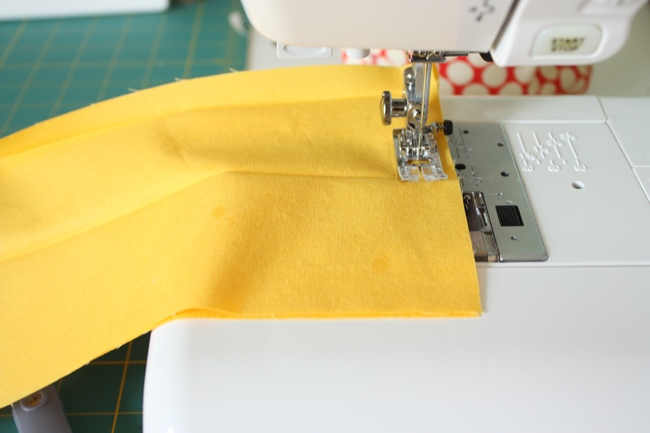
Pin band (which is now a loop) to skirt top RIGHT sides facing aligning raw edges – not the side of that band that you previously ironed under by 1/2″.
Sew together, aligning side seams, using a 5/8″ seam allowance.
Press seam up towards band.
Sew in elastic:
**See alternate method below…
Otherwise you can continue on and sew it in the way I did.
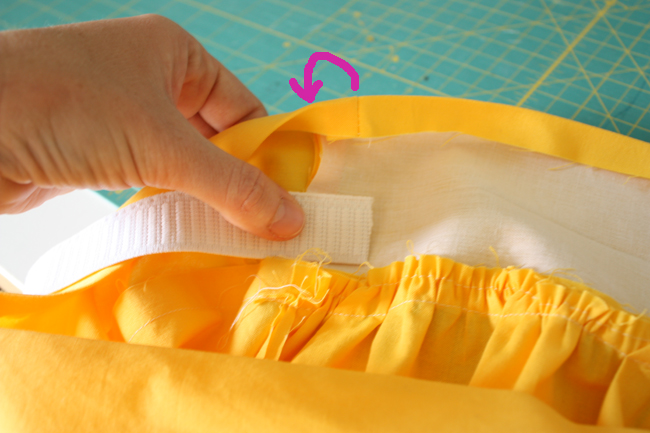
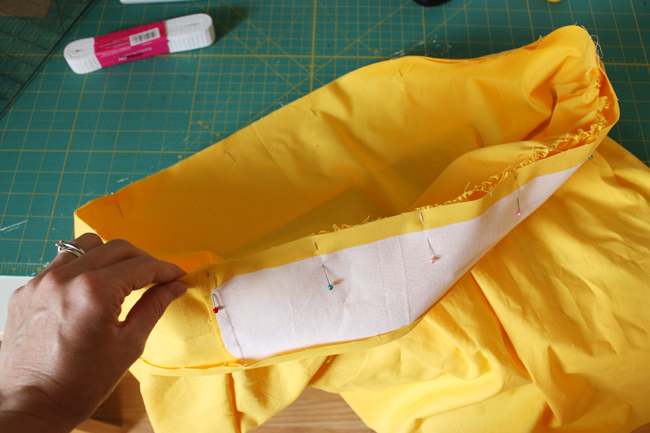
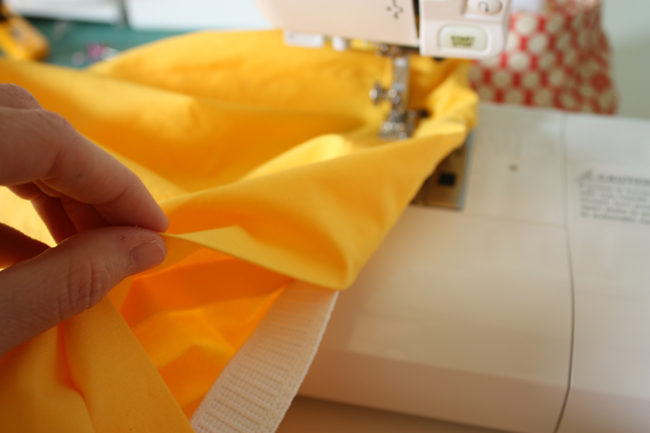
Pin elastic at side seams so that the elastic runs along the back band piece, raw elastic edges pointing towards front band.
Fold waistband WRONG sides facing over elastic.
Sew down seam, making sure you’re using a thread color that will match your fabric since it will show. I back stitched along this seam several times to make sure the elastic would stay put. Repeat for other side of skirt being sure not to twist the elastic.
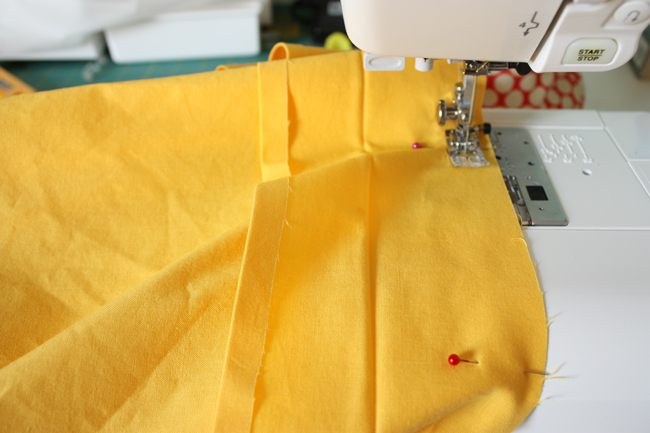
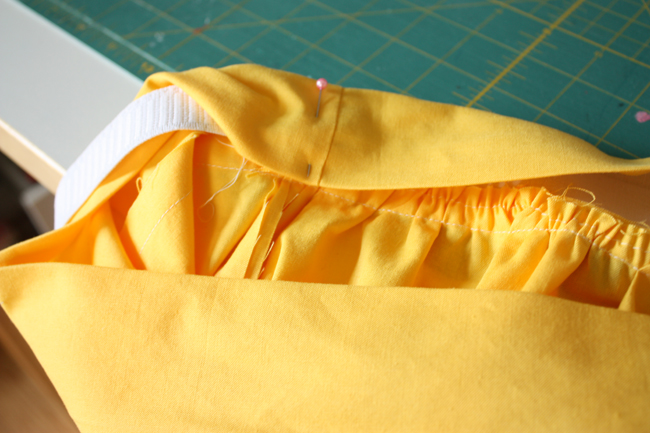
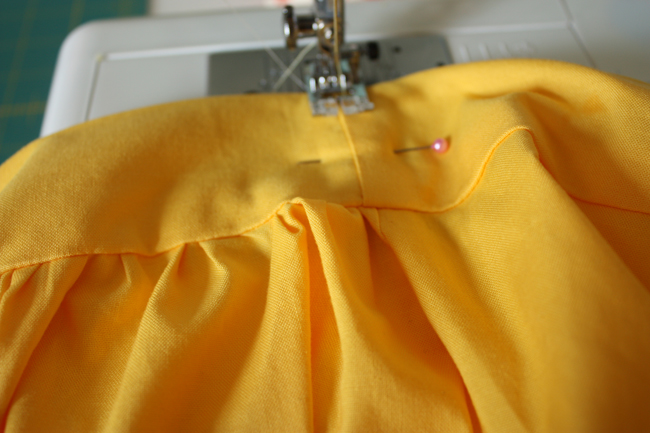
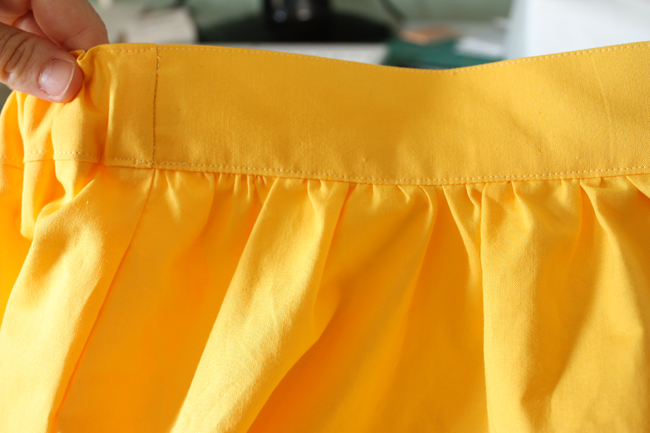
Folding remaining band over so that it covers the raw edges of the skirt etc, topstitch along bottom of both front and back bands.
Making sure you tuck the elastic in towards the band as you go. It can be kind of tedious, but take your time and you can slide the band pieces along the elastic as you get to the other side.
*** There are many ways you can sew in the elastic, that way seemed most logical to me. You could alternately: just sew in one side seam with the elastic – making sure to attach a safety pin to the other end, then sew the back casing almost closed, leaving a 2-3″ opening. Reach into the casing, pull the elastic the rest of the way through, pinch it in between the remaining side seam, sew it in like you did the first side, then simply sew the opening you left shut (oh and don’t forget to take off the safety pin).
At this point you could also stitch right along the top folded edge of the band, it helps keep the elastic from twisting around in the waistband casing.
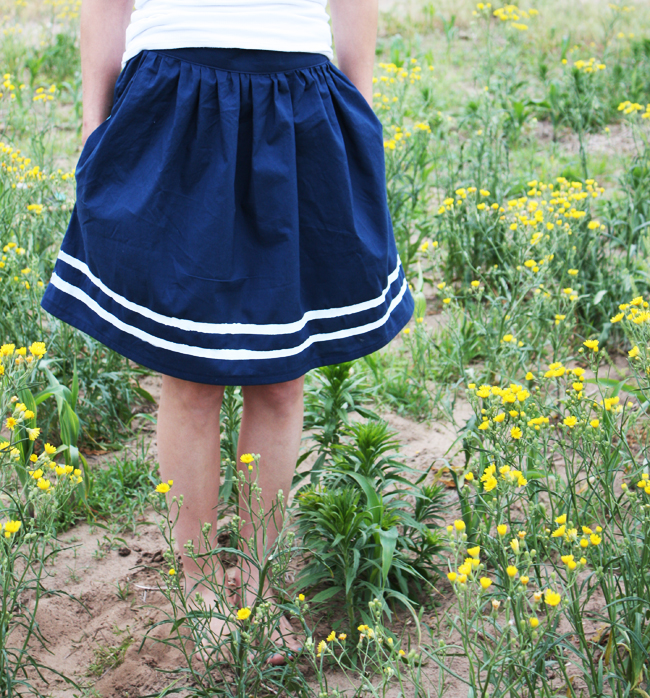
Hem the skirt by ironing over by 1/4 inch and again by 1/2″ and sew.
Try using a freezer paper stencil to make a vintage inspired design. Use your imagination and get creative! I though it would also be really classy to sew ribbon along the hem similar to how I freezer paper stenciled on the blue skirt.
P.S. this tutorial also works for little girls! You just might want to adjust the height of the waistband pieces.
Fantastic tutorial, your skirts are gorgeous.
lily x
Oh, it doesn’t look hard at all… but I bet I would still struggle with it!
Esther.
Great! My fingers are itching… Can’t wait to make one!
I love this skir – perfect for summer. And I love the scandinavian enamelware too! Thanks for the tutorial!
That is so cool! You are a genius!
i adore pockets, they really help me through the day 😉 these are cute!
I love your turorial..
I love a skirt with pockets! This is bookmarked and on my to do list. Thanks!!
Leila x
Just made this skirt, Anna! It was a breeze to put together (well, except when I went to cut the front waistband piece and accidentally cut INTO one of my skirt panels!!!) EEEK! So, I ended up putting another contrasting fabric on the bottom edge of the skirt- and I love it! Sometimes mistakes pay off… Will send you a picture later! 🙂 p.s. you’re awesome.
LOVE this! Thanks for the tutorial.I need to make a bunch of these for me and my girls!
And thank you so much for the shout out on the diaper clutch. I love simple sewing!
Yeah, I made one earlier this week. Wearing it as I type. I will send you a pic later. Thanks for the tutorial.
Just Another Day in Paradise
Just a quick note to let you know that a link to this post will be placed on CraftCrave today [02 Jul 01:00am GMT]. Thanks, Maria
Love the vintage inspired design!
I LOVE the contrasting fabric pockets, such a simple idea with an awesome effect.
That is SUPER cute! I love the details, they totally make it! Thanks for the how-to, I’ll be linking.
Love it!! xx I wanna make one.. so glad it ahs pockets. Im sick of picking things up as i walk around the house and sticking them in my bra! haha xx Bec xx
This is great! Thanks 🙂
I love to have pockets. So I love this skirt! Beautiful job Anna.
I love how you are so fearless with sewing clothing, Anna. I’ve recently started collecting some Cathrineholm enamelware and your skirt is so perfect!
anna, i did it! hahaha i altered it a bit to fit my style, but it is such a beautiful skirt! check it out at my blog
http://colacolaisland.blogspot.com/2011/07/gathered-together.html
have a great day everyone! thanks again for the amazing tutorial!
best,
nicole m.
Love your tutorial! Skirts are adorable:) Best regards, Sistu
I made this on Sunday and I am disappointed with how it turned out. It just isn’t flattering at all. Great tutorial with fine instructions and pictures, but the skirt just looked very homemade when done. I will be scraping it but I appreciate the tutorial otherwise.
I’m sorry it didn’t turn out the way you wanted Sew Charitable. You’re right the skirt isn’t going to be perfect for all body types. It might help to make the skirt panels less wide. It would make the skirt a little less full. Just multiply your waist measurement by 1.5 and cut each skirt panel to that width. 🙂
Thanks Anna for the tip. I appreciate it! I will try it out. Your directions and pictures were great though.
I have had this skirt bookmarked for a couple weeks, and finally got around to trying out your tutorial last night. I chose some really ugly fabric I had in my stash that my sister bought me on clearance…. Well, guess what…. Now I love the fabric! Hahaha the tutorial was super easy, and I had no questions or problems (well, only that I made my pockets a little too small– I guess I didn’t give enough wiggle room!). The skirt is a little fuller than I would normally like, but with a wide belt, it’s just adorable! I am going to make it again, with your suggestion of multiplying by 1.5 instead of 2. Thanks for sharing this tute!
I made this today and it looks great! So easy to follow, found you on pinterest.
I think I’ll try 1.5 next time too, but I still love this one, thankyou!
Just found this skirt on SewCanShe and going to give it a go right now!
Made it! Changed it a bit but this was the basic idea, thanks love it! https://www.facebook.com/photo.php?fbid=245020825612826&set=a.175114255936817.36755.117181831730060&type=1&theater
parabéns e muito obrigado
http://becaeyel.blogspot.com.br/
Such a great color for this skirt! Thanks for the tutorial – you make it look fun and enjoyable! And pockets are just FUN to have!
Jenny
http://seaminglysmitten.com/
http://www.seaminglysmitten.blogspot.com
Thanks for this great tutorial. I bookemarked the tutorial page las week and I finally finished my skirt. I love it. I am so proud of myself right now. Can wait to weare it tomorow. Thanks for your time of posting all your great tutoriasl. Noemi, NC
i feel to be proud after read your article and rx Actually its a need of human and Developing is must for us in successful life.
Love it!! xx I wanna make one.. so glad it ahs pockets. Im sick of picking things up as i walk around the house and sticking them in my bra! Buy Secnidazole Thankyou!
Lovable and informative one. I appreciate your work for such excellent blogging.
How can i get pregnant
Thank you for help in sewing. Your explanation is great and on this basis I have just sew similar one skirt. 🙂
Hello there,
Love the photography. Love the fabric of the yellow/white skirt. 😉
Cheers,
Lyric
http://www.sewcroandquilt.wordpress.com
This is such a great tutorial! It can be easily modified for a lining, and I love the casing for the elastic! Looks more professional 🙂 They say your first garment to sew should be a skirt 😉
I have a question after reading some of the comments. It’s mentioned by you to multiply the waist measurement by 1.5″ instead of 2 (which I only see in the comments, not the instructions 🙁 ). My waist is 34″ x 1.5 = 51. Is this the width measurement to cut of both pieces of skirt panels? I’m confused here because wouldn’t that make the skirt huge?
If one piece is cut to the waist measurement, while the other one is gathered later, wouldn’t that not fit? I’m just confuzzled on the construction of the front/back of the skirt.
Should the width measurement of the pieces be 34 / 2 then + 1 (seam allowance) = 18 W (in order to cut two pieces)?
Sorry for the confusion!
Thanks for the comment. The measurements are your exact waist measurement (by cutting two you’re automatically multiplying your waist by 2). So you should cut two pieces 34″ + 1″ SA (that’s 35″ by whatever length you’d like your skirt).
Hope that helps. 🙂
Thank you so much for the quick reply! I’m gonna give it a go ;D