
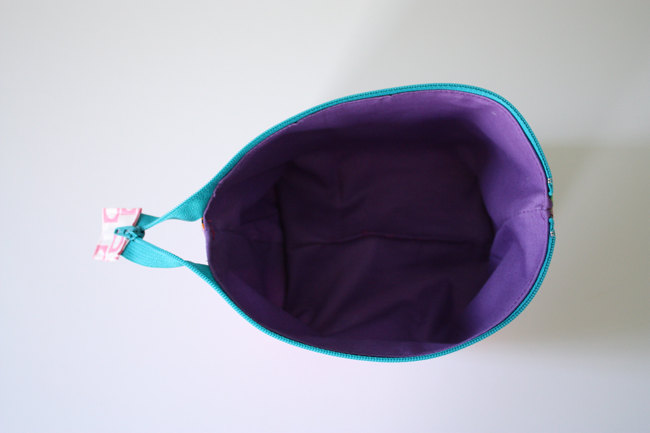
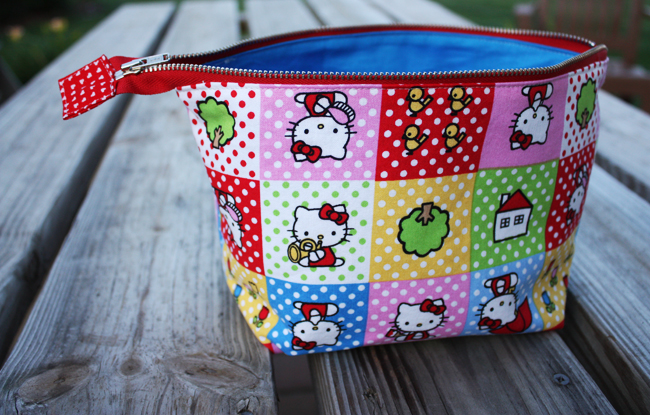
Doesn’t it ever get annoying digging through a zippered pouch? I love being able to see what’s inside and what I’m searching for. I spotted this little pouch the other day and had to make something similar.

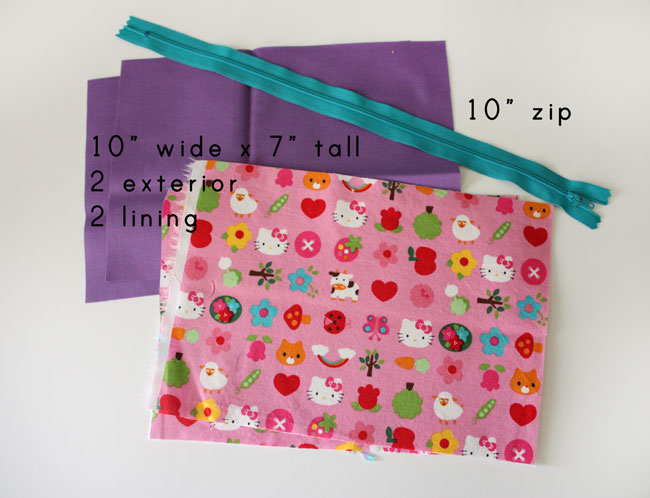
Materials:
- fabric, 1/4 yard would be plenty
- zipper, at least 10″ long or longer
- thread
- interfacing of your choice, I used Pellon 101SF, or skip it all together
- scrap for zipper end pull (leather pull available here, waxed cord pull available here)
Directions:
(1/2″ seam allowance, unless otherwise noted)
(Optional) Fuse on or baste on interfacing of your choice to main exterior pieces.
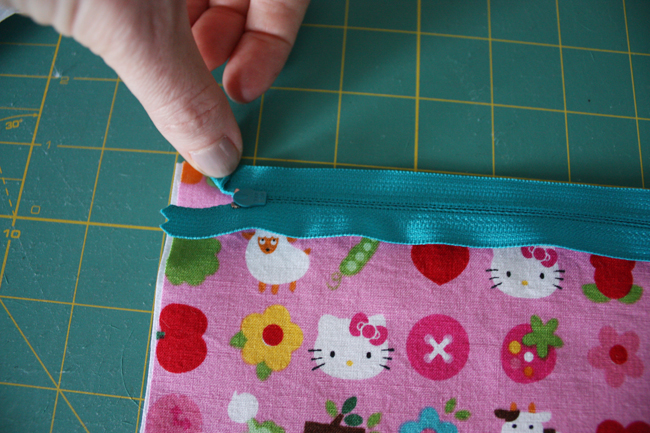
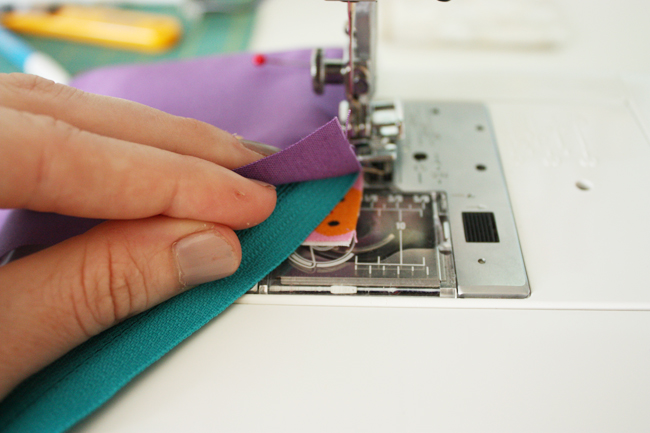
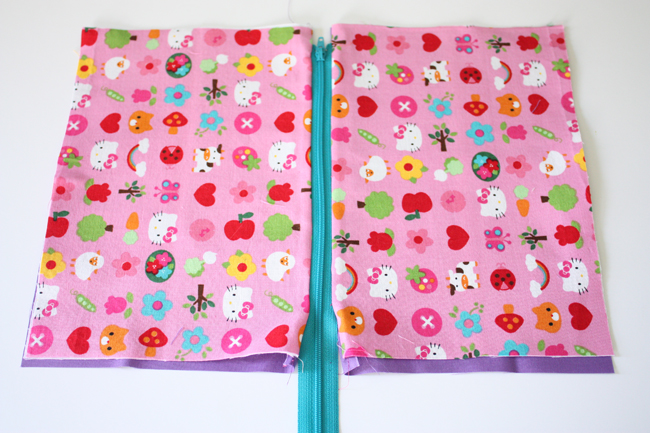
Lay one exterior piece right side up, lay zipper (teeth side down) on top with the zipper pull at the left – aligning zipper tape edge to the raw edges of the top of the exterior piece. Tuck in pull side zipper end, just bend it 90 degrees. You may choose to sew it down, or just pin it in place like I did. Make sure the metal bit of the zipper is just about 3/4″ away from the left edge. Layer lining piece on top, right side down on top of zipper. Pin and baste, you can skip this part, but basting really does help things from slipping around too much.
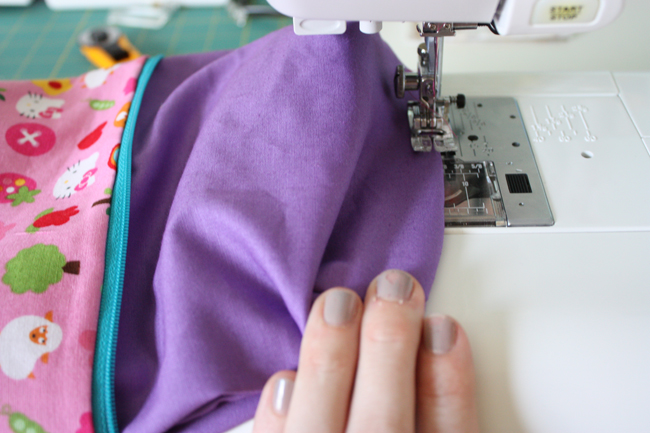
Use your zipper foot and a 1/4″ seam allowance. Sew over basting stitches, but not all the way to the end.
At about 1″ before the edge of the fabric, stop, backstitch, and then pull the zipper away from the seam, bending it down out of the way, in towards the fabrics. The whole point is to pull it out of the way so it doesn’t get caught in the seam. Continue stitching along the fabrics until the edge.

Flip so that the fabrics are wrong sides facing and press.
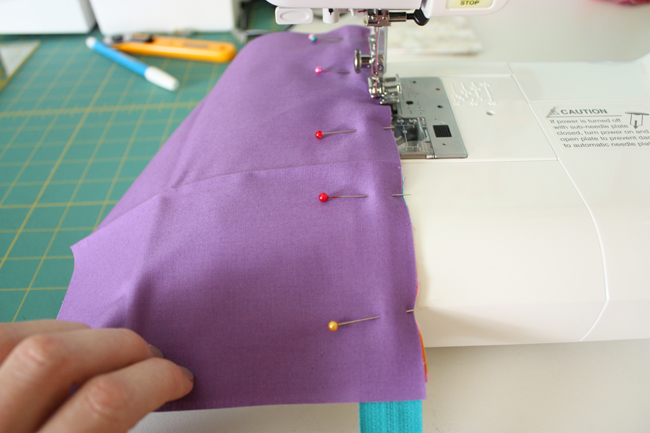
Lay the remaining exterior piece right side up, lay zipper (with fabrics attached) on top – teeth side down with the zipper pull at the right. Tuck in pull side zipper end, just bend it 90 degrees, just like before, making sure the metal bit of the zipper is just over 3/4″ away from the right edge this time. Lay lining piece right side down on top. Pin and baste. Using the zipper foot and a 1/4″ seam allowance sew over basting stitches, but not all the way to the end just like before.
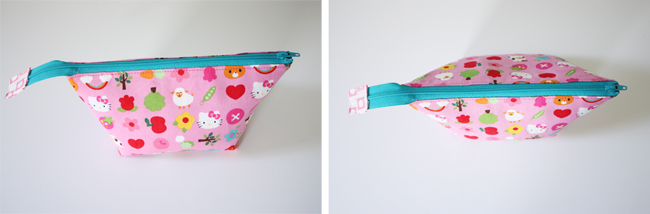
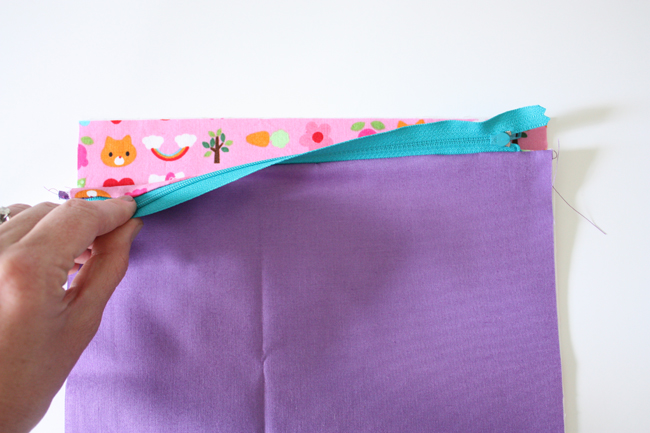
Again, about 1″ before the edge of the fabric, stop, backstitch, and then pull the zipper away from the seam, bending it down, in towards the fabrics. Continue stitching along the fabrics until the edge. Flip so that the fabrics are wrong sides facing and press. Do NOT topstitch along either side of the zipper at this point, we’ll be doing that in another step towards the end. This is what you’ve got so far:
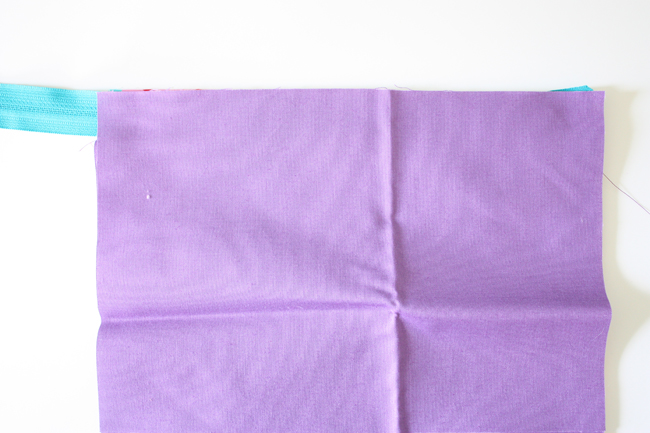
Next. flip so that the exterior fabrics are right sides together and the lining pieces are right sides together (with the zipper hidden in the middle).
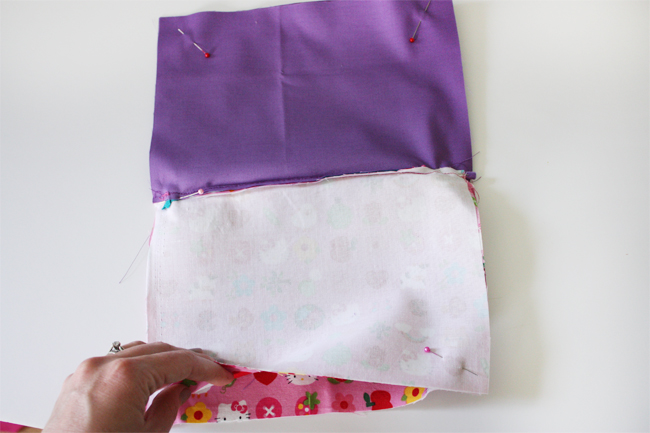
Open the zipper at least half way at this point!
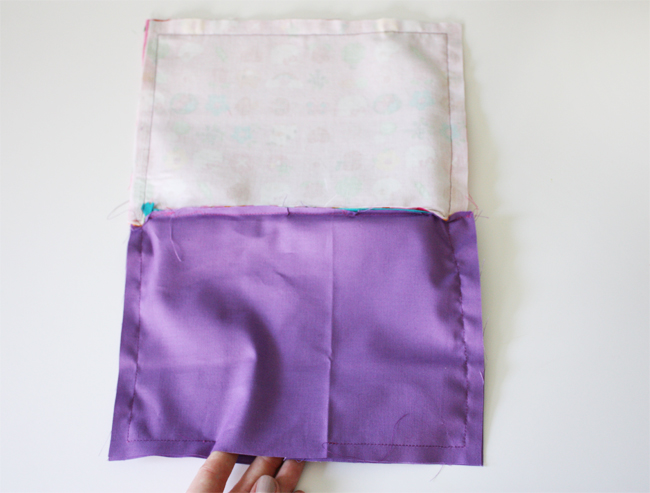
Pin and sew around all edges leaving approximately a 4″ opening in the bottom (or side) of the lining. You’ll be using a 1/2″ seam allowance. Be sure to get close to the metal zipper ends on one side, and bending the zipper end down into the pouch on the other side making sure it doesn’t get caught in the seam.
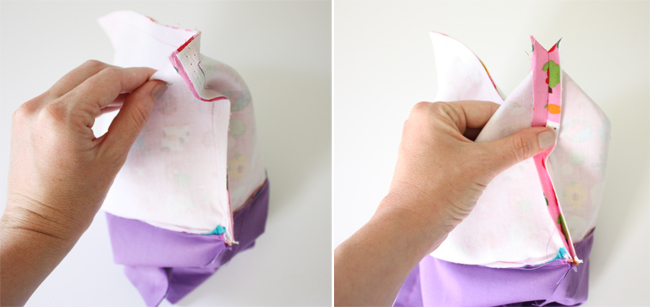

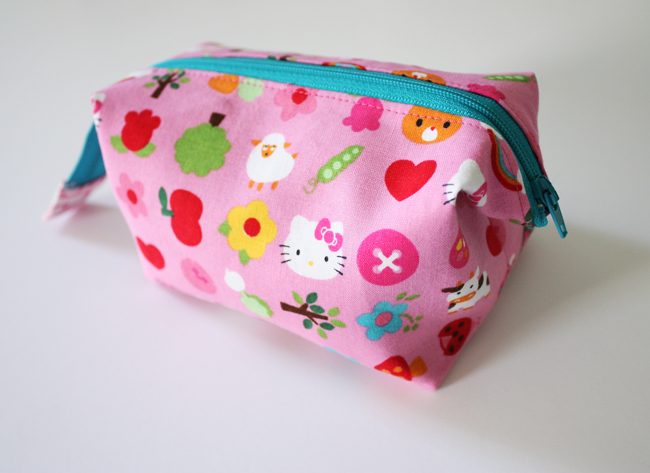
Box the corners by pinching each corner together and aligning each corresponding side/bottom seam, one corner at a time. Use a ruler and water soluble marker to mark a line perpendicular to the side seam 3.5″ long.

Sew along that line, trim the seam allowance. Do this for all four corners (two exterior, two lining).
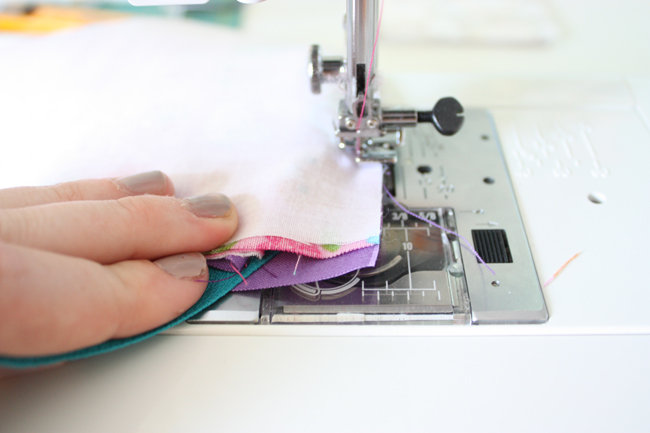
Pull pouch right side out through the opening you left in the lining. Tuck in raw edges of opening. Sew opening in lining closed using a small seam allowance by machine (sewing close to the fold as in the above picture) or hand stitch the opening closed. Push lining into exterior. Press around entire opening and carefully along the zipper.


Topstitch using a slightly longer stitch length (and taking your time) around the entire opening of the pouch.
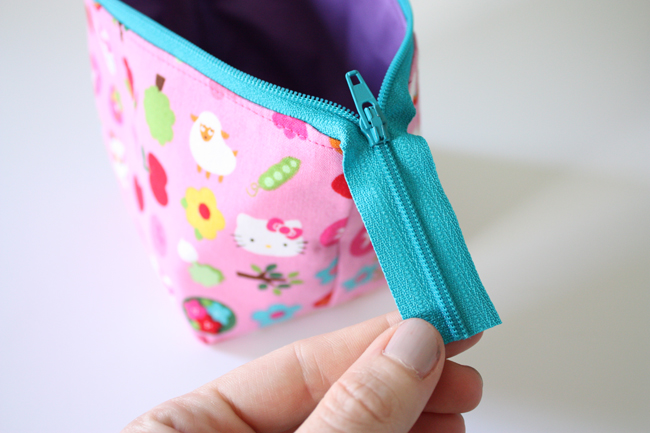
Trim the zipper tail so that you have about 1″ of space past the pouch’s side (be careful not to accidentally slide the zipper pull off the zipper!).
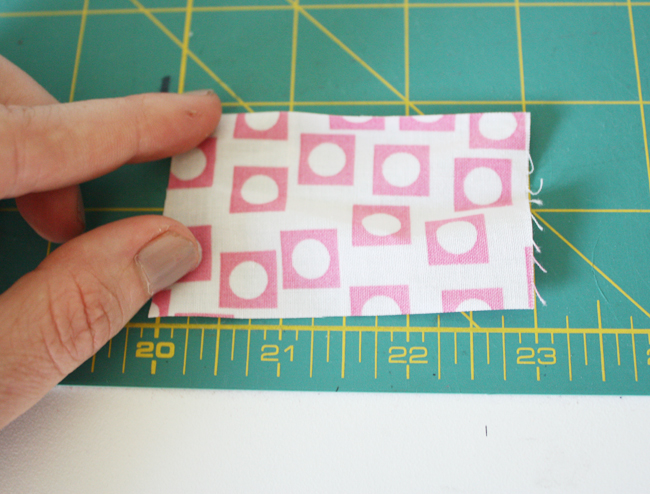
For making the zipper pull tab, take a 2″x3″ piece of fabric.

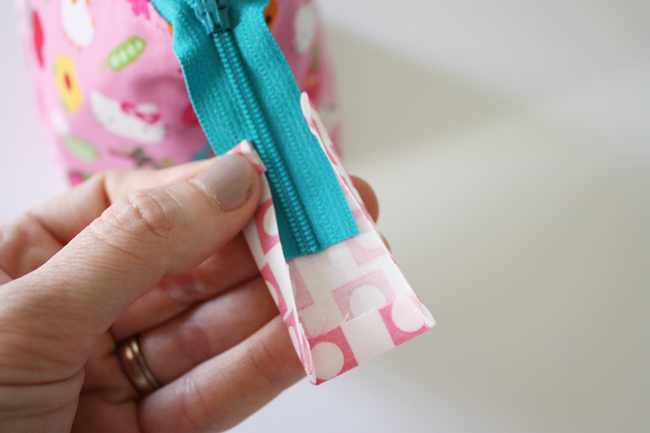
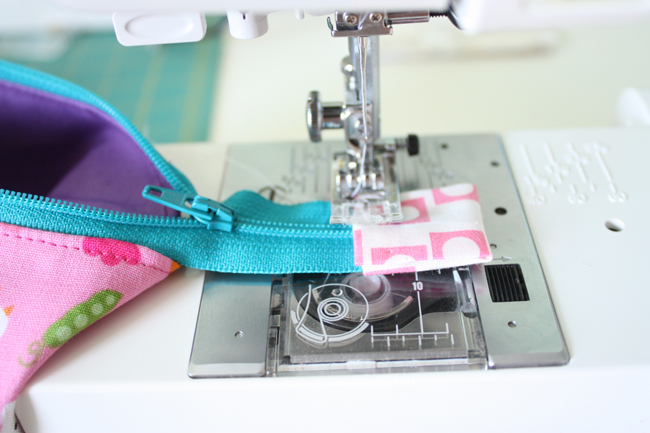
Press all edges in by 1/2″, slip over zipper end.
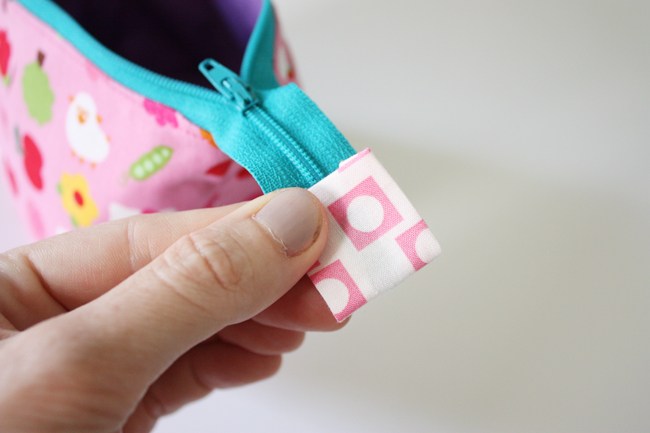
Fold in half, sew around all four edges of the tab.
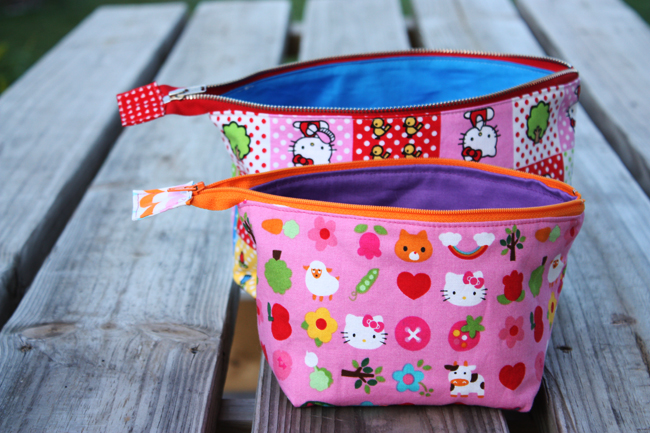
That’s it! Enjoy your super functional pouch and have fun being able to find the things you need easily!!!
Ta-da!
As always Anna – these are lovely. The tutorial is fantastic, and I look forward to putting it to good use in the future. Thank you!
What an amazing tutorial! Thank you for sharing this.
Your tutorials are always so clear and concise! Thanks for sharing 🙂
sweet! thanks for the tutorial!
Super cute!!!!! I love how big the opening at the top is!!!
These are so cute! Love the bright fabrics you used. Aren’t zippers fun?
Zippers are AWESOME, they are my favorite thing right now!
very smart idea! And you make it look easy.
Thanks so much for this tutorial!
so great! and that hello kitty fabric…adorable! thanks for this!!
Sweet! Great tute Anna, they are on my to do list!!
This is a great tutorial. I love the little tab of fabric you use to finish off the zipper. I will have to try this the next time I make a zippered pouch. It looks so neat and well…finished, if that makes sense.
Anna
These are goig on my ever increasing “to do” list for the week.
where did you get such cute fabrics???
thanks for sharing such a great tute.
have a fabulous week.
Julie
I love this Anna! I will definitely give this a go! I like how the interfacing helps it stand up well too.
Oh my, I love finding fun new zipper bag ideas, and this one is COOL (so are your fabrics – YUMM!) 🙂 Thanks for the tute – I want to try this! I especially like that there are no raw edges – not every designer makes the extra effort to ensure the inside of their bags is finished properly 😀
Great idea!
Love, love, love!!! will be making one asap!
OOPS ensure the inside of their bags *ARE finished properly, lol.
These are super cute Anna! I love how they look like little whales when you’re looking from the top like in the last pic :).
Love your tutorials, Anna, they’re always so clear. These are so cute!
ooh, love this! I just got a bunch of zippers, I see some pouches in my future. That dotted HK is adorable!
awesome! I’m loving the HK dots too. Where did you find it?
I just found your blog through pinterest, and I’m so excited! Love your tutorials and your adorable pouches and bags.
Yep! Super Awesome!! 🙂
Yep! Super Awesome!! 🙂
thank you for taking the time to put a tutorial together for this adorable pouch! I have really cute fabric for this, just need to go get some zippers!
Quick THANK YOU! Now I need to go collect my supplies so I can go make this!! Adorable and brilliant <3
Thank you thank you thank you! Used this to put in the diaper bag to keep all the little toy cars and things in one easily accessible place instead of all over the bag. Keep writing!
http://www.Greatproofreading.com
Professional, Affordable, Impeccable Blog Proofreading – When your blog has too many readers to pretend it’s okay because no one is going to see it.
I really like that you left the zipper end out of the lining, it is roomier and faster to use like this. Good idea and so nicely made!
great idea~! can’t wait to try it out!
Anna you amaze me every single time I stop by! Thanks for sharing this cool pouch. Can’t wait to have a minute to myself to make one (or five!)
Kim
Great tutorial, thank you so much for taking the time to put it together! Can’t wait to make a few of these when I get a chance.
Great! I’m gonna try this, thank you!
You smart girl you! Can’t wait to make a ton of these.
Just the tutorial I needed 🙂 Thanks for sharing.
I’m going to make one tomorrow.
Do you happen to know where I can find that Hello Kitty fabric online. I’m in love it.
Thanks!
Very cool, thanks for the tute!
Super cute!! I have got to make time to learn to sew a zipper.
Love this. Where did you get your HK fabric?
Such a cute little pouch. Thanks for sharing!!! I’m pinning this one…
This would be such a great way of making book bags for school, so you can open up the bag wide to get big books in – and how cute are they when they’re small! No wonder you made a bunch 🙂
These are adorable, Anna! Hooray for more zippers, and the Hello Kitty fabric is darling.
thanks! I love the wide opening!
I just discovered your blog and it’s amazing. You should write a book!
thanks for sharing your talent with us!
Stefanie
gracias ¡¡¡¡
Oh gosh…. so pretty! Thank you, girl!
Awesome! This makes all my junk so much easier to get to!
so cute! you never really outgrow hello kitty.
These are adorable, Anna! Thanks for sharing your tutorial! I’ll be making a few of these!:)
What a super cute pouch! I need to make one of these!
Thank you so much, 4 out of 6 teacher presents sorted!
Ah, this is perfect! I’ve been wanting to make a nice travel zip bag for small toiletries, and this could be perfect. (Also love your nail polish!)
Gotta try this. Love that fabric and love your tutorials!!
Anna, I love the new Hello Kitty Pouch. It’s super cute as always you out did yourself again…………………
And my sewing to-do list just got a little longer 🙂 Thanks for a great tutorial!
Thank you! On my need to make list :))
Fantasticness!
Amei, trabalho lindo e ótima dica!
Beijo no coração.
Solange Nunes
http://www.solangenunes.k6.com.br
Sewing scares me, but I think my babygirl would love this pouch! Where did you get that fabric?
Great! I think these will be my Christmas gifts to sisters and co-workers. Thanks so much for sharing!
So awesome! Can’t wait to make one! Great tutorial, Anna. 🙂
Fabulous!!! never thought about putting a zipper on this way!!!
GREAT tutorial and I really like the zipper positioning! Thanks for sharing.
Thanks Anna for sharing this wonderful pattern!
Perfect timing—this is just what I need!!! Thanks so much for sharing your fabulous tutorial!
Hi your tutorial came just in time for my sister’s 60th, too too much fun!!!!! Love the way the zip goes in!!!!
Anna this is awesome! You just seriously made my day. I have been sewing since I was a little girl and still am so clueless, but your tutorials are so easy to follow and helpful! I am going to be making some for sure.
super cute pouch!!!
Thanks for another awesome tutorial, Anna! You’ve done soooooo much for sewists all over the world… How awesome is that? I hope the ones that follow your free tutes also buy your wonderful patterns. I carry your 241 tote every single day (in various “incarnations” as my purse, and I love that pattern!!!!! Thanks for being so wonderful!
Super! I have made several pouches but had not thought of leaving the zipper tail long with the tab. Really like this style.
Makes me want to dig for my zipper stash! 😀 These are lovely… and so practical too!
These are so cute. Thanks for the awesome tutorial. Ohhhh I could put handles on either side and it could be a small purse for a little girl. Ohhh I like that idea. I have a birthday coming up for my great neice. Thanks again.
quilting dash lady at comcast dot net
oooh this looks like something i could actually sew!
I DID IT I did it I did it!! And it’s fantastic! Thank you for a most excellent tutorial – I made a bag tonight and it is darn near perfect! I was nervous about the zipper (even though I’ve made dozens of zipper bags) but it was no more difficult than a regular installation 🙂 I can’t wait to try the other sizes 🙂 I blogged about it today if you want to take a peek – I linked to both of your tutorials 😀 THANK YOU!!
THIs sucks it didnt even work the instructions were not helpful 🙁
Well, you could always email me with questions!
Hey,
I made two of the pouches today, it took me about 40 min each. Super tutorial, very helpful and easy to follow – thanks a lot!
Hello!!! From Spain, beautifull!!!! Thanks!!!!
supeeeer!! i really like it!!!
LOVE this tutorial! I’ve already made two (you can see the photos on the post link below) and plan to make many more. Thanks for the great pattern!
http://www.patchworkduck.com/2012/07/finish-it-up-pouches-computer-cases-etc.html
Thank you for this tutorial!! I found this while looking for a completely different bag, but decided to make this style anyway. I LOVED it! Super easy. Just finished making two to gift to a friend, and I’ll be making plenty more. 😀
Love your blog and your fantastic bag and pouch tutorials! Just made a couple of these – thank you 🙂
blogged at thirtynineblog.com
oops got my own blog address wrong!!
http://thirtynineblog.blogspot.com
This is the greatest tutorial! I just made one for a gift and I want to keep it for myself 🙂 guess I will me making another one or ten !,
Thank you for this tutorial! I want to make one to use as a project bag for my sock knitting. I also bought some Hello! Kitty fabric at Fabric.com. I was looking for Flea Market Fancy, and needed a little somethin’-somethin’ to get the free shipping.
Thank! Desde Argentina!!!!
Sorry I do not speak English.
Many Thanks. It is very beautiful. I like it so much.
Gracias¡¡
besos.
Just discovered Pinterest…..wherever have I been?? Best of all I found your great tutorial. Can’t wait to try it.
I made this today using your tutorial. It turned out great. Thanks!
Made a small one for a present for a work collegaues daughter but I love it too much to give away!! Awesome tutorial – THANK YOU!!!!
Great tutorial!! I can’t seem to get my zippered corners as neat as yours…
I am a beginner and I made 5 of these (small and medium) bags in the last week as gifts. Your instructions and pictures are excellent. Thank you for taking the time to share this. Now I just need to make one for myself! J
This is the cutest little pouch ever! I made one today in about 20 minutes! Love It!!!
Such a great idea, I am always looking for ways to use up some of my precious scraps. Thank you. Missnuggy
this is a GREAT tutorial…best I have tried yet! I think I am addicted!! I have already given one to almost everyone I know LOL
Thanks for the great tutorial. I made my first bag in the medium size with reproduction 30’s fabric. It turned out very cute and didn’t take long to make. With a 2 year old, I am all about fast projects! I will be making these for Christmas gifts for my family and friends. Thanks again.
Thank you…I’m going to try this!
I’m so happy to see your post. I was trying to work through a similar project in my mind before I came across it and your tutorial helped me to figure out the step I was missing. I love your finished product.
Brilliant! Can you guess what I’m going to be doing today? :O)
Thank you very much.
What a wonderful tutorial!! Thank you!! Thank you!! -Marci @ Stone Cottage Adventures
great tutorial, thanks for sharing 🙂 pics of my attempt here
http://abimakes.blogspot.co.uk/2012/11/my-first-ever-zip.html
I just made one of these (the medium size) last night!!! Thank you SO MUCH for the tutorial. Mine came out PERFECT!!! I was planning for it to be a christmas gift, but think I’ll keep it for myself. One of these will make an awesome snack bag(must be separate from lunch) for my daughter to take to kindergarten. As soon as I get some more zippers I’m making more!!! Thanks for sharing everything that you do. You blog is always really inspirational, your projects are useful and your instructions and tutorials are easy to follow and accurate!
I think this tutorial is going to be my savior this year for xmas gifts. I’m gonna start a big ole assembly line. THANK YOU. Molly
Loved making this! Although (through my own fault) I made mine SUPER easy to see into because I had to widen the all box corners :P. I could see myself coming up with a million uses for these, thanks so much for the easy to follow tutorial!
Great tutorial, thanks for sharing!
Thank you so much for this amazing tutorial! it gave me the confidance I needed to try sewing in a zipper. You made it so easy for me.
I gave you total credit and blogged about it, something this good just has to be shared!
🙂
This is awesome. I just tried it today and learned how to do the zipper and it was so great!!! THANKS!
Hi, Anna! Thank you very much for your tutorial!
This is my version: http://polinakuts.blogspot.ru/2012/12/blog-post.html
I am big fun of your talent, there are two my another copies of your products:
http://polinakuts.blogspot.ru/2012/04/blog-post_4533.html
http://polinakuts.blogspot.ru/2012/02/blog-post_4376.html
Tank you for ideas!
Hi Anna. I have made several of these bags for Christmas presents. The tutorial is really clear to follow and I am delighted with te end result. Many thanks.
Thank you so much for this clear tutorial. I’ll send you a link once I’ve made it and will link to your blog! Lovely fabric by the way! X Jenn
This was a great tutorial – thanks so much for posting it! My first two bags are here: http://www.craftsy.com/project/view/zippered-pouches/79679
Deb
Be sure to get close to the metal zipper ends on one side, and bending the zipper end down into the pouch on the other side making sure it doesn’t get caught in the seam.
I have no idea what this part means, and the pictures are not speaking to me lol. Can you pretty please LMK 🙂 melzie4boyz@aol.com
Hello Anna, happy new year!
Yesterday I made one of your pouches and I’m still smiling :-)!
I’m a beginner and so happy about sewing in my first zipper.
Thank you so much for your wonderfull tutorial.
Greetings from Germany
Ines
This is a wonderful tutorial. Thanks for sharing.
Mingz Eclectic Creations
Have to say thank you for this tutorial. I have made 4 of these now and keep thinking up new reasons to make more. They’ve become my absolute favorite pouch (LOVE how wide it opens up). So a great big huge THANK YOU for sharing your ideas and skills with the wide world!
Just found this tutorial – really great instructions and such a useful bag! I’ve already made three.
Wow, this is a great tutorial – thank you very much!
I am on pouch the third – the first two were gifts to two delighted friends. This one is off to a 7-year-old birthday girl filled with markers, scissors, and candy. What a great design and a super-clear tutorial! Thank you!
Great tutorial! I made myself one in each size. I love them. Thank you!!
http://madeonmaple.blogspot.com/2013/01/open-wide-zippered-pouch.html
Coming soon I’ll be making your Sidekick Tote. Thanks for keeping me busy!! 🙂
Oh this is a great bag and tutorial. I can’t wait to give it a try! Thanks so much for sharing your work.
hi! about to make ur cute bag and was doing a read thru first….question….materials are 10in zip and 10in wide fabric but ur zipper seems to be longer than ur 10in fabric? what am i missing?
Hi Courtney, a few factors come into play, but basically, the width of the pouch changes with the seam allowances, etc. I’m sure once you sew the pouch it’ll make more sense. 🙂
ohh ok I see now. thanks for the reply 🙂
I just made my first one of these. Thanks for the easy step by step instructions.
Thank you for an amazing tutorial. I made my first zippered pouch and it was so easy!
Just made my first OWP! This was also my very first zipper (note to self: must buy zipper foot!). I muddled thru the zipper w/o the right foot but it worked. It was confusing (not the instructions, they were very clear!). My lack of zipper foresight….but after I got that first one made….BAM, it all sunk in! I love it!
Thank you so much for sharing. I plan to try some of your other tutes as well!
Here’s mine! http://www.flickr.com/photos/53865436@N00/8438927911/ made with Nancy Drew fabric outside and laminate inside. My zipper end is morphing. First I left off the tab, then put one on, today I will make the end shorter and put another one on. 🙂 Great tute, thank you very much!
http://www.happydancequilting.wordpress.com
Thank you very much for this tutorial, I made the small pouch this week-end and it went very well with the instructions. I love the result:-)
Best regards from Germany,
Sybil
Thanks for the great instruction on sewing zippers this way! I left the excess really long to act as a sort of a handle. I linked to you on my blog: http://coconutxoxo.blogspot.com/2013/01/how-to-make-cosmetic-bags-with-zippers.html
I made a small one,added a few pockets on the inside for credit card and chapstick and cash and left my zipper very long, looped back in itself as a wristlet handle. Nit too bad for my second shot!
found this tutorial via someone else’s email blog, i think… clever idea… i have so many zips now i know what to use them for!!!…from Australia
thank you for this perfect tutorial – I made already many pouches but always struggling with the zipper end – now I know and it will be a child’s play like this.
Thank you for the awesome tutorial! I made a waterproof one. Thanks again!
http://www.amberthreads.com/2013/03/waterproof-open-wide-zippered-pouch.html
I have made hundreds of zippered pouches and always struggle with the ends of the zipper being enclosed in the side seam creating a big lump. This was a great tutorial and I will use your technique in the future. Thanks so much. Shirley
Thanks, I just made the large size. Your tutorial was great and I love the design of the bag. I’ll photograph it tomorrow and comment with the link.
I just love the way the bag turned out and it was just so easy! Thanks. http://www.peaceandplastic.com/2013/03/its-in-bag.html
thank you precious
I am not a seamstress, but I used to your tutorial to make a gorgeous zippered pouch from a thrifted skirt. Thanks for the great tutorial! http://organized31.blogspot.com/2013/04/upcycled-skirt-to-zipper-pouch.html
This is so awesome, thank you for sharing, and extra thank you for sharing your resources. Those zippers are fantastic.
sorry, did not speak English.
hola, soy de argentina y hace mucho sigo tu blog. el tuyo me inspiro a tener uno. te invito a que veas lo que hice gracias a este tutorial estupendo!
gracias!!!
http://mientrastantomaguy.blogspot.com.ar/2012/08/sale-una-cartuchera-con-buho.html
Me encantado , te felicito
Eva
This comment has been removed by the author.
This comment has been removed by the author.
Actually no matter if someone doesn’t be aware of afterward its up to other users that they will help, so here it happens.
My web site – http://Www.26320.info
Thank you Anna for this great tutorial I made heaps of them! So easy with your step by step instructions! I have posted photos on my blog with link to your blog. Happy sewing Hanka 🙂
Thanks a lot for this great tuto! So clear! And no mistakes for mi first sewing!
Cheers
Florence, from south-west of France
This is awesome! Thank you VERY much for your tutorials!
HI, I have made already made 3 sets of these pouches for 3 diff ladies in my life,including my mom. I need ure help now, my mom has requested me to make a pouch of a certain size. She wants it 15″ wide , 12″ high & the boxed corners should b 6″ wide.
I would like to know what measurements to cut to make this size,specially the height, do i add 6″ to the 12 ” of height & when the boxed corner will b cut for 6″ then the height will come back to 12″ as needed for the size. I hope I ‘m making sense.
Pls help asap. Love ure tutorials, so clear & easy to follow. hope to hear from u soon. TC
I made three more pouches after work yesterday. Just wanted to say thank you!
I made a couple of these pouches and love them! I did it slightly different as I used laminated material for the inside lining so they are a wet bag. This way when I travel this coming July, I can use these with my lotions, etc and if they happen to leak, the bag will easily wipe clean. I made one into a diaper changing tote with a small changing pad as well. I posted my bags in my blog (giving full credit for the tutorial to this site and adding a link to the tutorial as well). I hope you do not mind my doing this. I did not do any “how to” on my post as I stated I used your tutorial. All I posted were my pictures. Here is my post if you would like to verify: http://multitaskingmamajd.blogspot.com/2013/05/open-wide-zippered-pouch.html
Thank you for your tutorial! I plan to make more bags in the future as I just love them!
I’m confused about this step:
“Pull pouch right side out through the opening you left in the lining. Push lining into exterior. Sew opening in lining closed using a small seam allowance. Press.”
I understand you’re pulling everything right-side out through the opening and then pushing the lining to nestle inside the exterior…but then all of a sudden we have to sew the opening closed? : Does that involve taking the lining back out of the exterior? I’m confused about how to sew the lining closed (won’t you see the stitches?) and what exactly to press…??
Sorry for these relatively simple questions…I am a beginner and the picture doesn’t show exactly how the stitches are being made! Thanks for any help you can provide!
Sorry Grace! Just updated the directions now. Just flipped those two bits around: You’ll stitch the opening closed, then tuck the whole lining into the pouch. Then press around the whole opening (plus the whole pouch might be kind of wrinkled from pulling it inside out).
Tuck in the raw edges of the opening. You can then sew the opening closed by hand (where you won’t see the stitches) or by machine sewing really close to the fold of the opening. (The picture shows me sewing it by machine, it’s how I close all my linings, but it’s totally up to you. If the stitching bothers you then do and invisible hand stitch to close it up. 🙂
Hope that helps!
Very clear now! Thank you so much, Anna! 🙂
Thanks for a FABULOUS tutorial, Anna!!! Very clear and easy to follow. I love the shape of the pouch. I’ve just made one using crazy patchwork… http://www.threadingmyway.com/2013/06/crazy-patchwork-open-wide-zippered-pouch.html
Thank you so much for such a clear and easy to follow tutorial. I made 2 this afternoon with waterproof linings to use as makeup bags – great for presents. Also tried a quilted exterior – the possibilities are endless!
Fantastic tutorial and photos Anna! It’s wonderful that we have a internet community of sewers so willing to share their knowledge. I just started sewing again since purchasing my dream sewing/embroidery machine: Janome Horizon Memory Craft 12000. I’m practicing making small cosmetic bags first from a tutorial from Sweet Bee Buzzings that is similar to yours that I’m adding decorative and embroidery stitches and designs to. I love your bags too with the wider zipper openings. I have to try them too. Thanks so much! I’m a follower now.
A fantastic tutorial – very clear and brilliant photos, thanks!
I tried one with a really chunky zip:
http://whimsarium.blogspot.co.uk/2013/07/whim-3-open-wide-zippered-pouch.html
but deffo want to try out some more!
So freaking cute! I just whipped one up for fun and now I’m obsessed! Thanks for a great tutorial.
Lynn from St. Louis
So detailed and generous of you to share. Many thanks.
Thank you for this awesome tutorial!
Did bookmark this a long time ago, today my first is sewn – very pleased with the result and your tutorial!!
Why ever sew any other pouch than this one?
Perfect with three sizes too! I did the smallest one this time, but there will be more of them in all sizes!
Great tutorial, I’m pumped to try it out. Any chance you can make the instructions printer-friendly? 🙂
Anna, I am SO excited to make like a million of these! Ok, maybe not a million. But close. We’ll start with one of each size? It’s just what I was looking for to help organize so many things. Toy cars. Travel meds/vitamis while we’re on roadtrip vacation. My daughter’s very many hair supplies…. etc… Did you ever post the fabric requirements for the medium and large bags? I couldn’t find on your blog… but I’d love help with your design? Thanks for the tutorial!!!
Cheers!
Adrienne
Oh, and then I went back and read and saw the UPDATE info… ya. So Thank You! And next time I promise to read better. (well, as good as I can with 2 crazy toddlers of my own running circles around me). =)
Anna, I am still having problems:(. When layering the exterior, zipper and lining I cannot even baste them together straight! I have the zipper foot on my machine and the zipper pull to the left as your instructions but this does not leave 1/4 inch for the machine to sew a seam. The machine just sticks at the zipper pull cannot sew past it. What am I doing wrong?
Sorry you’re having zipper woes! Try closing the zipper until you get to a certain point, then lift your presser foot and wiggle the zipper open, then continue sewing. That should allow you to get past the zipper’s pull. Hope that helps!
Actually Anna, I can’t even get the get past the zipper pull to get started! I’ve finally managed to get it in By opening the zipper so I don’t have to sew near the zipper pull at all:). I also found that my machine doesn’t feed very well unless I am sewing to the right of the. Zipper – not sure why but it worked! Thanks for your tute and your reply – can I like to a Flickr pic when it’s complete? Lxx
Hi Anna, I just finished making a ton of zip pouches, and I thought of the open wide pouch! I love it, and it uses so very little fabric for such a fabulous result! I featured today on my frugal sewing site: http://sewistry.com/2013/08/open-wide-zip-pouch-tutorial/ I hope it’s ok!
Love your tutorial! Easy to follow and fast project to do. All the ladies I know (friends and daughters-in-law) will be getting a set of these for Christmas.
Just made my first Open Wide Zip today and I’m so happy with the way it turned out. Your technique for making the zipper extend beyond the outside of the pouch was easy to follow, and makes it so easy to see inside the pouch when open.
Thank you so very much for posting this tutorial!
This is my first & your tutorial was wonderful!!!
Thank you so much for sharing it!
I used your tutorial last week and was delighted with the result. Your instructions are clean and straightforward and my bag is gorgeous. I am sure this is the beginning or (yet another) obsession. Thank you.
My daughter needed a fabric pouch for kindergarten (tomorrow sniff sniff!) & I found this tutorial which seemed so perfect for school supplies. She picked out the fabric, I learned how to sew my first zipper and do my first box pleats, and we are both thrilled that 1) all her supplies fit inside (made the medium) and 2) how adorable it is. Thank you! XOXO
I just sewed this up and it looks great! Thanks for the wonderful tutorial. I kept my ipad next to my sewing machine for quick reference. I’m already planning on making another!
I cannot wait to make this bag following your clear pictured instructions! Thank you for sharing this tutorial. I’ve included your link in today’s blog post, a round up of zipper applications! http://lanettascreations.blogspot.com/2013/09/scary-zippers.html#.UihcpsasiSo
I need to get a few more zippers, but this is on my high priority list! Your instructions are so clear, that really helps!
Just have to post a quick comment to say how much I love your tutorials Anna. I was able to whip up an open wide pouch today for a quick gift- thanks for sharing your free tutorials!
I am so glad I discovered your blog! This tutorial is perfect for a sewing noob such as myself. I’ve already made 5 of these things, each time feeling like I had performed some kind of magic trick: “ta-daaa you just installed a zipper! BOO-YAH!”
The Madras Bag is next! Thank you so much for sharing.
Thank you for this great pattern and tutorial. I have just made my first one, I see many, many more in my future 🙂
Thank you so much for show/teaching people. I never know how to make one. Just make one today.
Dominica
Again – Thanks for a Great tutorial – my second is now ready: http://svartamalins.blogspot.se/2013/12/avsked.html
Merry Christmas and Happy New Year!
I made it!!! I left out the pellon and regret it now. I made the medium bag so now I’m making the small one and adding the pellon for sure!
Great tutorial!!! Love this little zipper pouch.
I just found this tutorial today! I wanted to thankyou for posting this! I just made a little bag tonight and I’m so happy with it. I still really like making little things for my grown girls and I know they will love them!
thanks a lot – i have just finished this cute bag in not even an hour and even with a patched exterior! the hardes part for me was the tiny patch for the zipper end. i hate this small scale sewing. but i made it! thanks again for the very instructional tutorial. greetings from germany, kat
Hello! I’m an Italian woman. Thank you very much for this tutorial, it’s very clear and nice! I have made a pouch for a baby and I’m very happy because I love the result 🙂 You can see it at this link: http://www.lasoffittadeighiri.blogspot.it/2014/02/bibs-baby-pochette.html
Bye, bye
Thank you for such clear, easy to follow directions. I’ve made two so far and they both turned out wonderfully.
Thank you very much for your easy, step-by-step tutorial with photos. I have made my first ever zip pouch and it turned out nicely. 🙂
I actually found this blog and that is amazing thing I enjoy reading this easy to understand stuff. Keep it up.
Website
Pretty remarkable post. I simply came across your blog and desired to say that I have really enjoyed searching your blog posts.
how to claim ppi
It’s amazing to visit again n again coming to your blogs the superb effort is here.
sewa mobil
Is there a video tutorial for this as well?
Thank you for the tutorial. Very clear and helpful.
I am truly keen of reading posts on the attention-grabbing topics n now I’m on the most effective place.exercise for weight loss
Thank you for this I made my first today.
How do I pockets on the outside to this bag?
Anna, I love this bag it is wonderful and your pattern/instructions are so well written. I have lost count how many I have made:) I love them so much I have a hard time giving them away.
thanks for sharing. Would it be possible for me to sell these, only small scale, just to help pay for more fabric? I totally understand if not, I just wondered……..
thanks laurie
Sorry Anna, as to my previous post, I just saw your “charity/fundraising” note. 🙂
Thank you
Anna I liked your bag it is beautiful and your content is well written in a nut-shell manner. Thanks for sharing such fabulous tutorial guidance. I will try to make it. http://www.macobag.com/pouches/zipper-pouches.php
I love love love this tutorial! I’ve made six of these now as gifts – you can see the ones I made here:
http://esmeintheattic.wordpress.com/2014/08/06/roses-and-elephants/
http://esmeintheattic.wordpress.com/2014/08/15/child-artwork-teacher-gifts/
Thank you so much Anna for the wonderful tutorial! x
The picture tutorial is just perfect for a novice to follow. I am so very happy to have come across your blog. My eight year old son is happy to have his own personalised pencil pouch. Thank you for sharing.
Great job. thanks
Thank you for the tutorial. Maby you might look here : http://otticreativ.blogspot.de/2014/12/genaht-fur-den-adventskalender.html
lg otti
Love it. Thanks.
Well you can never have too many project pouches, so I’ll definitely be adding one of these to my collection. Thank-you for sharing this tutorial – it’s fantastic!
Just found this tutorial a couple days ago, have always avoided zips but this tutorial made it easy. I have already made two with a few more to come. Thank you for the detailed tutorial. Carole
Excellent tutorial…great photos, discriptions and easy to follow….thanks for posting
I saw your pouches on Instagram, and had to try one. Even with your excellent tutorial, I managed to goof it up a bit, but still like it a lot and plan to make more. I tried reading it from my phone, and always seem to mess up, since the instructions are so small. Next time, I’ll print it out.
Dear Anna, after finishing your Snappy Manicure Wallet earlier this week (great!) I just finished my first Open Wide Zippered Pouch! I am so proud, another success. It came out truly beautiful. I feel really comfortable with your instructions, everything is clear and easy to follow. Thank you so much. I just love the way you insert the zipper here – no bulky end or edges. Do you think I (advenved beginner now…) am ready for you Super Tote now?
Best regards,
Claudia
I use this tutorial all the time! It’s clear and concise and all of the sizes are perfect! Thanks for sharing your talents 🙂
So sorry I can’t find where it says how far in from the right, edge of fabric you should begin sewing? Looks like it’s not sewn all the way.
Hi Karen,
It’s up there in the instructions, 🙂 just in case you missed it:
“At about 1″ before the edge of the fabric, stop, backstitch, and then pull the zipper away from the seam, bending it down out of the way, in towards the fabrics. The whole point is to pull it out of the way so it doesn’t get caught in the seam. Continue stitching along the fabrics until the edge.”
Wow.. That’s really a great tutorial. I really thank u so much for that.
Thank you for this wonderful tutorial, Anna! I just made four for gifts and two for myself. They are perfect for small knitting projects and so adorable!
Thank you for this pattern, just made my first pouch.
Thanks for sharing your wonderful tutorial (which I found via Pintrest). It has helped me complete a little bag I was working on. Brilliant! Thanks again :). xx
thank you so much Anna, your pictures and tutorial is very clear and helping a beginner like me! best regards from Indonesia
This was a great little tutorial. Thanks for using LOTS of pictures for us visual learners.
Thanks so much for this amazing tutorial! I’ve made a few of these now and have been playing with variations like adding a leather bottom. Your details are so helpful, I’ve bookmarked this and open it every time that I make one, they make perfect gifts! Thanks again!!
this is the most perfect tutorial EVER!!!! thank you!!!!!
I want to try this hope it is easy
Thank You for tutorial. I made the large. I didn’t get my zipper to have have that tail. I missed something. Thank you it’s really cool
Thank you for sharing! My version is here:
http://www.twenty-five.net/poisonwood/2015/10/24/a-tote-and-a-pouch/
Thank you for a wonderful tutorial, I used this to make a Christmas gift. I was surprised to see this was a free pattern, especially with the wonderful instructions given.
Thank you for the wonderful tutorial. I made a bunch of bags for gifts, then got your book and read it while driving to and from Christmas. I love what the interfacing does for the bag. I am now making two tone zippered pouches and on my next break from school, I want to attempt one of your totes. I learned to sew in the 1970’s in home ec class. It’s sooo fun to be creating once again.
Merci !
When all said and done, what are the approximate dimensions of the small bag? I see you start with 10×7 pieces of fabric. I’m looking to make a bag just like this one in dimensions closer to 5×7. A tad bigger will do. Thanks so much!
-Keri
Hi Keri,
Thanks for your comment. All the finished dimensions are listed on this post: https://blog.noodle-head.com/2012/06/open-wide-zippered-pouch-tutorial-size.html
🙂
Thanks, Anna! I did find this after the fact. I made a medium bag but shortened the height of the bag to about 6 inches. I cut 3 inch corners instead of 4 inch ones. It’ll work great for my husband’s headset at work!
A wonderful tutorial! Thank you!
I just want to thank you for the tutorial. I made 4 bags over the last 2 days in 2 different sizes and I LOVE them all!
This tutorial was awesome! Thank you! I needed a new bag, and this one suited. I followed your instructions for the large bag, and it came out exactly as it should have. Thanks so much!
Made one, love it! Thank you so much!!!
excellent tutorial, probably the best I’ve read on line. Good explanations, very clear pics. Thank you very much for sharing. Carine
Just what I am looking for as I am wanting to make a large bag out of old band uniforms! Would making a larger size than in this tutorial be much different? Would love a response by email and would definitely give you the credit!! Thanks so much for sharing this tutorial…….beautiful bags!!
Thanks Nancy! Yes, you could certainly enlarge it to make it more of a bag/tote size. 🙂
Totally awesome tutorial. I love the precision with which you describe everything, right, left, where exactly and at which point do you tuck etc, this is just simply very helpful and gives me the confidence I need to try it, because I know if I get stuck I have a “map” that I can find my way around on. Your designs are also beautiful ❤️
thanks for the inspiration
So glad you found it helpful. 🙂
I made the large-size bag for a “wedding day survival kit,” for a bridal shower. Fun tutorial!
Oh that’s such a great gift idea! 🙂
Love your tutorial!
Hej there, with your tutorial by my side I just sewed my first zipper ever! I took some time but your instructions are perfect together with the pictures! Also, my first paper pieced item. Super proud! Thank you so much for sharing!
Here is the result: https://instagram.com/p/BJUanA0hCVI/
Do you have a tutorial on how to make the zipper end curved (not the tabbed end)
This made a GREAT present for my 2 grand-daughters who are making them on there own now!
What a great tutorial! thank you so much – my zip end without the tab was a bit shonky but not too bad for a first attempt. Oh and thanks for the magnetic clasp workshop too – saved my bacon 🙂