
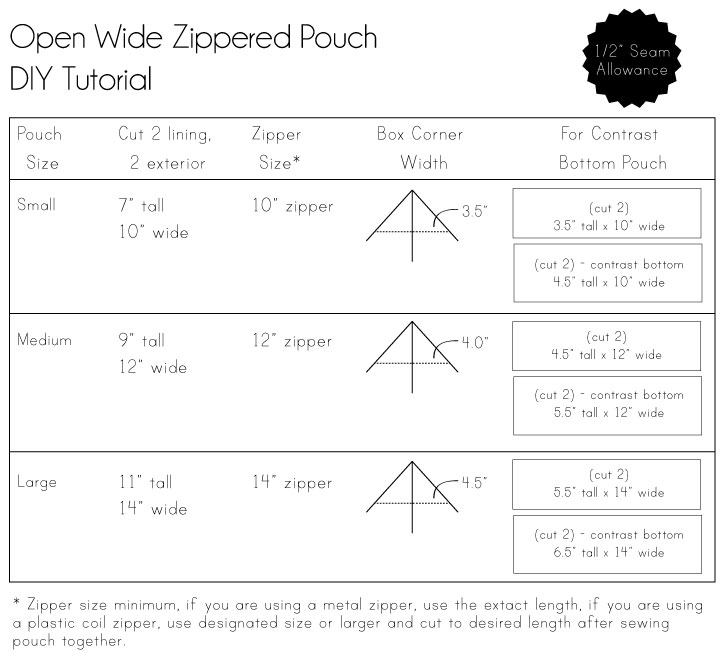
For the contrast bottom style pouches, simply cut two pieces of each measurement listed in the chart (right column) and sew together using a 1/2″ seam allowance.
So for the medium size pouch:
– Cut two pieces 4.5″ tall by 12″ wide and two pieces 5.5″ tall (the contrast bottom) by 12″ wide.
– Place one pouch top fabric right sides together with one contrast bottom fabric piece and sew along 12″ length using a 1/2″ seam allowance, thus making one exterior.
– Repeat with remaining fabrics to complete the back exterior.
– Cut 2 lining pieces as listed in second column.
Approximate Finished Dimensions (width and depth measured at base):
Small // 4.5″ H x 5″ W x 3.5″ D
Medium // 6″ H x 6.5″ W x 4″ D
Large // 8.5″ H x 8″ W x 4.5″ D
Approximate Finished Dimensions (width and depth measured at base):
Small // 4.5″ H x 5″ W x 3.5″ D
Medium // 6″ H x 6.5″ W x 4″ D
Large // 8.5″ H x 8″ W x 4.5″ D

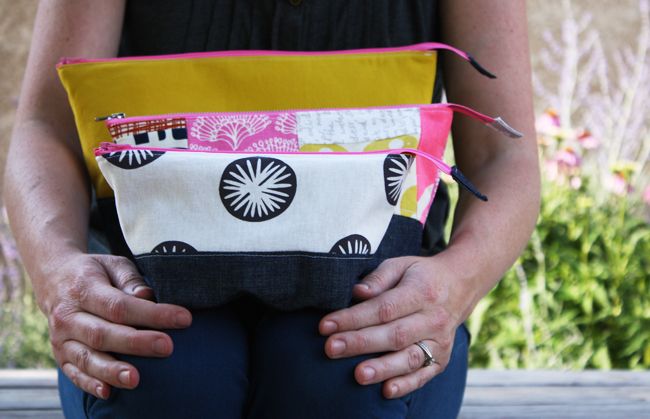
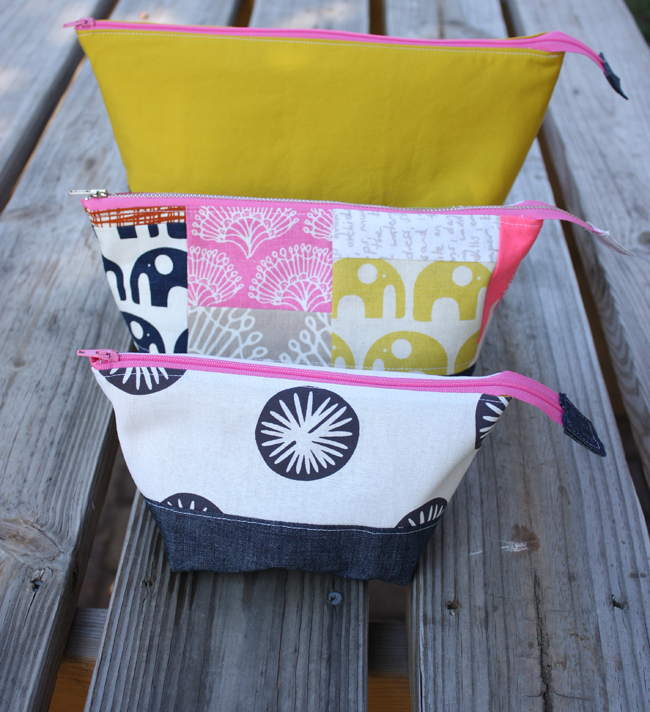
Fabrics: The Hello Kitty fabrics from the first post were purchased at fabric.com, seems like Hello Kitty is popping up a lot, so keep your eye open if you’re a fan (yip yip!)
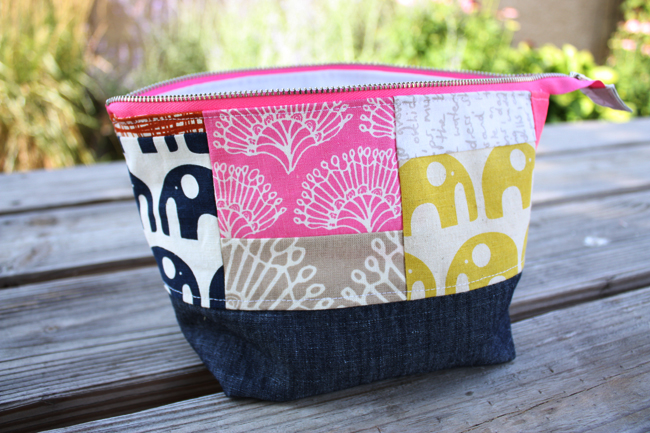
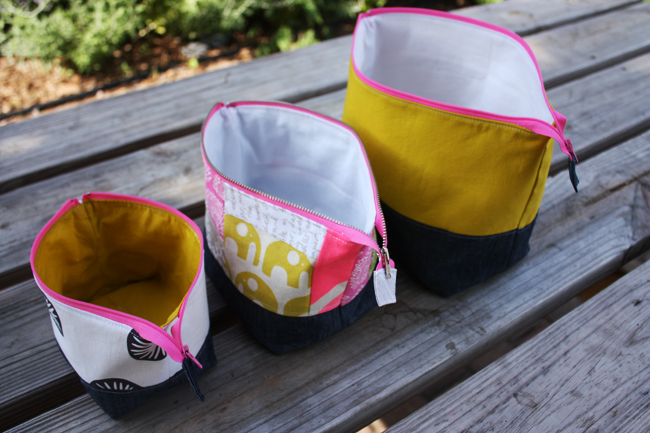
The medium size pouch is patchwork using an Umbrella Prints Trimmings pack, if you’ve never seen their fabrics I suggest you check them out, all handprinted in Australia. Love their basecloth and style.
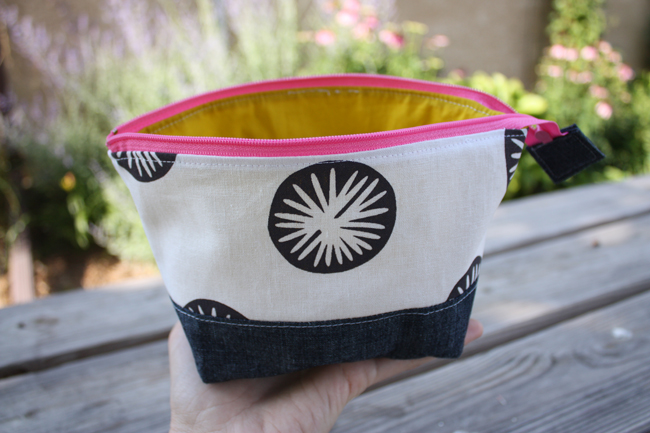
The small pouch main fabric is handprinted by my friend Leslie who runs Maze & Vale, where she sells her handprinted fabric and goodies. She’s hosting a handprinted fabric swap now which is really cool.
The bottom contrast band to all the pouches is Robert Kaufman cotton linen in denim purchased at Pink Chalk Fabrics. Love this stuff, it’s like a favorite pair of jeans.
The yellow fabric (large pouch) is Pure Elements in Empire Yellow by Art Gallery Fabrics, believe me, you need every color.

Happy sewing everyone!!!
If you’ve enjoyed this free tutorial, please stop by my pattern shop for lots of other projects to sew!
Thankyo so much for sharing these with us, they are gorgeous and I can’t wait to make some, add some chocolate 🙂 and they will make great gifts!
Very beautiful pouches. Why did you use a metal one on the medium? do they have special purpose, I always buy the plastic ones at zipit?
Seeing the pouches folded I thought of putting a pressure closure under the end of the ziper and the side of the pouch. No much use, just for fun.
Awesome pouches! Thanks for the tutorial. 🙂
excellent! thanks Anna x
Very nice pouches! I love your tutorials and photos, because there are no questions remaining for me and I`m able to get started immediately! Thank you for sharing!
These are so cool. I’ve already made three of your madras totes this summer… Now, I’m going to have to add THESE to the list, too!
Thanks for the generous tutorial!
Ok, it will be a sewing afternoon today, they are so cute.
Thank you so much. I love all of your tutorials and patterns.
You’ve done it again!! I can’t wait to make a set!!
Thanks for the cute tutorial! Love the pouches
– Katie Fleming
Kate Michelle Designs
xxx so much fun! I love the way you have put all of those colours together xx
Amazing, Anna, as always!
Tünde (from Budapest 😉
Thanks for the great tutorial and sizing chart. I’ve been matching up leftover fabrics for small gifts to sew in between the larger projects and this is just perfect!
Thank you! These are adorable!
Great tutorial–I can’t wait to try it! 😀
Love the nesting bags. 🙂 Beautiful job. You’re such a pro Anna!
I love all your versions, and I particularly like the Umbrella Prints trimmings, they’re such a fun way to get into their fabrics :o)
I love these! They would make such great gifts.
Very cute! Thanks for figuring out all the math, love them 🙂
These are so fantastic! I can’t wait to make a million of them!
WOW! What an awesome tutorial, Anna! You never cease to amaze us! This is just what I’ve been needing for my purse – can’t wait to make one!
excellent tutorial (always!). I’d love to get my hands on some of that hand-printed fabric. Its perfect.
Thank you for sharing your tutorial. Love the Hello Kitty fabric. I was looking for something to give for my granddaughters birthday and this would have been perfect. Cannot wait to make a pouch for her….Judith, Texas
You. Are. Awesome. Thank you!
Anna you are the very best. Seriously. I stayed home from the gym last night (bad but I needed some time!) to make one of these and I Love It!!!! Thank you for sharing this 🙂 It will fit perfectly in a runaround bag!
nannergirl@hotmail.com
so lovely, useful and pretty! a great share thank you! xxx
Anna, this was super fun to make and I love and so does my granddaughter love how wide it opens! I am planning on making a few more of these! Thanks so much for another great tutorial!
HERMOSOS!!!!♥♥
Thanks! Super useful!
Thanks for the tutorial. I had plans of making a boxy pouch for my daughter’s birthday, but sewed this up instead. It came together great! I will be showing it on my blog next week.
This is so nice of you to share, Anna! I’ll have to try this style soon.
love the look of a metal zipper!
how did i miss this post?? LOVE the pouches and thanks so much for mentioning my fabric, i love seeing it all sewn up into something both lovely and useful 🙂
I am wondering how I can get rid of my family for the weekend so that I can devote an entire weekend to making all your pouches! So stinkin’ cute!
They are great! Thank you so much for sharing. I definitely need at least one of them.
again, adorable!!! love the bags made with trimmings!!
I love these! The fabrics are absolutely gorgeous 🙂 And the pattern just rocks!!
These are great. Thanks for the tutorial! I bought the Trimmings pack, too, but didn’t use it yet…may have to whip up one of these. Fun catching up with your site, hope you are well!
LOVE THESE!! so cute and would make great gifts!
~amy
http://www.LadyMockingbird.com
These are so cute! Thanks for the great tutorial.
Lovely tutorial, Anna! Can you please tell us what the finished dimensions are for each bag? That would be very helpful for figuring out which one to sew for a specific purpose. Thanks for treating us to such great tutes!
thank you so much for sharing such a fabulous tutorial, I just bought a bunch of zippers at a second hand store for 5cents a piece (about 25 of them), now I know what everyone will be getting for Christmas. Thanks for sharing!!!
This comment has been removed by the author.
oh, I totally {heart} these! great idea!
Thank you! I can’t wait to get started on some of these.
So beautiful pouches – so helpful tutorial and chart! Thanks a lot! I had to sew up some of these immediatly, one for me, two as gifts, probably more following…
Thanks for this pattern and turoial. It was great to do. I used some of my favorite scraps 🙂 Now i have a place for my crochet work.
The one with the patchwork is my favourite!!
Beautiful pouches…..will make all three for Christmas gift sets.
Thank you so much for the tutorial. I made the medium size bag last night and I am in love with it. I plan on making more for Christmas gifts!
excellent….these are wonderful!
This is a great tutorial. Made one and quilted the fabric so that I have a cute bag to protect my camera when I toss it into my purse. This was so quick and easy. We all know that zippers can be tricky but your pattern makes it so simple. Thanks. I will certainly make more of these.
Excellent tutorial, thank you very much!
These are so great! Thanks for sharing!
Thanks for the great post and wonderful directions. I just used it to make a pouch for the pretty little pouch swap. Your tutorial was easy to follow and I had terrific results. http://jenniffier.blogspot.com/2013/02/pretty-little-pouch.html
I needed a break from sewing my school work and these bags are just perfect and so much fun.
It’s a great tutorial. You can see mine: http://kamielandodille.blogspot.be/2013/03/waar-zijn-die-rode-bollen-voor.html
My sister has been asking me to make her some yarn totes with zippers. Your open mouth large pouch is GREAT for this purpose. I added two holes in the front with grommets so she could pull her yarn out and crochet while away from home…pop it in her purse and go! Thanks so much for the tutorial…I love the denim contrast. 🙂 I will be making many of these!!
Hi, I already made four of these and gave it to my friends as a gifts. Girls enjoyed them a lot. It was great tutorial, so easy to follow, thanks.
check them at: http://ruzovysob.blogspot.sk/2013/05/trojicky-z-pariza-from-paris-with-love.html
This is a great tutorial! I have just linked to it on my blog. Thank you for sharing your knowledge with us.
http://alittlebirdmademe.wordpress.com/2013/06/21/a-list-of-30-free-tutorials-and-patterns-for-wallets-and-pouches/
Thank you so much for this tutorial! I made 4 and love how they turned out. Your instructions were great and your photos are super helpful, as always.
Love this bag, thank you for sharing the tutorial!
Great tutorial! Thanks for posting it! If I used a trapezoid shape instead of the rectangles for the exterior and lining pieces, then boxed the corners, the sides should be straight but would the pouch still open as wide?
I believe so, if the trapezoid is larger on the bottom than the top. 🙂 Do some experimenting, you’ll do great!
Thank you for sharing this tutorial, just the type of pouch I was looking for. Sorry if I sound stupid but, how do you sew on the contrast pieces? I want to make the small pouch with contract color am I suppose to sew a 3.5″ piece to the 4.5″ piece for front and back???
Thank you,
Candace
Hi Candace!
No such thing as stupid. Okay, for the small pouch you’ll cut two pieces 3.5″ tall by 10″ wide and two pieces 4.5″ tall by 10″ wide (the contrast bottom) , sew them together using a 1/2″ seam allowance, thus making the front and back exterior pieces. Final measurement of each exterior piece will be 10” wide by 7” tall. Hope that helps!
🙂
Anna
Hi Anna, Thanks for sharing, I have used the DIY for a small and medium and you can see them here (sorry the text is in Danish):
http://madebymadvig.blogspot.dk/2014/06/to-do-ta-daaa-4-toilettasker.html
Br,
Mette
The link to the instructions won’t work for me. Can you email them? Thanks!
Hey Brooklynn! Sorry! I just switched blogging platforms and the links should be fixed shortly! Thanks for understanding! 🙂
Perfect! Just what I was looking for! I can’t wait to sew some up!
If I don’t want to add a contrast piece should I just add that measurement to the front and back panel measurements?
Hi Nancy, the first measurements listed are for the non-contrast pouch, so for example, the small size is 10” wide by 7” tall. You’ll be cutting 2 exterior pieces and 2 lining pieces that size. 🙂
Thank you for this tutorial. I’ve sewn clothes for years, but not many non-clothing crafts. Your bags are so cute I decided to try it. I just finished a set, and they went together beautifully. I appreciate your clear instructions and step by step photos. They were easy to follow, and I’ll be making many more of these for my use and as gifts. Thanks!
Great tutorial, love the graph, clear cut with easy instructions for any sewer. Love your bags.
Hi Anna, I will love to try These pouches soon, They are great! But are you sure with the stated approx. finished dimensions? They seem to be a lot smaller than one has to cut for outer and lining fabric….? Or where is my mistake in thinking….
Thanks for a quick reply.
Regards,
Claudia
The dimensions are pretty accurate, maybe you’re not considering the boxed corners?
Hi Anna, thanks for your quick reply!!! See – I knew there was something wrong in my thinking… alright. Thanks!
Claudia
When you give the finished dimensions, is the width for the wider top zipper part or for the bottom less-wide part? If I were to make the large or medium bag, what would be the finished width at the top and the finished width at the bottom? Thanks!
I made one of these for my daughter for her first day of kindergarten. She still uses it, two years later. Now it’s time to make one for my middle daughter who starts her first day of kindergarten very soon. Thank you so much!
Thanks for the zipper link. I just ordered 35.
Thank you so much. This is the best tutorial for a pouch *ever*! I have made 6 of them so far as knitting project bags and all of them are well loved by their recipients as well.
made a pouch for my granddaughter’s teacher….amazing!
(is there a flicker page to post pics? would love to see some of the others’ pouches)
This is just what I need for my purse – can’t wait to make one!
Have you ever used pellon flex fusible foam as interfacing? Any tips?
Hi Theresa, thanks for your comment. I haven’t tried foam interfacing on the open wide pouches before, give it a try though! Should work beautifully.
Thanks for the tutorial. I made three pouches in three days.
https://mutundluecke.wordpress.com/2016/03/13/more/
I’ve just made 7 for my family. They are adorable! Thanks a lot!
Can you sell your patterns? Or are they for personal use only?
Sorry I meant can you sell the bags you make with your patterns?
Hi Jen,
So glad you’re enjoying my patterns and tutorials. And yes, you can sell finished items using my tutorials/patterns/and book projects. Giving design credit to me or referring to my website would be great, but is not required. Let me know if you have further questions.
I love your patterns and tutorials! Thank You!
These will make great essential oil bags. I’m a beginner and this was a perfect tutorial – thanks!
My very favorite go to zipper pouch for gives and swaps!
The zipper lengths in the pattern seem very long for the finished bag dimensions… I just want to make sure they’re right before ordering zippers! If the finished bag size for the large bag is 8.5 x 8, do I really need a 14″ zipper? Thanks!
Yep! the zipper lengths are correct. The approx. finished dimensions are measured at the base of the pouch, sorry for any confusion!
Great tutorial! I am making some knitting project bags and the pattern is perfect!
Still coming back to this tutorial. Thank you for it! Seriously the best pouch!