
Firstly, I do want to mention how deeply saddened I am for the Sandy Hook shooting victims and their families. Like many, I think I feel really helpless, but I’m hoping that it’s bringing to light some important conversations.
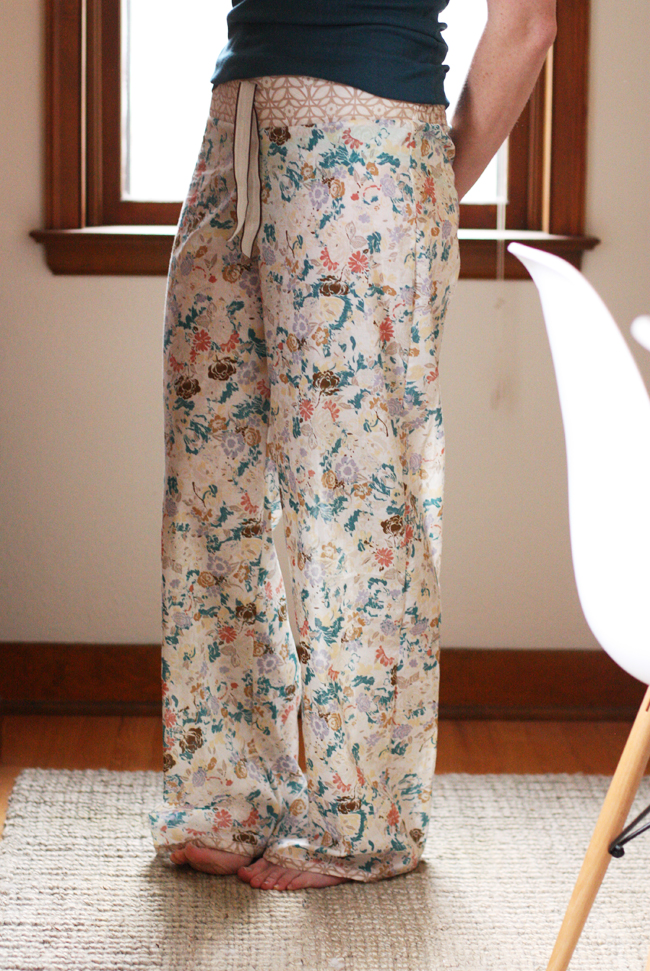
If you remember, I made a lovely pair of pajama pants in October. So today I’m sharing the tutorial on how to make them! The pattern pieces are based off of your body measurements, so if you have kids you can make them some too! Thank you to Art Gallery Fabrics for letting me use their lovely voile, in Impressions in Beige & Millefiori in Cream.
What you need:
- 2.5 yards fabric, if you have 54″ wide voile, you can possibly get away with just get one yard (I did)
- 1/2 yard contrast fabric, for waistband and binding on hem
- elastic thread
- thread
- 1.5″ wide elastic
- small scrap of fusible interfacing
- ribbon for faux tie
- pair of well fitting pajama pants to make your pattern
Make pattern and cut:
{1/2″ seam allowance used throughout, unless otherwise noted}
First we’ll take some measurements and make the waistband pieces. Measure hip to hip and add 1″. Measure around the back side of the fullest part of your body (your hips and butt usually) and add 1″.
Make two pattern pieces.
Front waistband will be 6″ tall by your hip to hip measurement.

Back waistband will be 6″ tall by your fullest body measurement around your butt/hips (measured from hip to hip around the back).
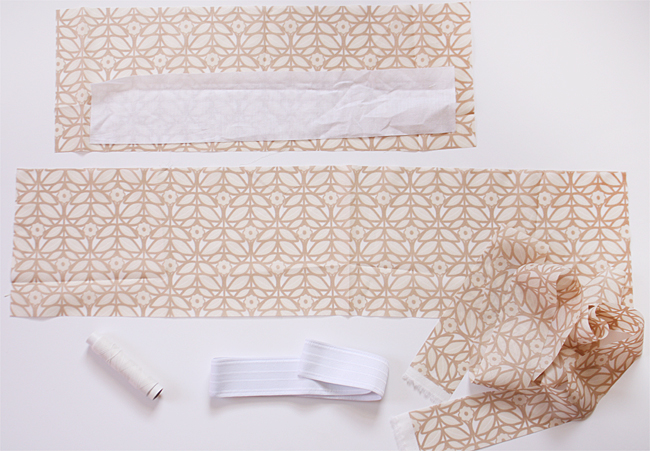
Cut one front waistband (fuse interfacing to wrong side of front waistband) and one back waistband.
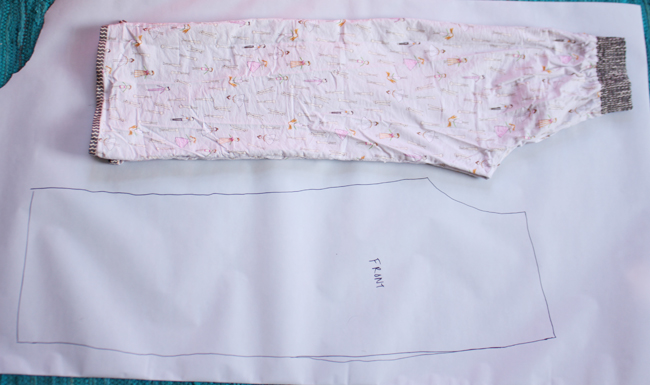
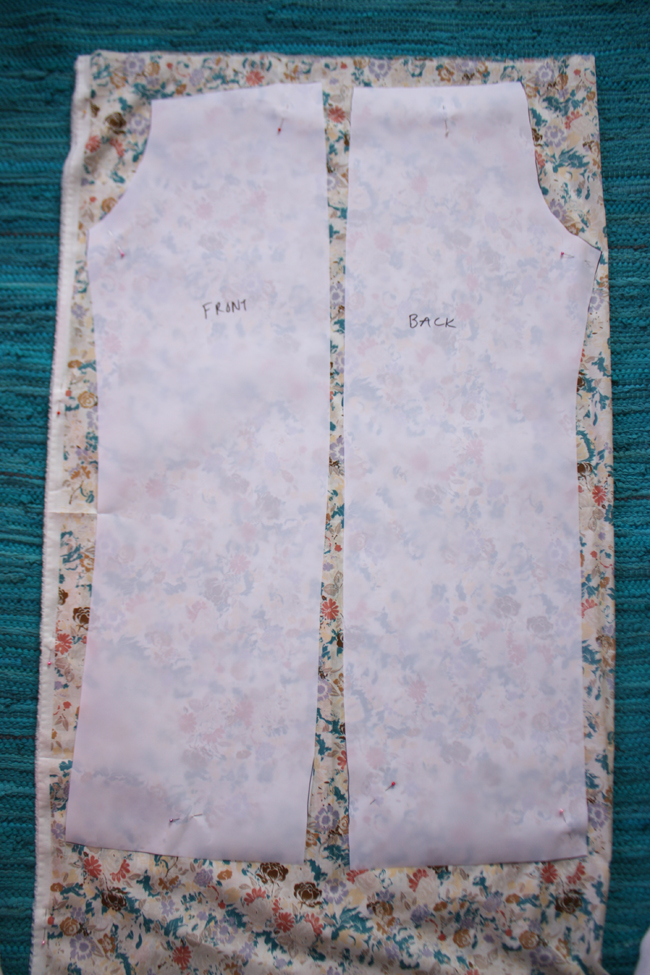
Cut two front leg pieces and two back leg pieces by tracing a pair of existing pajama pants or using your favorite commercial pattern. ** You’ll want to make sure that the front waistband piece will fit your front pant pieces, just hold the front waistband piece up to the front pant pieces and make sure they’re about the same width.
Cut two hem binding pieces 2.5″ tall by circumference of pant leg + 1″.
Cut elastic 1-2″ shorter than your back waist measurement.
Sew:
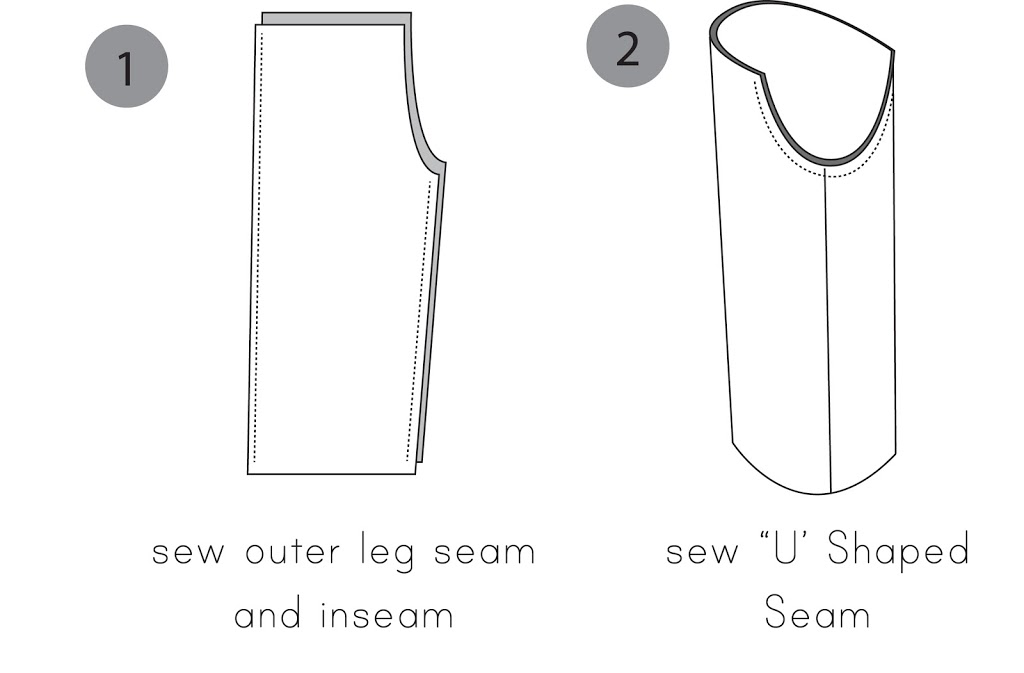
1. Place one front leg and one back leg piece right sides facing. Sew along outer leg and inseam. Finish raw edges (I serged mine, but you could also do a french seam, zig-zag, etc.). Repeat for other pant leg.
2. Turn one pant leg right side out and slip it into the other pant leg, aligning the inseam seams. Sew along that ‘U’ shape. Finish raw edges. Turn pants right side out.
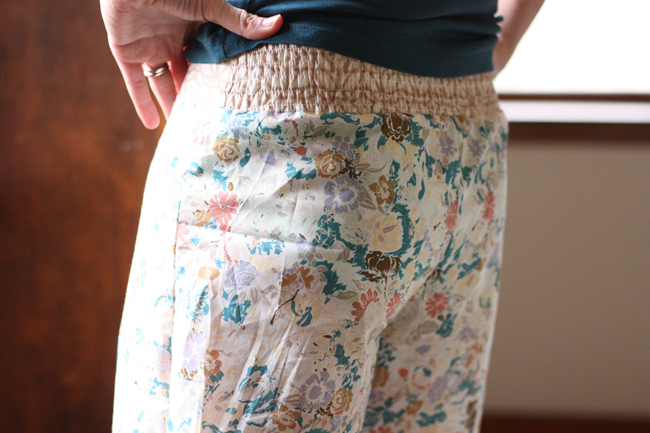
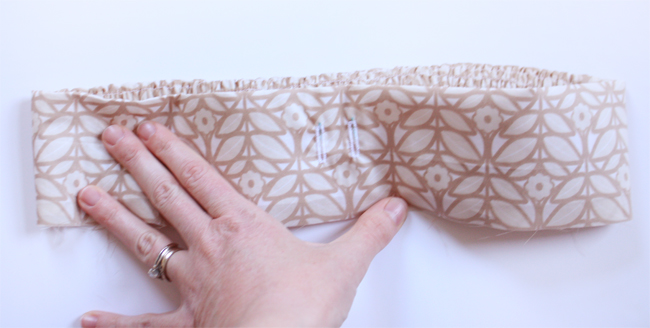
Next, take the back waistband piece, using the elastic thread in the bobbin, shirr the entire back waistband piece stitching rows approximately 3/8″ apart across the piece. Using a spritz of water and and iron, shrink up the elastic thread, pressing gently on the elastic thread side. Press in half lengthwise wrong sides facing. Set aside.
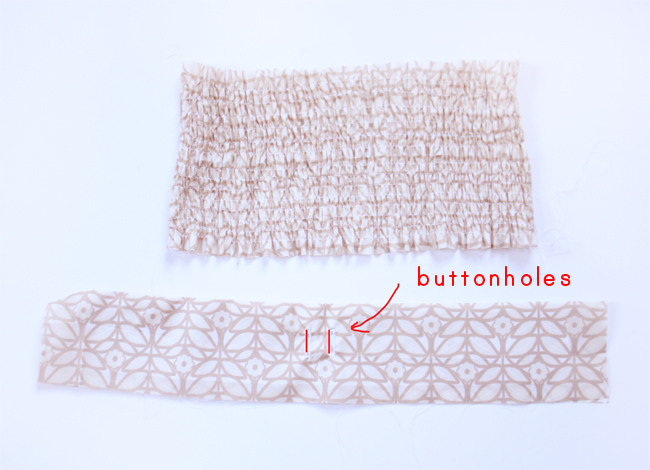
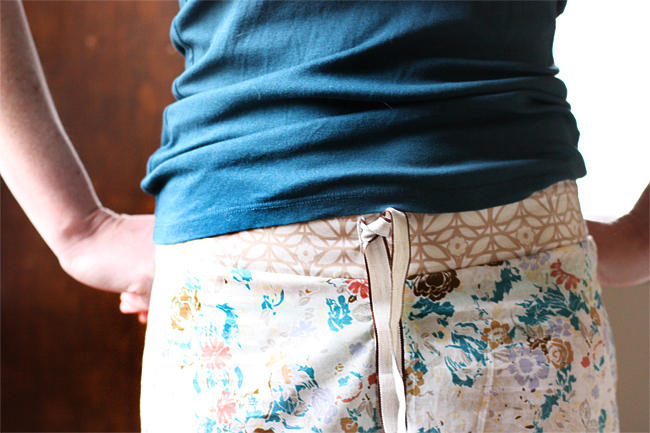
Take the front waistband piece and fold in half lengthwise wrong sides facing. Mark the half way point and on either side make two buttonholes for the tie/ribbon.
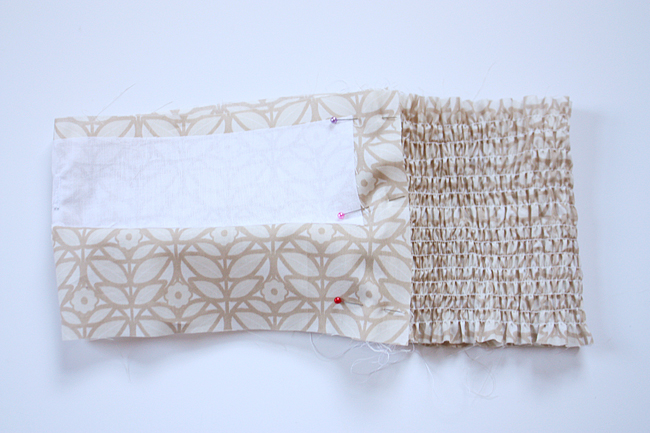
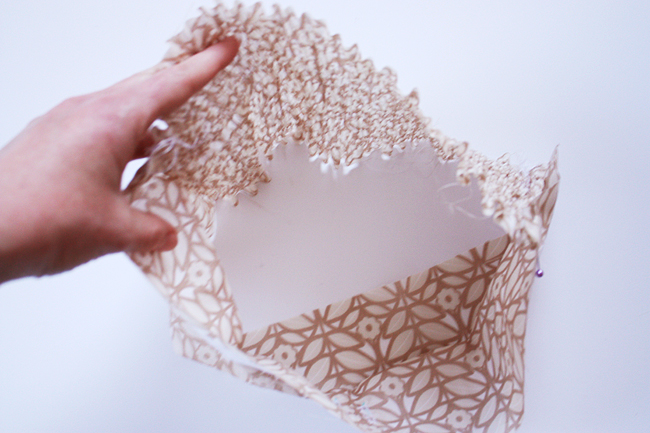
Open up both waist pieces. Right sides facing align raw edges of each short side of waistband. Pin. Sew. Now you’ll have a waistband loop:
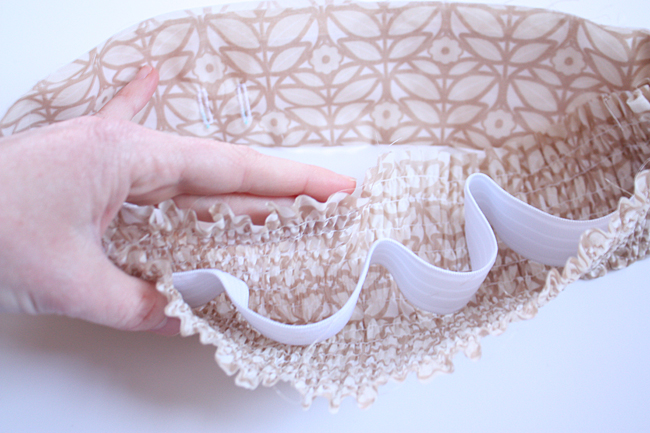
Insert the 1.5″ elastic in between the folded back waistband piece. Pulling elastic ends just past the side seam of either side of the waistband, sew “in the ditch” along side seam on either side to hold elastic in place.
Your waistband will now look like this:
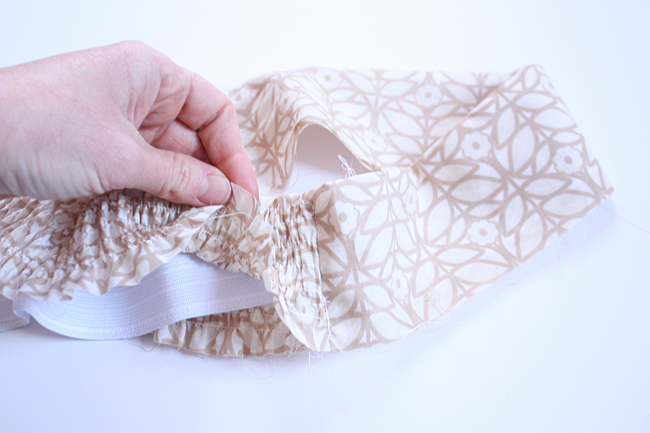
Take pants and slip waistband with buttonholes facing the right side, aligning raw edge of waistband with top of pants, and aligning side seams of pants with the side seams of the waistband. Pin. Sew. You’ll need to stretch the back waistband as you’re sewing. Finish edges.

Finish pant bottoms by attaching bias tape binding as you would a quilt or other project. Insert ribbon or fabric tie into buttonholes. That’s it! Hope that this tutorial can be helpful for someone.

Enjoy! ♥
thanks for sharing this tutorial.İt’s very helpful for new starters(like me 🙂 )…
Yay!! I’m so excited! I’ve been hoping that you’d make a tutorial! Quick question…do you think that this would work with flannel for the pants, and using cotton for the waistband? I’m thinking I’m going to make some for myself and my daughter this weekend!!
yes! it’ll work great with flannel and any quilting cottons as well. 🙂 Just be sure to pre-wash your fabrics!
OoooOOh thank you so much for this tutorial! I’ve been wanting to make some jammie pants!!!
oooh these are so cute!! I want some – now!
Is there any particular type of elastic thread, shrinkable one, or does it work with any type of it?
Anna
As far as I know there’s only one type of elastic thread (different brands of course). If you need more info on shirring there are lots of great tutorials out there just for that. 🙂
Beautiful Anna! I’d love some just like it! I’ll have to add them to the to do list.
Love these! So luxurious!!
Wow, these look really, really nice! I’d love to make myself a pair. The fabric you’re using is just lovely too.
Oh yes!! I was just thinking of your pj pants yesterday and wishing there was a tutorial for them! The perfect pyjamas are so difficult to find! Thank you – I’ll be sewing some of these up very soon!
CUTE!! Love these, Anna. I’m always a big fan of the shirring, to be sure.
🙂
Awesome tutorial Anna! Thank you and I’m going to make some for ME after Christmas!
Beautiful!! I have those same voiles — a yard of each, hmn? 🙂 You always make it look so easy, Anna!!
Lovely pajama pants! Thank you so much for the tutorial! I hope to make a pair very soon.
Amanda
I love the idea of a shirred back panel. It sounds so incredibly comfy!
Oh man, I am so excited that you did this. Of course I’m desperate to try it. Hopefully after Christmas.
p.s. You are a sewing genius.
These are great, Anna! Thanks for sharing!
I have some fabulous fabrics winging their way to me right now with the idea of doing some clothes making from them, I may have to try these!
ohhh they look amazingly beautiful!
You are the best!!!! Thanks for the tutorial!
Great tutorial, thanks so much for sharing 🙂
Oh man, I bet these are just divine to wear. Thanks for the tutorial! 🙂
they look so comfy and I can’t imagine having them made from voile!
I could use some cute pajama pants! Thanks for the tutorial
I looove that you showed sewing the inseam/out seams first and then the front/back rises as a continuous seam;)
These are beautiful Anna! Just beautiful! I wish I would have read this post before last night because I couldn’t find a single pair of Christmas pj’s I liked for myself! Great tutorial! You are a sewing wiz!
Great tutorial. I hate the feeling of the shirred elastic against my skin. It never occurred to me to fold in half to get the same effect. Thank you!
I want to make these especially since my favorite pair of pajama pants have developed a hole. Thanks!
These are fantastic. I made pajamas and nightgowns for all my friends and family this Christmas. I wish I had seen this tutorial before that as I really like the shirring you added at the waistband. It makes them hug nicely. Here is a link to mine, http://gjeometry.com/2013/01/04/sleeping-in-style-with-monkeys/ Some of the pj waists are elastic and some are drawstring, but they are much more “relaxed” looking without the shirring panel. Next pj project for me will be this one! Thanks for sharing.
Wow I love the pants. If you hadn’t proved it with the tutorial that these are selfmade I probably wouldn’t have believed it!
Great tutorial! I have a quick question though. I’m making these pants and I’m on the waistband part. I tried them on and the waistband was too big, so I took it in on each side. Now it fits my waist, but it’s hard to get over my hips. What did I do wrong?
Hi Elizabeth,
Too loose after shirring, etc? I’m going to reply to your email….
I was so excited to make these. Epic fail. Pants did not fit at all. So disappointing.
Can you shirr the entire waistband (back & front) with no elastic encased? Would I need to change any measurements or would it still be the same as above?
Sure Amy! You could. 🙂 You would make the front waistband larger to accommodate the shirring. Just a little bit of caution though, depending on how your shirring is, it might not feel like the pants will stay on as well (I had made some with only shirring on the back band and they slipped down too much for my liking). 🙂
Thanks!
I’m making the harem pants by pattern emporium, they don’t include a shirred waistband option in the PDF. Just elastic or tab. Making my brain work over time! I want them loose enough to get over my hips but snug on my tummy. But I dislike elastic, feels too tight to me & I want comfort 🙂 I wonder if I cut the waistband by my hip measurement then shir that & see if it’s snug enough on my tummy. I have big hips/butt/thighs but my waist nips in. Makes all pants fittings a drama. Thanks again for your help & fast reply 🙂
A.
Thanks for the wonderful tutorial! After I attach the waistband to the pants how do I get a nice clean finish on the raw edges of the pants/waistband before turning the waistband over? I would like to avoid having the raw edge rubbing against my daughters skin. Thanks!
No prob Elizabeth! You could sew the outside of the waistband on first, then press the inside of the waistband to the wrong side by 3/8”, then sew from the front of the waistband ‘in the ditch’ catching the inner waistband in the seam. Make sense? I hope a little! 🙂
I am a beginner sewer, though I have had a little experience in the past. I am going to try and tackle making these pants and am so excited. My only question is…what does it mean to sew “in the ditch” when it comes to the elastic?
Hey Whitney, in the ditch means to sew on a seam, in this case, the side seams of the waistband. Use a matching thread and the stitches won’t even show. Hope that helps!
Thank you! That helps!
Okay, another question! I got the waist band made (yay!) and then after that it’s been a disaster! I won’t even try to explain what I did wrong, just that I know what I did wrong. After investigating I have found that with all of my existing pajama pants the crotch part is shorter in the front than the back, if that makes sense. What I’m understanding is you simply fold your existing pajama pants in half and all four pant legs are the same size/shape? You don’t take into consideration that normally the front crotch area is shorter than the back?
I have sewn and ripped and sewn and ripped and…. SO want to get this right!
Hi Whitney, if you’re tracing from a pair of existing pants, you’ll fold them in half (back of legs touching) and trace that shape. Then you’ll fold them in half again (front of legs touching). Make sure you follow the seams of the pants and add a seam allowance. Most pants do have a dip in the front rise. When tracing you can account for that, or after you can cut away at the center front to make it lower. Hope that helps! 🙂
I’ve just found your site and this amazing tutorial. I’m working on a pair of similar pants and your tips are exactly that I was looking for. Thanks for sharing!
ooooh great tutorial, thanks! I’m going to try this over the weekend. I’m new to sewing and have been wanting to make a pair like this, with this waistband too. I also want to try adding shirred ankle cuffs, if you have any tips on that, that would be awesome.